Pages

Thursday, May 31, 2018

Guest Designer Gig for CAS(E) This Sketch #274

Happy Thursday everyone!!

I am popping in with a Guest Designer post for CAS(E) this Sketch #274.

Here is the card I created:


Below is the sketch that inspired my card.


Instead of a circle like was in the sketch, I chose to use hexagon. I used the Hello Bluebird "Pig Day" stamp set for the images and the sentiment on this card.


I stamped the pig, the bird and the grass from the "Pig Day" stamp set and colored them in with Copic markers. I actually googled photos of pigs to color the pig more accurately. I wound up experimenting with a white gel pen over the Copics on the pig to give it some fine "fur."


I layered the octagons over a rectangle I had die cut out of patterned paper.


I stamped the sentiment from the same set under the image in black. I LOVE this stamp set and will be making a lot of cards with it.

I want to thank CAS(E) this Sketch for the chance to be a Guest Designer for this sketch!! I had so much FUN!!

I thank you for stopping by!! Have a FABULOUS day!!!


Supplies:
(some affiliate links used at no extra cost to you)
Stamps-Hello Bluebird "Pig Day"
Dies-Die-namics Stitched Rounded Rectangle Stax, Honey Bee Stamps "Hexagon Solid Stack" Honey Cuts
Paper-Neenah Solar White, Bazzill "Vibrant Blue" card stock, Recollections Patterned Paper
Other-Sizzix Big Shot Machine, Copic Markers, Memento "Tuxedo Black,” Ranger “Jet Black” Archival Ink, 3L Scrapbook 3D Adhesive Foam Squares, Scotch Dot Adhesive

Thursday, May 24, 2018

Coffee Lovers Blog Hop

Happy Thursday everyone!! Today I am on the CAS-ual Friday's Stamps Blog with a creation I created for the Coffee Lover's Blog Hop.
I am sharing a card I created using the CAS-ual Fridays Stamps "Coffee Talk" and "Peace Love and Coffee" stamp sets with the "Coffee Cup Fri-dies."


I started by adhering a white 4" by 5 1/4" rectangle onto an A2, white card base. I then adhered some paper scrap squares I had in my stash.


I adhered a die cut from the "Coffee Cup Fri-dies" for part of my sentiment over the top left square. Under this, I stamped a few coffee beans from the "Peace, Love and Coffee" stamp set.


I then used foam adhesive to pop up a sentiment I stamped in orange from the "Coffee Talk" set over the beans. I adhered a coffee cup die cut opposite the sentiment.

My last step was to adhere a heart that was in my scrap bin over the bottom right square and then cover the "coffee" sentiment, the coffee beans, the "coffee" in the cup and the orange heart with sparkle pen and Glossy Accents.


I made this simple and in colors that could be used for both a male or female.

The stamp and die sets I used are available at the CAS-ual Fridays Stamp Store right now. Use my code NORASENTME to get an extra 15% off your total order!!


I thank you for stopping by today!! For more of the hop, click on Coffee Loving Cardmakers!!

Have a FABULOUS Day!!


SaveSave

Thursday, May 17, 2018

CAS-ual Fridays Stamps Sneak Peek-Sands of Time 2 and Hour Glass Die

Happy Thursday!!

Today is the last day of Sneak Peeks from the Ink Squad for CAS-ual Fridays Stamps. Today we are sharing projects using the "Sands of Time 2" stamp set and the matching "Hourglass Fri-dies."


Here is the card I created using these products:


I started my card off by blending red Distress Oxide ink in the right bottom corner of the card and then spritzing water over the top. When it dried I misted gold over the top of the entire card front.


Next I stamped and heat embossed the sentiment from the "Sands of Time 2" stamp set in gold. I then used foam adhesive to adhere the hour glass that I had stamped and colored in using Copic markers. When I think of hourglasses, I think of the older kind that were made with wood. I tried to make the top and the bottom of the hourglass look like wood.


For my last touch, I wound some gold floss across the top and added a heart that I die cut using the "Fun-Fetti Fri-dies." I covered the heart with glossy accents, as well as some of the hearts in the hourglass.


These new products, along with the whole release is available right now in the "NEW" section of the CAS-ual Fridays Stamp Store. Use my code, NORASENTME to get an extra 15% off your total order!!!


Don't miss out on the other sneak peek projects are available on the CAS-ual Fridays Stamps Blog!

I appreciate you taking the time to stop by!! Have a FABULOUS day!!


Wednesday, May 16, 2018

New from CAS-ual Fridays Stamps-Peaceful Garden and Garden Fri-Dies

Happy Hump Day!!

Today I am back with a project using the new CAS-ual Fridays Stamps "Peaceful Garden" stamp set and "Garden Fri-Dies."


I started off my card by covering a neutral, A2 card base with patterned paper. I then used foam adhesive to adhere a circle where I had stamped the leaves from the "Peaceful Garden" stamp set.


Next I adhered some vellum leaves that I had die cut using the "Garden Fri-Dies." I topped them with some red roses that I had die cut using the same die set.


I added a black, gold embossed sentiment strip in the middle of the circle and then covered all the roses with Glossy Accents.


To finish off the card, I randomly added some clear sequins.

These new products are available now in the "NEW" section of the CAS-ual Fridays Stamps Store. Use my code-NORASENTME-to get an extra 15% off your total order.


For more projects using these fun goodies, hop on over to the CAS-ual Fridays Stamps Blog. Tune in tomorrow for one last post using another new stamp and die set.

I thank you for taking the time to stop by. Have a FABULOUS day!!


Tuesday, May 15, 2018

Best Day Ever-New from CAS-ual Fridays Stamps

Hello everyone!!

I am back again today to showcase another new stamp and die set from CAS-ual Friday Stamps. I used the new "Best Day Ever" stamp set and "Best Day Ever Fri-Die" to create my card.


I started off by using a watercolor technique with Distress inks on a 4" by 5 1/4" piece of watercolor paper. When that was dry, I adhered it to a teal, A2 sized card base.


Next I adhered a white die cut frame over the watercolor area. I added some teal flowers, that I stamped using the "Best Day Ever" stamp set with some green stems from a die set that is being introduced tomorrow.


I added the white sentiment that I had die cut using the "Best Day Ever Fri-Dies," covering it with clear sparkle pen.


The last step was to use some pearl embellishments for the flower centers.

Here is a peek at these new goodies:


These are available right now in the "NEW" section of the CAS-ual Fridays Stamps Store. Use my code-NORASENTME-to get an extra 15% off your entire order!!!


Don't forget to pop on over to the CAS-ual Fridays Stamps Blog to see some more creations using these new stamps and dies.

Thank you for stopping by!!!


Monday, May 14, 2018

CAS-ual Fridays Sneak Peek-Celebrate Stamp Set and Jumping Jax Fri-Dies

Happy Monday everyone!! I hope you all had a FABULOUS weekend!!

Today the Ink Squad and I are giving you a peek at some of the new goodies at the CAS-ual Fridays Stamps Store!! We are showcasing the new "Celebrate" stamp set and the "Jumping Jax Fri-Dies."


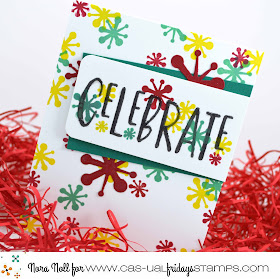
Here is the card I created:


I started off my card by stamping on a white, A2 sized card base in yellow, red and teal using the "Celebrate" stamp.


I set this aside and stamped the sentiment, in black, on a white strip of card stock. I masked off the bottom so I could stamp the little jax with different colors. I then stamped over the sentiment using the bigger jax stamps. I covered the "celebrate" with clear sparkle marker and used Glossy Accents over it.


When the sentiment strip was dry, I used foam adhesive to layer it over a piece of teal card stock and some red jax that I had die cut using the "Jumping Jax Fri-Die."

These new products, along with the whole release is available right now in the "NEW" section of the CAS-ual Fridays Stamp Store. Use my code, NORASENTME to get an extra 15% off your total order!!!


Don't miss out on the other sneak peek projects are available on the CAS-ual Fridays Stamps Blog! Tomorrow I will be back with another project!!


Sunday, May 13, 2018

Happy Mother's Day!!

Hi everyone!! I just wanted to wish all my friends a Happy Mother's Day!!


I created a card using My Favorite Things "Stitched Flowers" dies, Paper Smooches "Foliage 3" dies and WPlus9's "Love Mom" stamp set. 


I layered all these over a die cut frame from my stash.


May all you mother's be treated like the QUEEN you are!!! 👑👑👑👑👑

Have a FABULOUS day!!


Saturday, May 12, 2018

Happy Saturday and a few Mother's Day Cards

It has been crickets here on the blog as of late. I have been taking a little bit of a hiatus from the web to attempt to work out more. The first week went swimmingly. The second week...not so much. I used to be GREAT about exercising in some shape or form five days a week but it just has not been in me to want to keep that up. I think it is because I was consistent for so long and did not lose a pound. (I also cut down on my food intake too-a thyroid condition makes this all frustrating!!)

Chris and Charlotte were away for 5 days for robotics and I attempted to clean up my craft room a bit. I had stuff everywhere. Alas, it is still a bit messy but decided not to stress until June after school is done for the year.

In an attempt to get my mojo back, I sat down and created a bunch of Mother's Day cards this week. I do not send any out but had a few requests from co-workers for some.


One thing that I did one lonely night was get a bunch of scraps out and die cut flowers using the My Favorite Things "Stitched Flower" dies. I pulled a few of them out and layered them over a card front.


I then used the "Die-namics Mom" from My Favorite Things and adhered it over. My last step was to adhere a combination of jewels and sequins on the card. Easy peasy!!

For my second card, I used the negative of the die cut as my jumping off point for the card design.


I took various flowers in light blue and pink and adhered them over a white card base. I then masked the negative die cut and blended Simon Says Stamps "Blue Jay" ink over the top. I then stamped a sentiment from there retired My Favorite Things "Amazing" stamp set.


I adhered the "mom" over the flowers and then adhered clear sequins randomly across the front.


The last step was to use some Nuvo Crystal Drops in *"Gloss White" in the middle of the flower in the "o" in mom.

My next card I created I adhered the die cut flowers over a white card base that I had die cut using the Mama Elephant die "All Prettied Up." I then used the "Die-mics Mom" to die cut the front.


I adhered the white panel over a red card base. I then popped the die cut sentiment up using three more layers of die cuts.


I then stamped a sentiment in red from the retired MFT "Amazing" set under the die cut. I think this is going to be my new "go to" stamp set as it seems to work with a lot. I had it in my stash, unlinked!!


To finish off the card front I adhered clear sequins across the card front.

Inside of each card, I stamped the above sentiments from the WPlus9 "Love Mom" stamp set in colors that matched with the outside of the cards.

My last card I kind of cheated. I used pattern paper as the background for my card.


I layered a negative die cut "mom" over the card front where I had blended a combination of "Peacock Feathers" and "Tumbled Glass" Distress ink, as well as stamped a sentiment from the MFT "Amazing" stamp set.


I added a couple die cut flowers at the top, as well as a vellum butterfly I had lying around on my desk.


My last step was to adhere some jewels in the middle of the flowers die cuts.

Well that is all from me today. I hope you all are enjoying the weekend!! Have a FABULOUS day!!