Tuesday, September 7, 2021

Distress Inking and Copic Coloring for Some Challenges

Happy Tuesday everyone!! I hope you all had a fabulous holiday weekend. 

Chris and I are in full fledged empty nest and we actually were social for a change. We had my Dad and Stepmother over for a cookout on Sunday and went to a friend's house to spend time with my girls on Monday. We hadn't been all together for over a year. It was so refreshing!!

That said, I know we probably should have not gone anywhere. However, I am tired of being the only one staying home and socially distancing. I am vaccinated, I have been masking EVERYWHERE for months, and I needed these visits for my mental health.

I also had some fun making a couple cards for some challenges. 

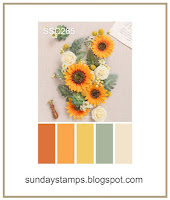
I created my first card for the Color Hues Challenge #TCH #25, Sunday Stamps #265, a color challenge,  Addicted to CAS #205-Nature and The Four Seasons Challenge.

I started off my card using a rectangle die to die cut a mask. I placed the mask over an A2, top folding, white card base. 

I then blended Ranger Distress Ink in Squeezed Lemonade, Mustard Seed, Dried Marigold and Carved Pumpkin through the mask. I then used Tim Holtz Distressed Mica Stain-Set 1, over the top.

While the stain was drying, I die cut Prima Moroccan Foliage Dies out of white cardstock and used the same colored Distress Ink blend over the top. 

I tied the three leaves together with 49 and Market Jute and adhered them to my card front.

My next card I created using this weeks Color Throwdown #658 and Freshly Made Sketches #501 as my inspiration. However, I missed the deadline for both. I am also going to enter this into the Inspired By Card Challenge #IB185, which is to use scraps on a card. I used PLENTY of scraps on this card!!


I started off using the Hero Arts Bold Script Prints background stamp using Hero Arts Charcoal Dye Ink on a Neenah White card base. I then stamped it again using Hero Arts Navy ink.


I then a scrap of light gray cardstock over the top. I then adhered a light blue rectangle scrap that I embossed with a polka dot embossing folder and a strip of blue pattern paper. I stamped a sentiment from MFT at the bottom of the blue rectangle.

I die cut some Pink Fresh Curvy Leaves out of vellum and Neenah White cardstock and layered it over the top of the card.

I then used a Pink Fresh butterfly from Little Butterflies that I had stamped with Tuxedo Black ink. I colored in the image with Copic Markers and then heat embossed with Ranger Super Fine Gold embossing powder. I die cut it using the matching Small Butterflies die. 

I adhered it to my card front using foam adhesive. My last step was to use some SB.com Clear Shimmer Pen.


Well that is all from me today. I want to thank you all for taking the time to stop by. Have a FABULOUS day!!


Monday, September 6, 2021

Cupcake Inspiration Challenge #527-Shades of Green

 Hello my Crafty Friends!!!

Today I am here with a card for the new Cupcake Inspiration Challenge #527-Shades of Green. I used a digital image from  WWW.CRAFTYSCRAPPERS.IN, our sponsor for this challenge. 

Isn't this little dragon a cutie? 


Below is the badge for this weeks Cupcake Inspiration Challenge #526-Shades of Green.

(source)

I used a photo program to make this little scene with the clouds and my little dragon. I printed it out twice-once on printer paper and once on *Neenah White Cardstock. I started out by cutting masks out of printer paper, covering the clouds and the dragon, and then shading the background using *Tumbled Glass Distress Ink.

Next I used my Copic markers to color in the dragon and shade the clouds a bit. I used a *Lawn Fawn Stitched Rectangle Die to die cut my panel and two scraps of green pattern paper. I adhered all to an A2, green, top folding card base, as shown. 

I then did a technique I have NEVER done before to get the little "scales" on my dragon. I used a two colors of green colored pencil-a dark green and a light green-and made tiny circles all over the dragon. This gives the illusion of scales!! I LOVE how it came out!!


I covered the clouds and the wings with a *clear shimmer pen. I used *Glossy Accents over the horns and the wings to make them stand out. My last step was to adhere the sentiment, which was also gifted to us. 

I encourage you to come on over and play with us this week. I so want to see your take on this challenge!!! Hope on over to the Cupcake Inspiration Challenge #526 to link up your creation!!

That is all from me today. I thank you for taking the time to stop by. Have a FABULOUS day!!!


***Affiliate links are used in this blogpost at no extra cost to you. All are noted by an asterisk.

Tuesday, August 31, 2021

A Few Cards for the Online Card Class on Crushing Cardstock

 Hey Friends!! 

Just popping in really quickly today to post three cards that I created for last weeks Online Card Class--Crushing Cardstock. I was not able to complete all the homework for the class this weekend as was planned. Cleaning my house got in the way!!! However, I did create a few cards to post.

My first card was inspired by Cathy Zielske's Day 1 class. I created a simple card by using the Altenew embossing folder *Ranunculus Bouquet 3D and some blue cardstock. 

I then went above and beyond by using some Hero Arts *Unicorn White pigment ink over the top of the embossed image. 

I added a white die cut sentiment that was cut using the Papertrey Ink Big Hugs Die

My last step was to adhere some pearls around the image in random places. This was a fun card to make and I love the simplicity of it.

I am going to enter this into this weeks Simon Says Wednesday Challenge-Anything Goes. 

My second card was from a Day 1 lesson by Caly Person

It was to weave cardstock strips together. I used strip dies from The Stamp Market to die cut various colors of purple cardstock, in a few sizes. I then wove them together to make this background. This was kind of time consuming to do but fun. I have a bunch of extra strips to make other creations at a later time.


I added my woven panel to a white card base and added a Pinkfresh Studio *Curvy Leaves die cut to the card. I covered the die cut with a *Clear Brush Marker for some sparkle and shine. 

I added a Prima Ephemera Flower from the *Watercolor Floral Collection over the leaves. The color matched the cardstock I used PERFECTLY!! I used Nuvo English Mustard Crystal Gloss Drops to punch up the flower center a bit and my clear brush marker over the flower.

The sentiment is from my stash. I believe it is by Taylored Expressions but not sure. 

This was a fun technique and I think I would like to try it with either some smooshed colored cardstock or ink blending. I would have to have a bit of time, though, because weaving is a slow task. I am not a patient person so this was a stretch for me.

My last card that I am posting is from Day 2. Yana Smakula made some cards with some rays. I happen to have these *Color Block Slices by Spellbinders (presently on sale) and I pulled them out for the first time. 

I literally went through my scrap drawer and pulled out various scraps in the same color family to use on this card. I then die cut my rays.

On some of the rays, I used various embossing folders that I had. (The stripe is from JoAnn's, the Dotted Flower Rings are by Sizzix and the lace is a Tim Holtz Alterations *Lace Texture Fade Embossing Folder)

Over my rays I adhered a Flower Cluster Wafer Die by Simon Says Stamps over the rays. The sentiment was die cut using The Ton's Bold General Greeting dies with *Peacock Feathers Distress Ink and Clear Brush Marker covering the top of each letter. 

I adhered pearls from Mint Leaves Pearl Mix from Kat Scrappiness over the card front as a last touch. They are a mix of teal and green and I think punched this up just a bit. I had never seen pearls like this before and was glad that I had bought them. 

I am going to enter this card into the Paper Players Challenge #556, which is a tic-tac-toe challenge. I used the left column-feminine, birthday, floral-as the inspiration. I am also going to enter this into this weeks Addicted to Stamps and More Challenge #413-Birthdays.


This class was  a lot of fun and I encourage anyone from beginners to sophisticated card makers to take it. There are a few more techniques I am going to try but just need the time to actually attempt them. I wish I didn't need to work!!

Well, that is all from me today. I thank you for taking the time to stop by. Have a FABULOUS night!!!


****Affiliate links are used in the blog post at no extra cost to you. All Affiliate Links are indicated by an asterisk. By clicking on these links, you help support me buying more card making supplies to use for my creative ideas.

Monday, August 30, 2021

Cupcake Inspiration Challenge #526 Reminder

Hello everyone!! 

Today I am popping in with another card I created for the Cupcake Inspiration Challenge #526-Take Flight. Unlike my card from last week, I did not use a plane. I decided to use a butterfly. They fly, right?

Below is the inspiration for my card. I chose to use the theme, rather than the photo to create this.

To start my card off, I used an embossing folder to emboss a doily onto a piece of *Neenah White Cardstock and die cut it with a Mama Elephant rectangle die. I then adhered it over a purple, A2, top folding card front.

I added a gray circle over the top of the doily and stamped a sentiment from Your Next Stamp. Next, I used foam adhesive to adhere the *Small Butterflies from Pinkfresh Studio. I had stamped these little beauties with *Vintage Photo Distress Ink, colored them in with Copic Markers and then stamped again with *Versamark to heat emboss with Ranger *Liquid Platinum embossing powder. I then die cut them out with the matching *Small Butterflies Dies


I added some *Glossy Accents in some of the veins of each butterfly and then added some purple sequins.

I LOVE how this came out!! It is simple and I am going to be sending this out to a special someone who is having a bit of trouble right now.

Please hop on over to the Cupcake Inspiration Challenge Blog to see what the other Design Team members created. I hope that you will play with us this week!!!

Thank you for taking the time to stop by!! Have a FABULOUS day!!

***Some links in this blog past are affiliate links used with no extra cost for you. These are noted with an asterisk. B


Tuesday, August 24, 2021

Altenew Pair a Flower Contest and an entry for JUGs Challenge

Hello everyone!! It is Tuesday here in blog land. 

As I am writing this, it is Sunday and the wind is whipping and the rain is coming down in droves. Tropical storm in Connecticut!! Happy that Henri went west as we have not had a real hurricane in 30 years and I am happy to keep it that way!!

On to my card!! I created this card for some challenges, the first being the Altenew Pair a Flower Contest. I knew what I was going to do when I saw the challenge but it took me a while to get it done.

The challenge was to make a card using one of Altenew's flower stamps and a photo of the flower as your inspiration. I chose to use the Altenew Paint-A-Flower: Clematis Josephine and paired it with a photo from my garden. While I don't have the same kind of Clematis as the stamp, I tried to watercolor the image as well as I could to match the picture. 

I went out of my comfort zone a bit on this and heat embossed the flower with white embossing powder and then used Hero Arts Soft Pink ink to watercolor my flower. I am NOT a great painter and often get impatient. I tend to over paint to the point where I wear away the paper. I was successful in not doing this to my card.

My leaves were done with a combination of Twisted Citron, Mowed Lawn and Peeled Paint Distress Ink. I also splattered all the ink colors on the background, as well as used a bit of Tarnished Brass Distress Stain. I used the brass because I knew I wanted a gold sentiment and do not have a great gold  mist. Any recommendations would be welcome!!

The sentiment was done using Versamark ink and heat embossing with Ranger Super Fine Gold embossing powder. I actually used a sentiment from the Clematis Josephine set, something that I NEVER do. I usually just go into my random sentiment box and pull one. I liked what this said, though, and thought it appropriate for my card. 

The center of my flower was done using Squeezed Lemonade Distress Ink. 

I am SO HAPPY with the way this turned out!! I am also going to enter this into this weeks Just Us Girls Challenge-#598-Colorweek. It was to use the colors Yellow, Pink and Green on a card. Again, I am also entering this into the Altenew Pair a Flower Contest.


That is all from me today. I want to thank you for taking the time to stop by. Have a FABULOUS day!!!


***All supply links in this blogpost are Affiliate links and are used at no extra cost to you.