Showing posts with label Smile Card. Show all posts

Monday, September 12, 2022

Just a Reminder for the Cupcake Inspiration Challenge #552

 Hello my friends!!

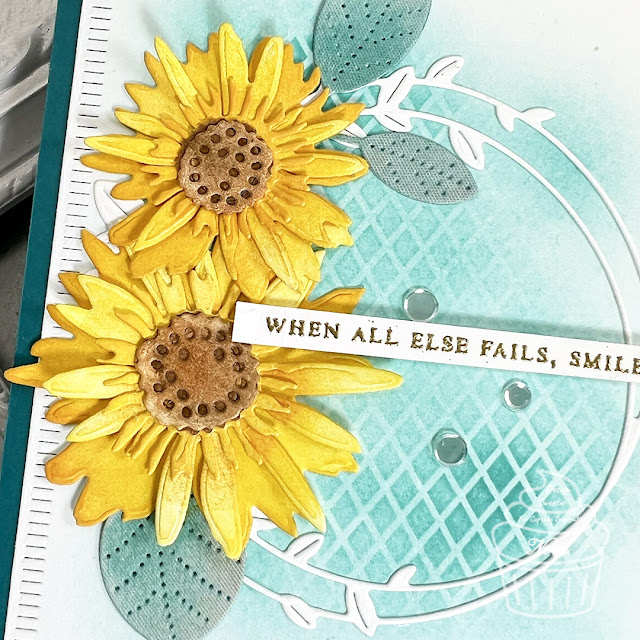
Just popping in with a reminder for the Cupcake Inspiration Challenge #552. It is a color challenge!


It is to use the colors jade, yellow and brown. As I look at my card in the photo, I think it is more blue than jade but I don't have any ink that color!! 

Below is this weeks Cupcake Inspirations Challenge badge for CIC552.


We are doubling up with Double Trouble Challenges this week.


Double Trouble Challenge Blog:  https://doubletroublechallenge.blogspot.com/

Play along here and hop over and play along with Double Trouble!
Combine their theme recipe with our color challenge:

From:       The Kitchen at Double Trouble 
Servings:  Unlimited Portions of Fun
Recipe:     3-2-1 Recipe
Ingredients:  
     3  Colors of your Choice  (Jade, Yellow, Brown if playing along here)
     2  Embellishments 
     1  Stamped or Digital Image 
*For more of the recipe instructions check out their blog: HERE


I used flowers from The Greetery, leaves and the wreath are from Simon Says Stamps.

That is all from me today. Please hop on over to the Cupcake Inspiration Challenge Blog and play along. I cannot wait to see what you create!!!

Nora


Wednesday, March 10, 2021

Day 2 of the CAS-ual Fridays Stamps March 2021 Release

Happy Wednesday. It is the middle of the week and it has been so beautiful here in the Northeast. I know it is only a tease though, as we tend to still get snow in March and April.

Today I am here with a sneak peek of the new CAS-ual Fridays Stamps release. I created two cards to showcase the new Flowerburst Stencil and the Sassy Smiles Duo stamp set. 

For my first card, I chose to use just the Sassy Smiles Duo stamp and die set to make a fun, graphic card design.


This was an easy and fun card to create. I started out by stamping the SMILE sentiment from the Sassy Smiles Duo set with red ink on a white, A2 card front. I stamped over the red with some  WOW! Clear Embossing Ink and covered it with WOW! Clear Embossing Powder. I then heat embossed the SMILE to give it the shine you see on the card.


Next I stamped the sentiment over and over again, across the card front, using shades of red and teal ink.


I used the heart from the Sassy Smiles Duo set and randomly stamped it with the different teal colors in between the stamped SMILE sentiments. 


I adhered the card front to a white, A2 card base and wrapped the top of the card with some teal twine. My last step was to use some red, Nuvo Crystal Drops around the embossed, red sentiment. 

This was one of my FAVORITE cards I created with this release and was so simple to create!!!

On my second card, I combined the Sassy Smiles Duo set and the new Flowerburst Stencil to create a clean and simple card.


I started off the card by blending Kitsch Flamingo Distress Ink across the entire card front. I then masked off the center of the panel with a heart and shaded some more pink ink over the exposed areas. When I removed the heart, it left a slightly lighter area of pink where it had been.


My next step was to use the same Kitsch Flamingo Distress Ink and the new Flowerburst Stencil to create the pink flowers across my card front. I tried to use different pressure with my blending tools so that some of the flowers would be brighter than the others.


Inside the heart, I stamped the sentiment from the Sassy Smiles Duo set in black. I used foam adhesive to adhere the SMILE that I had heat embossed with Kitsch Flamingo Embossing Glaze and then die cut using the matching die. My last step was to use white, Nuvo Crystal Drops around the heart to give it a bit of emphasis. 

This new stamp duo and stencil, as well as all the other products, are available in the CAS-ual Fridays Stamp Shop under the NEW section right now!!! Use my code NORASENTME to get 15% off your total order!!!


Be sure to comment to be entered into a random drawing of all the commenters on the designers blogs to win a prize. Hop on over to the CAS-Fridays Blog to link up to the fabulous creations created by the Design Team!!

That is all from me today. Be sure to pop back in tomorrow with a sneak peek of a new stamp and die set!!! Have a FABULOUS day!!




Saturday, December 5, 2020

Everyone Could use a Smile-A CAS-Fridays Post

 Today it is my turn on the CAS-ual Fridays Stamps Blog with a trio of cards using the "Sassy Smiles" stamp set.

Hop on over to my BLOG POST to see how I created these cards!!!

I thank you for taking the time to stop by. Have a FABULOUS day!!


Monday, May 18, 2020

Multiple Monday #1

Happy Monday everyone!!

I have been doing a lot of cardmaking lately but have not been blogging much. I am on my computer so much for work now that I just don't have any energy left to write anything. The school year will be over June 12th and I am SOOOOO looking forward to it.

One thing that I decided to do this month is to make some cards using a similar design. I want to send some out to people that I know are working hard and not feeling the love from their bosses. Yes, even people NOT on the front lines are having a lot of stress and anxiety about their jobs. Everything is so up in the air.

This week I am posting a small set of cards I created. I basically copied the design of THIS card by Carissa Wiley.

I have to admit, I rarely copy cards but am more "inspired" by aspects of them. However, I just thought the cards Carissa made were just amazing. I did not have ANY of the same supplies as her so I adapted what I had to create my version.


To start with, I made a "test" card. I often do this when I am making multiples of something to see what supplies I would use.  I used The Stamp Market's "Painted Background" (retired) stamp set to create my rainbow effect. The little heat embossed hearts are from Pretty Pink Posh's "Rainy Day Additions" stamp set and the sentiment on this card is from Simon Says Stamps "Tiny Words."


The polaroid frame is the "Polaroid Shaker Frame" from MFT Stamps, the flower die is from Pink Fresh Studio's "Dainty Blossoms," and the smile sentiment is from the retired WPlus9 "Basic Greetings." Instead of doing foiling like Carissa did, I used gold cardstock and heat embossing for the gold elements. It was just easier for me and I don't have the machine she had to use for foiling.


For my "real" cards, I chose to change the blue to a lighter shade. I liked how the card looked with the more aqua shade than the Island Blue I used on my "test" card.


I also chose to switch up the sentiments a bit too. The embossed sentiment on the card above and below is from the Ink Blot Shop's "Sentiment Label Block's" stamp set.


I cannot tell you the FUN I had just looking through my supplies to substitute for what she used. I urge you to try and copy a card design substituting the supplies you own. I usually get bored making multiples but since their were so many steps, my attention didn't wane.


The sequins were the last touch and are from Pretty Pink Posh.

I want to thank you for taking the time to stop by my blog. I will be back next Monday with a bunch of similar cards I created using my own design.

Have a FABULOUS day!!


Friday, May 8, 2020

Smile: Happiness is Contagious!!

Happy Friday!!

Just popping in with a card I created for the Online Card Class: Spring Card Camp 2. I am so happy that I took this class!! So far the techniques have been ones I have used but then the designers KICKED them up a notch!!

Yesterday's homework was to make your own stripes. Here is the card I created.


I used the colors from a Design Seeds color card to pick the colors for this card. I wanted to try to step out of my comfort zone!!


I originally wanted to make it a one layer card but as always happens, I tore my paper when taking off some of the tape and had to improvise.


I used Honey Bee Stamps "Zen Floral Stamps" to stamp inside most of my stripes that I blended on this card.


I stamped "Smile," a sentiment from My Favorite Things, in black on the striped panel and then emphasized it with a Tonic Aqua Shimmer pen and Glossy Accents. It almost looks like it is a die cut!!


I will be creating my next homework assignment after work to post tomorrow. I have never been successful with the next technique so cross your fingers that I can get it to work!!!

I am also going to be posting this on the NBUS Challenge Blog as I have had these Honey Bee Stamps for a while but have never used them. 


I appreciate you taking the time to stop by. Have a FABULOUS day!!


Monday, April 15, 2019

CASE this Sketch Challenge #317, Alcohol Inks, Pink Fresh Studios and a Card Set

Happy Monday everyone!!

Today I am popping by with a few things. First up is a card I created for CASE this Sketch Challenge #317.


I have been playing with alcohol inks and have made a ton of panels. I decided to cut them down and made a bunch of cards from them. I thought this was perfect for the sketch.


Instead of leaving more room on the left side, I shifted the sketch so the indentation on the right was bigger.


The die cut was cut from Neenah Solar White cardstock with Pink Fresh Studio's "Floral Squares" dies. I actually cut three layers and adhered them together for some dimension.


It is hard to tell from the photo but the die cut is layered with Tonic's Aqua Shimmer Glitter Gloss.

As a jumping off from this card, I created a set of cards using different alcohol ink backgrounds that I had in a drawer, just waiting to be used.


I used the positives and negatives of the Pink Fresh Studio Floral Squares to overlay my alcohol backgrounds.


I used smaller sentiments for each card, and the card on the right I used Hero Arts White Satin Pearl embossing powder. There are specks of purple in it too because of something that was on my desk. I chose to not do it over because IRL it looks kind of cool.


Some of the alcohol panels are popped with white foam, some I chose not to pop up. I hate making the same card over and over so this gave me a bit of room to experiment.


I added Diamond Stickles to the dandelion for the card on the left and filled the flower on the right with Glossy Accents.


The scalloped squares were die cut from scraps of cardstock using Paper Trey Ink's Limitless Layers dies.

I had so much fun making these and LOVE how this set came out. I think I will be using these as a gift for someone in the future.

I thank you for stopping by. I hope you have a FABULOUS day!!


Tuesday, June 20, 2017

Playing along with CAS(E) This Sketch Challenge #226, The Challenge #87 , AAA Cards #92 and MFT's Camp Create

Happy Tuesday!! I hope everyone is enjoying their summer!!

I have been busy deep cleaning area by area in my house. Yesterday it was my bedroom and today it was our mudroom closet. Everything was emptied out or pulled away from the wall, dusted, vacuumed, washed, and a TON was purged. This is all in avoidance to cleaning the one room that needs it the most-my CRAFT ROOM!!

I did have a chance to play a little after all the work was done. I created two cards for some challenges.


The main jump off for the creative process on these cards was playing along with My Favorite Things "Camp Create" and using a resist technique, as well as AAA Cards Challenge #92, which also had the same challenge.


I used the MFT "Balloon Strings" background to stamp and emboss in clear. Then I used Kuratake Gansai watercolor to paint over it. For the pink card, I added some cellophane over the top while it dried to see what would happen.


Once the paint was dry, I used an MFT "Die-namics Stitched Rounded Rectangle" to cut the panel out. I then used MFT's "Stitched Flower" dies to cut out flowers from scraps of patterned paper in oranges and pinks. These colors were inspired by The Challenge: Colors #87.


The layout was inspired by this weeks "CAS(E) This Sketch #226." 


I layered the green panel and the flowers over a pink card base for the first card. The sentiment was die cut using Simon Says Stamps! "Summer Greetings" die.


 The pink was a bit bright so I created a second card using a white background.


I used all the same products on this, with the exception of the flower centers. I used enamel dots rather then sequins.


I think I like the white card a bit better!!!

Well, that is all from me tonight!! I hope you have a FABULOUS night!!


Supplies: 
(affiliate links used when possible at no cost to you)
Paper- PaperTrey Ink "Rasberry Fizz" card stock and patterned paper, Neenah Solar White 110 lb white card stock, Bo Bunny Press Double Dot Orange Citrus Paper, Doodlebug Design "Kraft in Color" 6" by 6" paper pad, Basic Grey
Dies-My Favorite Things "Die-namics Stitched Rounded Rectangle," "Stitched Flower," Simon Says Stamps! "Summer Greetings" dies
Stamps-My Favorite Things "Balloon Strings"
Other-Kuratake Gansai watercolor, Enamel Dots (orange and aqua), Simple Stories "Winter Wonderland" Enamel Dots (off white), Diamond Stickles, Doodlebug Design Sequins, Sizzix Big Shot , Ranger Multi Matte, Scotch Adhesive