Monday, November 30, 2015

From Our Family To Yours-Paperie Ink Christmas Carolers

Happy Monday!! My blog has been very slow as of late. Work has been getting in the way of my creating. I have had to take a nap when I get home before I do all the running around with Charlotte too. I will be happy to feel normal again but it sure is taking a long time.

Today I am sharing a card I created for Paperie Ink using the Christmas Carolers stamp and die set. This set is so darn cute!


I started by stamping the birds, their "Christmas" accessories, the nest and the eggs on white card stock and die cut the pieces out. I then colored the images in using Copic markers.

Next I stamped the branch and the log onto kraft card stock. I then ran the card stock through a wood grain embossing folder to give the wood pieces some texture. I cut them out using the matching dies. Using Walnut Stain Distress Ink, I sponged over the wood pieces to give them a bit of dimension.

I assembled all the pieces over a snowy background scene that I had adhered to a red card base. I added clear Wink of Stella to the birds hat and the bow, and added snow to the nest, branch and log. I sprinkled some fine, clear glitter over the snow  before it dried to give it some sparkle.

The last step was to stamp the sentiment in black at the bottom of the card.

I think this card came out so adorable. I cannot wait to send it out!!

Thank you for stopping by. Have a great day!!

Supplies:
Card stock-Paper Source (kraft), My Favorite Things (red hot), Neenah Solar White, Paper Trey Ink Vellum
Ink-Walnut Stain and Tumbled Glass Distress Ink, Momento Tuxedo Black
Stamps-Paperie Ink "Christmas Carolers"
Dies-Paperie Ink "Christmas Carolers", My Favorite Things (Circles and Pinked Circle)
Other-Copic Markers, Clear Wink of Stella, Liquid Snow, Martha Stewart Glitter, Foam Adhesive, Sizzix Wood Grain Embossing folder, Big Shot

Monday, November 23, 2015

Flyin' High with Paperie Ink

Happy Monday everyone!! I am so excited to announce that I am a member of the Paperie Ink Design team. The stamp sets and matching dies are adorable and fabulous to work with.

Today I want to share with you a card I created with the Flyin High set. I did a TON of masking on this card and was originally going to make it a one layer wonder but plans changed as the card went a long.


I started by stamping the plane, masking it off, and then stamping the bunny on a white card base. Isn't he cute with his little flying ears? I stamped and fussy cut the clouds onto full stick post it notes and randomly arranged them onto the white background. 


I used three different Distress Inks-Tumbled Glass, Broken China and Mermaid Blue-for the inked background. I wanted it to be a vivid blue rather then a light blue.


I then took the masks off and colored in the stamped images with Copic markers. I cut the panel out with a die and layered it over an orange piece of patterned paper that I had adhered onto a white card base.


I added some Liquid Snow to the bunny's belly for a faux-fur effect and some pink Stickles for the nose. I then coated the plane with some clear Wink of Stella. I am in love with how this came out!!


Please come over to the Paperie Ink Blog and become a follower. You won't want to miss any of the fabulous projects that the design team will be showcasing. 

I thank you for taking the time to stop by today. Have a fabulous Monday!!

Supplies:
Ink-Distress Ink-Tumbled Glass, Broken China, Mermaid Lagoon, Memento Tuxedo Black
Paper-Neenah Solar White, Lawn Fawn
Dies-My Favorite Things (rounded rectangles) and Mama Elephant
Other-Copic Markers, Cotton Candy Stickles, white gel pen-Jelly Roll, Clear Wink of Stella, foam adhesive, liquid snow, Big Shot


Thursday, November 12, 2015

Always Playing With Paper-The Challenge #50 Card: A Christmas Color Challenge and Virginia's View Challenge #20

I hope your day is going well. Cannot believe it is already Thursday here. This week has FLOWN by! 

My first day back to work went well. Lots of hugs and happy smiles from all my colleagues. I got a lot of "hey, where were you?" from my students but I know they missed me!

Today I am sharing a card I created for "Always Playing with Paper: The Challenge #50." It was to use a color scheme of red, kraft, silver and white to create a card. At first, I was scratching my head. Then I had an epiphany. Here is what I created:


I apologize for the left part of the photo. The red ornament was reflecting off the silver and I was too lazy to go back and photograph it!! 

First I die cut the background using a PTI die from silver and white card stock. I then mounted using the positive and negatives from the colors onto a white card base.


Next I used some red thread and made some nests and adhered it to the card using glue dots. I layered a stamped, embossed and die cut vellum poinsettia over the thread. I adhered a sentiment strip over the poinsettia.


I then covered the middle of the poinsettia with Diamond Stickles, added Pretty Pink Posh sequins over that and then covered the sequins with glossy accents. 

I am in LOVE with this card. I had never used this stamp before and I am going to make a few more of these cards because I am so in love with it!! However, I think I am going to try to make some that are more monochromatic. 

Again, I am entering this into "The Challenge #50," as well as Virginia's View Challenge #20 that is all about texture. I think the thread, the layered embossed flowers and the sequin treatment can be counted for that. 


I thank you for stopping by today!! Have a wonderful Thursday!!

Supplies:
Dies-PaperTrey Ink
Paper-PaperTrey Ink, Die Cuts with a View
Stamps-Paper Trey Ink
Other-Thread, Pretty Pink Posh Sequins, Glossy Accents, PaperTrey Poppy Red Ink, Diamond Stickles, Glue Dots

Tuesday, November 10, 2015

Holiday Style Class: Day 1

Hello!! Just a quick post to show the two cards I created for my homework for the Holiday Style Class. It is only the first day and I am loving it!!

I used Laurie's techniques to create two cards. One is a holiday card and one is a non holiday card.


I used Festive Berries Distress Ink to do the shading at the bottom. Instead of just the holly, I added a few more sprigs to jazz the card up a bit. I added clear Wink of Stella onto the large sprig of berries and glossy accents to the holly berries.

On my second card, I did non holiday theme.


I blended Mustard Seed Distress ink and then stamped some sunflowers inside the blending. I then wrapped some jute along the edge and added a tag.


I die cut the sentiment out of brown card stock and added a gold enamel dot for the i. I love this technique and will be using it again for some simple cards.

I thank you for looking!! Have a great day!


October SJ Card Kit Blog Post-"Claudia's Stash"

Okay, I am a day late and a dollar short for this post. I SHOULD have posted this on October 31st when the SJ Card Kit Club blog post went live but with Halloween and then me having book club the next day, I just never got around to it. Shame since I created SIX cards out of the kit that Claudia sent using things from her stash. Please go browse if you have time because many of the people made some terrific cards.


As you can see from the photo above, Claudia sent us stuff to create both fall cards and Halloween cards. I chose to make three of each, though I could have created many more. It was definitely out of my comfort zone because there were NO stamps to color and all die cuts to use. However, it forced me to look at things in a new way and I LOVED it.


For this card, I chose to cut up a bunch of pieces of the patterned papers into strips as my starting off point. The only element that DID NOT come from the kit on this card are the ink that I used to distress the card and the sequins.


I LOVE how this card came out. When I saw the little wagon wheel, I knew I wanted to do a grouping with a pumpkin. I added the sequins as a finishing touch.


This was the simplest card I created. I rarely do simple these days but I LOVE how it came out. I even already sent this card out too!!

My last three were Halloween cards. Claudia sent the cutest ghosts and I just had to use them. I apologize because I know Halloween is over but I wanted to post them anyway.


One of the things I noticed right off the bat is I only own ONE Halloween stamp set. Claudia did not send any sentiments so what is a girl to do? I created one using stickers!! I added yellow Stickles to the eyes and mouth of the ghost for a bit more oomph.


For this card, I used the ribbon, patterned paper and ghost that were in the kit. I die cut the polka paper into a banner and tied the ribbon around it. I then added a foam panel to make it POP off the card. The sentiment is from the only stamp set I own that is a Halloween set. Instead of yellow Stickles, I added some Diamond colored Stickles to the ghost eyes.


My last card is simple. I die cut the polka paper and the black and white block to house the ghost. I added some vellum behind the ghost to give the eyes and mouth a "smokey" look. The sentiment I stamped and embossed.

I thank you for stopping by and viewing all my creations. This "kit club" had been so fun for me and I LOVE all the fun things I created with it.

Have a fabulous day!!


Monday, November 9, 2015

A Kindness Card using Simon Says Stamps

Happy Monday!! It is a beautiful day in Connecticut and one of my last days of freedom. I attempted to make my Christmas card at Shutterfly today with photos I took of a reluctant Charlotte yesterday and I think we are going to have to do them over. She is so self conscious and does not like having ME take a photo. I know all this is part of being a teen but she is so photogenic and it was never a problem in the past. Her silly selfies-she has no issue with, though, and I think it is so interesting.

On another note, I am going to share a a card I created on Saturday. It is with Simon Says Stamp! "Dexter and Simon" set. I LOVE pigs and I could not wait to ink this stamp set up when I bought it. I colored it in and then never did anything with it. (I do that a lot!!) This weekend I dug out my colored panel and finally completed a card.


I think he is so cute!! I colored Dexter in with Copics and then did some little "dots" with them around to make it a little more interesting. I then die cut the panel into a square using and MFT die.


I mounted the image on white card stock embossed with a heart embossing folder, glued part of the sentiment (also from Simon Says Stamp!) and then stamped the rest of it using black ink. I used clear Wink of Stella on the gray parts of Dexter and on the peanut butter jar but it is difficult to tell in this photo.

I will be sending this with a little something something to a friend this week. I bought a bunch of little things at the store today and I am so excited to send them out.

I thank you for stopping by. Have a wonderful night!


Supplies:


Saturday, November 7, 2015

Freshly Made Sketches #211 Card for a #sharehandmadekindness card

Hello everyone!! It is a dreary Saturday today-the perfect day to stay inside!!

I was quite busy in the craft room yesterday. I made SEVEN cards-which is a total record for me. I am a SLOOOOWWW card maker and sometimes it takes me a couple hours to create one! I think the secret was that over the last few weeks while lying around I have done quite a bit of coloring. I left these bits and pieces all over my desk and now I am using them in some cards. I think I should do this more often because I am so much more productive.

Anyway, today I am sharing a card I created using Freshly Made Sketches #211. I have to admit that it is NOT my favorite card that I have made in a while BUT I had fun putting it all together. That is what counts in this craft, right?


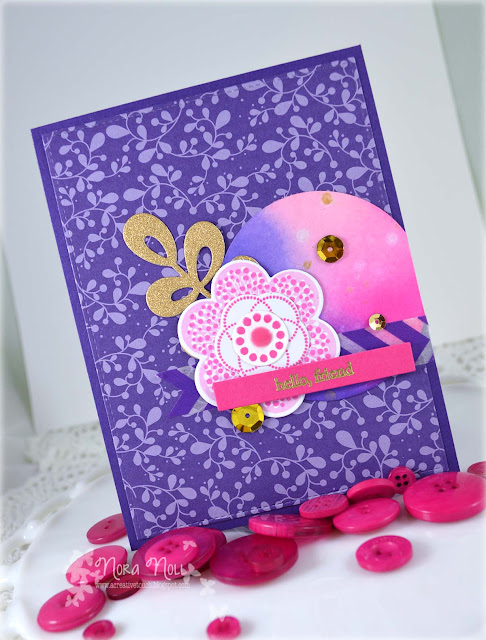
I created this card around the flower. I had these pieces stamped on my desk and it was either throw them away or make a card. I am going to send this to a friend filled with a little surprise this week. Who doesn't like a surprise?

This card is also for Jennifer McGuire's "Share Handmade Kindness" initiative that she has on her blog. I will be doing a lot of cards/card sets in the future toward this. My goal for the next year is to send random acts of kindness to friend, whether it be a friend I know in person or from online. I know plenty of people in need in my real life right now and a card is a wonderful pick me up. I know I LOVE getting a note in the mail saying someone is thinking of me.

Anyway, here is the inspiration sketch:

The pink and purple circle I created by blending Picked Raspberry, Spun Sugar and Wild Violet Distress Ink. I am in LOVE with this new purple ink!!


I added a piece of purple Washi tape under the sentiment strip and decided that my accents would be gold.


I used this new product from Tonic called "Nuvo Crystal Drops" in Carnation Pink for the large dot in the middle of the flower. It actually resembles and feels like an enamel dot when it dries. I have a few other colors and ordered a few more so I will be playing around with it in the future.

That is all for today. I will be showing some other cards on the blog that I made at a later date. I cannot post them all at once as I hardly ever am this productive!!

Thank you for stopping by today. Enjoy the rest of the day!!