Friday, January 1, 2016

Stamping Smiles Design Tic-Tac-Toe Challenge #1

Happy New Year!! The first Stamping Smiles Design Tic-Tac-Toe Challenge goes live today. Yippee!!

I actually created TWO projects for this challenge, using the middle column from top to bottom.


I chose to use sparkles, embossing and new on my cards.

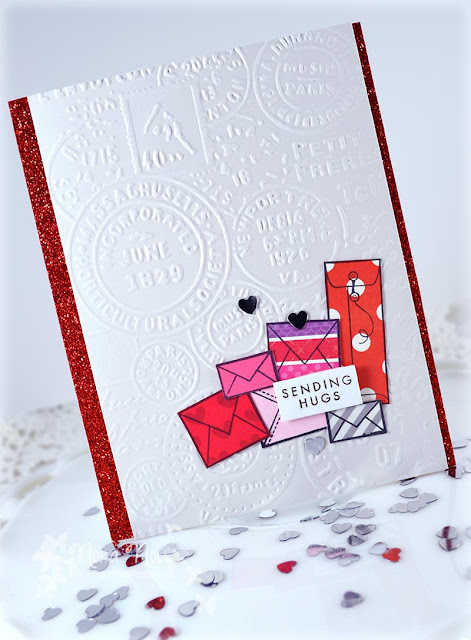
For my first card, I chose to emboss the Soft Stone card stock with a new embossing folder from Kaisercraft and added sparkle to the card with some glitter tape and silver hearts.


The gray card stock was cut to 4" by 5 1/2" and popped up over the card base with foam adhesive.


I then adhered stamped "envelopes" from Simon Says Stamp!'s "Happy Thoughts" set over the embossed paper. These "envelopes" were stamped onto patterned paper scraps and fussy cut by hand. I actually have to admit that I sat down one night to do the stamping and then another night to do the cutting so that I could have these images on hand to eventually make a card set.


The sentiment is from Hero Art's "Act of Kindness" set (also new) and stamped in PTI Smokey Shadow ink onto a piece of white, scrap card stock. I popped it off the envelope cluster using a piece of foam adhesive. My last step was to randomly adhere the little hearts using Ranger Multi-Matte adhesive.

I was so excited with how easy this card was to put together using the Tic-Tac-Toe board that I decided to create another card with a similar design.


For this card, I embossed a white background using a heart embossing folder, which I adhered to a 4 1/4" by 5 1/2" card base.


I then adhered the "envelopes" that I had stamped on scraps in the same general area. However, I decided to tuck the sentiment into one of the envelopes. I love how it looks!!


The last step was to adhere a variety of shiny, different shaped sequins randomly around the envelopes.

For someone who takes a long time to make a card, I created two cards in no time using the challenge card. I know that I will be making at least one more card using a different row because I had so much fun!!

I thank you for stopping by!! Have a wonderful day!!


Supplies:


Tuesday, December 29, 2015

Design Team Announcement

Today I am excited to announce that I am on the new Stamping Smiles Design Tic-Tac-Toe Challenge Design Team!!


I have long been admirer of Ka, the challenge owner, whom is a talented paper crafter and a really lovely person. I am delighted to be able to work with her and the other fabulous crafters on this design team.

I have to admit that this type of challenge is new to me but I know that it will be one to get my creative juices flowing. I am SO EXCITED to be a part of this design team and I hope that you will have fun playing along too.

Please check out the other talented design team members that I will be creating with.

The Challenge Originator

Design Team Members

I thank you for stopping by!! Have a wonderful day!!


Friday, December 18, 2015

Paperie Ink-Christmas Caroling with the Hedgehogs

Happy Friday!! It is exactly one week before Christmas! My blog has been echoing with all the nonexistent posts. I am so disappointed in myself!! I have been busy with Christmas preparations and my crafting has gone by the wayside. I have a week off starting on Christmas eve and I am hoping to get A LOT of creating done so I can post a bit more.

It is my turn over at the Paperie Ink blog.  I am sharing a card I created with the versatile Christmas Carolers stamp and die set from Paperie Ink. This set is SO CUTE and I have had fun creating all kinds of cards with it. I decided to create a holiday theme for this card.


I created the little scene by first blending Stormy Sky, Chipped Sapphire and Blueprint Sketch Distress inks, then stamping and heat embossing the snowflakes. I then added the adorable hedgehogs that I had stamped, die cut and colored in with Copic markers and adhered over some die cut hills. I dressed them in some festive headpieces, using foam adhesive to give each a little dimension. 


The music stand is adhered with foam adhesive too, and positioned in front of the little critters. 
I then adhered the entire scene over a red A2 card base that I covered with a stamped die cut.  


The last step was to stamp the white banner with the sentiment in red. I adhered it using foam adhesive so that it straddled both the scene and the red card base. 

This card was so fun to make with these little guys. I also LOVE how the background with the Distress inks came out!! 

Thank you for stopping by. For more adorable cuteness, please visit the Paperie Ink blog. 

Supplies:


Friday, December 11, 2015

Utilizing Smaller Images in Stamp Sets Using "The Christmas Carolers" set from Paperie Ink

Happy Friday! I have had such a hard time creating and keeping up with this blog due to all the holiday preparations. I have trying to get my shopping done and go to the gym now that I have been cleared to do cardio again. It has been interfering with my crafting time, though, and that makes me cranky. I wish there were more hours in the day!!

This week week we celebrated Charlotte's fifteenth birthday. I cannot believe my baby turned fifteen!!
We had a little party for her a week ago today and these are a few photos. Not the greatest but what I was able to get. Char is not exactly willing to have her photo taken these days.


Nice Face, huh? I love this kid so much!!

Today is my day to share a post on the Paperie Ink blog. I stamped two cards using the Christmas Carolers stamp set. Often when I use my stamps, I focus on stamping with the main images. I decided I wanted to utilize the smaller images on some cards to show the versatility of this stamp set. Here are some sneak peeks of my two cards.


Please pop over to the Paperie Ink Blog to see the details.

I thank you for stopping by today. Have a great day!