Sunday, May 31, 2020

Freshly Made Sketch Challenge #437 and Some More Homework

Happy Sunday everyone!! I hope you are all doing well. 

It is a PERFECT day in Connecticut today-mid 60's, low humidity with the sun shining. I spent some time outside watering my plants and planting some basil seeds in my skimpy veggie garden. We only are ever successful with tomatoes. Every time I have planted any kind of cucumber or squash, cucumber beetles kill my plants no matter what I do. 

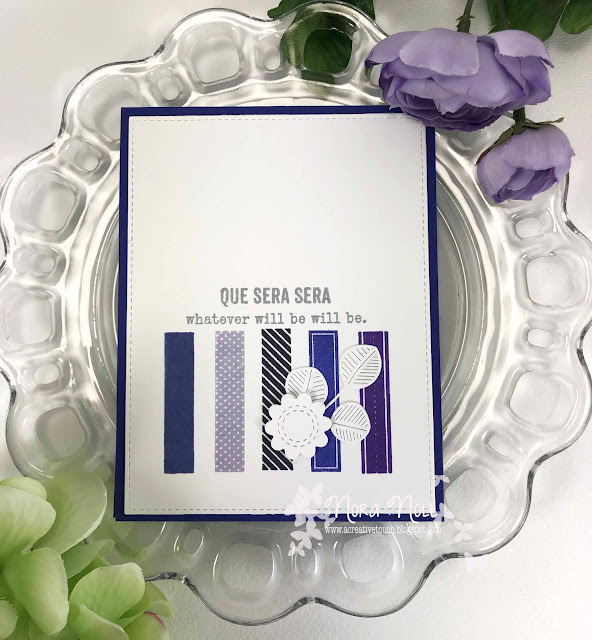
I was busy in my craft room yesterday. I created a card for Freshly Made Sketches #437.


Below is the sketch that inspired this card:
Instead of having the design at the top, I kind of "flipped" the sketch to have it at the bottom. I also could NOT have my rectangle images not be uniform. 


I have been trying to use more of the stamps that I own so I dug out this old PaperTrey Ink set, "Building Blocks" to use on this card. I used five different shades of purple ink to stamp each of the five images.


I added a white die cut flower from MFT and Eucalyptus Leaves from Simon Says Stamp.

Supplies:
Paper: Neenah Solar White, Purple Rain
Stamps: PaperTrey Ink Building Blocks
Dies: Simon Says Stamps Eucalyptus Leaves, MFT Stitched Flowers
Ink: MFT Boysenberry, Purple Rain, Lavender Fields, Wild Wisteria and Egglplant (retired), Memento London Fog and Hero Arts Soft Granite

Now for some cards for the Online Card Class Spring Stamp Camp 2. I still have not done all of my "homework" but I have worked on some.  I have not created cards with everything I have made, though.

My first card is my homework from Day 6.


I stamped the Pinkfresh Studio "Enchanted Blooms" with Hero Arts Unicorn White pigment ink on some pink cardstock. 


I cut up the cardstock and layered it on the bottom of my white card base. I then added a MFT diecut sentiment and sentiment strip at the bottom.


I die cut a ton of sentiments last weekend and glued three of them together to give them a little lift. I usually do this as I make my cards but I have been trying to be more efficient and have some die cuts pre-made to add to my cards.

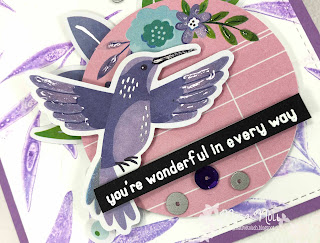
For my next three cards, I used a really cool technique by Dawn Woleslagle from WPlus9. We learned this on Day 19. Instead of making my embellishments for these cards, I embellished some pre-made die cuts from Pink Paislee.


I actually never do this type of thing but love designers like Jeanne Jachna that use pre-made embellishments on their projects. I have a TON left over from my scrapbook days and I recently bought these because I fell in love with them at the store. They make me HAPPY!!!


Dawn taught us how to do mono printing with Ranger Distress Oxides. I cannot say that I was that successful BUT it was fun to try!!


I embellished my my die cuts with some Aqua Shimmer Pen and Glossy Accents. 


The sequins were added in purple and silver. The sentiment is from Reverse Confetti. 


My second card used the printing part of the technique.


This was my FAVORITE card of the bunch. I think the background is so cool. Most of my examples did not come out like this, though. 


On this card I added a Stampin Up doily die cut with the pre-made die cuts. 


I also added some purple Nuvo drops instead of sequins on this card. 


Again I used the pre-made die cuts for the card. I added an MFT smile die cut for the sentiment.


I added some Aqua Shimmer and Glossy Accents over the top of it to make it SHINE.


I altered the sentiment strip to say what I wanted it to say. I used some foam adhesive to pop it up off the card. 


Using these pre-made die cuts was a lot of fun and I have a TON left over to make more cards at a later date!!

Smile, Laugh, Be Happy Supplies:

Paper: Neenah Solar White, PTI Vintage Jadeite

Stamps: WPlus9 Winter Greenery, Reverse Confetti So Many Sentiments,

Dies: Stampin Up Doily Builders, MFT Blueprints 13, MFT Smile Die

Ink: Cracked Pistachio Distress Oxide Ink, Spun Sugar Distress Oxide Ink, Lawn Fawn Jet Black Ink

Die Cuts: Pink Paislee Bloom Street Ephemera

Other: Nuvo Aqua Shimmer Pen, Glossy Accents, Foam Adhesive, Gemini Jr., Ranger Multi Matte, Scotch Dot Adhesive Roller, Gelli Plate


I think that is all from me today. I could add a ton more but won't. This class was a BLAST and even though it isn't live anymore, I would recommend for others to take. 

I thank you for stopping by. Have a FABULOUS night!!


Thursday, May 28, 2020

On the Blog at CAS-ual Fridays Stamps

Hi everyone!! I cannot believe it is already Thursday and almost the beginning of JUNE!!! Summer is almost officially here!!

Today I am on the CAS-ual Fridays Stamps Blog with a masculine birthday card.


Hop on over to the post to see how I created it!!

Thanks for stopping by!! Have a GREAT day!!


Tuesday, May 26, 2020

Hello Hello Hello!!

Hi everyone!! How is everyone holding up?

I keep thinking today is MONDAY but it is Tuesday and I am still mostly staying home. Things are opening up here BUT I am not one to hurry back out to "normal." Headed out today after work to Home Depot to buy a trellis and do some other errands with Charlotte and with the exception of Home Depot, it was actually nice because stores were EMPTY. However, I was still a bit stressed and will not be going out again anytime soon.

Soooo, I have been creating like crazy but not posting. Do people even read blogs anymore? I need to post on IG on a more regular basis but I hate typing things with my phone. My fingers are too big. I just wish I could upload to IG via my computer.

Any how, I have been taking the Spring Online Card Camp 2 and have had SO MUCH FUN. I have not made everything I created into cards as of yet, but the techniques I have learned and the ones I have used before have been so freeing.

My first two cards are from Day 12 and it is to use basic shapes in geometric patterns. I used circles on both of my cards.


All the paper besides the card base was from my scrap drawer. Simple design but I really like how it came out. However, the card below is my favorite one I created using this technique.


I used a printed background sheet behind my circles!! I think it looks so funky!!!!!  I also added a pattern paper circle for the middle of these circles and I liked that look too.

Below is a card for Day 3 of camp. I am so made because I should have used a colored cardstock because the embossing on the dry embossing on the white cardstock is hard to see.


I added some flowers from WPlus9 and the sentiment and tag are from Mama Elephant. All of these products I have had in my stash but have not used.


Another card I created this weekend was for last weeks Freshly Mades Sketches but never uploaded. I have been doing a lot of that lately.


Now I liked how this turned out EXCEPT for those stupid black tiger stripes in the back. I was trying to make a night sky and I used too dark of a gray and couldn't blend it out.


I also made the mistake of coloring in the girls first, which I would NOT do again. I would have done the sky. Since it took me so long to color, I decided terrible sky or not, I was making into a card!! This stamp was a NBUS so I am going to upload this into the NBUS Challenge.


Below is the sketch that inspired this. I flipped it so that the sentiment was in the upper left, rather than the bottom right.


Well, that is all from me today. Thanks for taking the time to stop by!!


Friday, May 22, 2020

Love You a Latte

Happy Friday!! I am celebrating today with CAS-ual Fridays Stamps and the Coffee Loving Cardmaker's Blog for their Spring/Summer Blog Hop!


I created a card with the CAS-Friday's new Coffee Chips chipboard. It is available NOW in the NEW section of the CAS-ual Fridays Stamp Store.


I started off my card by using the By the Beans Stencil and Ground Espresso Distress Ink to create a background.


When I was done stenciling, I ran the stencil and my stenciled background through my die cut machine to dry emboss the panel. This gave the stenciling a slightly raised look as you can see in the photo below.


I then adhered my background to an A2, top folding card base. This card was inspired by last weeks Freshly Made Sketches #435 so I adhered some paper strips from my scrap card as indicated by the sketch below. If you are new to my blog, I often use sketches when making most of my cards. Some are from challenges, others I create myself.

Next I used the Coffee'isms stamp set to to stamp part of my sentiment with red ink onto a circle die cut.


I adhered the circle to my card front using foam adhesive to give it a little pop.


The "latte" sentiment is from the new Coffee Chips  chipboard, which I inked with Ground Espresso Distress Ink to match the background, before adhering under the stamping.


My last step was to adhere a chipboard heart that I had covered with Candy Apple Distress Ink, Aqua Shimmer Pen and some Glossy Accents.


I had so much fun putting this card together and I hope that you like it!! Hop on over to the CAS-ual Fridays Blog to see more great coffee cards from the design team.

In honor of this blog hop, CAS-ual Fridays Stamps is having a 25% off sale on all coffee themed products. 

Use my code NORASENTME to get an extra 15% off your total order.


Don't forget to comment on the blogs along the way. There are flash prizes to be given away. To find out what you can win, please see the CAS-ual Fridays Stamp Blog


I want to thank you for taking the time to stop by my blog today. I hope you have a FABULOUS weekend!!


Monday, May 18, 2020

Multiple Monday #1

Happy Monday everyone!!

I have been doing a lot of cardmaking lately but have not been blogging much. I am on my computer so much for work now that I just don't have any energy left to write anything. The school year will be over June 12th and I am SOOOOO looking forward to it.

One thing that I decided to do this month is to make some cards using a similar design. I want to send some out to people that I know are working hard and not feeling the love from their bosses. Yes, even people NOT on the front lines are having a lot of stress and anxiety about their jobs. Everything is so up in the air.

This week I am posting a small set of cards I created. I basically copied the design of THIS card by Carissa Wiley.

I have to admit, I rarely copy cards but am more "inspired" by aspects of them. However, I just thought the cards Carissa made were just amazing. I did not have ANY of the same supplies as her so I adapted what I had to create my version.


To start with, I made a "test" card. I often do this when I am making multiples of something to see what supplies I would use.  I used The Stamp Market's "Painted Background" (retired) stamp set to create my rainbow effect. The little heat embossed hearts are from Pretty Pink Posh's "Rainy Day Additions" stamp set and the sentiment on this card is from Simon Says Stamps "Tiny Words."


The polaroid frame is the "Polaroid Shaker Frame" from MFT Stamps, the flower die is from Pink Fresh Studio's "Dainty Blossoms," and the smile sentiment is from the retired WPlus9 "Basic Greetings." Instead of doing foiling like Carissa did, I used gold cardstock and heat embossing for the gold elements. It was just easier for me and I don't have the machine she had to use for foiling.


For my "real" cards, I chose to change the blue to a lighter shade. I liked how the card looked with the more aqua shade than the Island Blue I used on my "test" card.


I also chose to switch up the sentiments a bit too. The embossed sentiment on the card above and below is from the Ink Blot Shop's "Sentiment Label Block's" stamp set.


I cannot tell you the FUN I had just looking through my supplies to substitute for what she used. I urge you to try and copy a card design substituting the supplies you own. I usually get bored making multiples but since their were so many steps, my attention didn't wane.


The sequins were the last touch and are from Pretty Pink Posh.

I want to thank you for taking the time to stop by my blog. I will be back next Monday with a bunch of similar cards I created using my own design.

Have a FABULOUS day!!