Thursday, July 23, 2020

Christmas in July-A CAS-Fridays Christmas Post

Just popping in with a sneak peek to the card that I created for the CAS-Fridays Blog. It is my turn to host the blog and I had fun making a slimline Christmas card.


Hop on over to see how I created the background on this fun card!!!


Tuesday, July 21, 2020

Twofer Card Challenge, A Sketch Challenge and some Butterflies

Hello everyone!! I hope you are all staying cool today. It is very hot and humid today in CT, two of my not favorite things. I did make it out for a walk this morning and am proud of myself for it.

I am popping in with some cards for some challenges. The first challenge I am entering is the Twofer Challenge #29.


The challenge this time around was butterflies.


I used Hero Arts Color Layering Monarch Butterfly Stamp set for my cards. I had so much fun doing a messy look for the purple slimline-the first slimline I have ever created!!!


I used four colors of Distress Ink after I stamped the butterflies with  Versafine Onyx Black. (Shaded Lilac, Seedless Preserves, Milled Lavender and Dusty Concord)


The "happy" sentiment was die cut using The Ton's "Bold General Greeting Word Plate Dies" and the "birthday was stamped with Hero Arts "Happy" Stamp Set. I splattered the card with black and white acrylic paint that was watered down.


I used Nuvo Crystal Drops in "White Gloss" to finish off this card. 

For my second card, I used the Global Design Team Sketch #250 as the inspiration for my card design. 

I also used a color challenge from a private FB challenge board for my colors.


I stamped the butterfly with Hero Arts "Soft Granite," "Soft Pool," "Tide Pool," and "Ocean" ink. I then covered it with "Nuvo Clear Aqua Shimmer pen." 


The white panel and the gray polka dot panel was die cut with The Greetery's "Crimped Frame Dies."


The sentiment was stamped on a piece of scrap paper and I used foam adhesive to pop it onto the front of the card.


The last step was to adhere some clear sequins and some pale green gems.

My last card I created for Seize the Birthday #195. The topping was to use a non-neutral card base.


I chose to use red.


I used a digital stamp-Layer Cake- from Power Poppy for this card.


I colored colored it in using Copic Markers, using colors that are more masculine in tone.


I added glossy accents on the "blueberries" and some yellow Stickles for the candles.

Well, that is all from me today. I want to thank you all for taking the time to stop by. Have a FABULOUS day!!


Monday, July 20, 2020

A Couple of Cards and My Anniversary!!

Hello everyone!! I hope that you are all doing well.

It is my 24th wedding anniversary. Chris bought me some pretty flowers but we did not do anything special today.


I have no desire to go out anywhere to eat. We did go out for ice cream. Chris hates going anywhere because of the masks!! I still had to commemorate it somehow so I made him take this selfie.


Today I am sharing some cards I created this weekend. The first I created for this weeks Cupcake Inspiration Challenge # 498.


The challenge was a color challenge to use yellow, white and blue. My blue is NOT the same shade as the photo and I hope this is okay.


I used Reverse Confetti's "Butterfly Wreath" stamp and die for my card. I stamped the wreath on a pale blue cardstock and colored the butterflies in with different colored aqua blue pencils.


I mounted the wreath over an A2, top folding white card base that I had splattered yellow and blue mists all over.


This was a fun card to make and I had fun getting messy. I am NOT great at colored pencil coloring, though. I cannot seem to shade no matter how hard I try.

I am going to enter this into The Daily Marker's 30 Day Coloring Challenge. I have not been great about participating in this challenge this time around but I am glad I did get to color a bit!!


My second card that I am posting was inspired by THIS card from Karolyn Loncon's Paper Therapy Blog that I saw on Pinterest.


I used pattern paper scraps to create my flowers. I could probably make 100's of these cards with the amount of scraps I have!!


I chose to CASE her card because my mojo is lost right now. I hate when that happens!!!


This was a lot of fun to create and I will be making a couple more like this at a later date.

Well, that is all from me today. I thank you for taking the time to stop by. Have a fabulous night!!!


Tuesday, July 14, 2020

Lack of Mojo and a Dog with Nine Lives

Hi everyone!! I hope that you are all doing well.

I have not been doing a ton of crafting as I have been so anxious between my dog being unhealthy and anxiety about going back to work FT to school in a month. The bottom line, I don't feel safe. No easy answer for any of it and all my concerns have not even been addressed in detail, anywhere.


As for Zack...this darn dog has nine lives!! July 4th we had to bring him to the ER Vet, thinking we were going to put him to sleep. His breathing was shallow all day, he didn't want to eat or drink, and he was coughing. He did nothing but lay around, sleeping and did't have any energy for anything. We know he has congestive heart failure and we thought it was the end.

HOWEVER, once we got there, they gave him a shot of diuretic and some antibiotics because they thought he had a secondary infection. He left there all perked up and gradually became himself, except he would not eat dog food. We wound up having to make rice, veggies and chicken because he needed to ingest his seizure meds and many of his heart meds. Zack gets most of his prescriptions via his food so he has to eat.

Fast forward to Sunday. I witnessed Zack having a stroke. It was NOT pleasant to watch but there was not anything anyone could do for him so we waited it out. We thought we would be taking him to the ER Vet once again, waiting for my daughter to come home from work. However, he rallied once again!! Within two hours, he was begging for food, though his neck was skewed to the right and he seemed to have more difficulty walking.

Two days later, he is getting better and better, now going up and down stairs again. I love him so much but him being up and down like this is stressing me out. We know he does not have a ton of time due to his heart condition getting worse and worse every time he is examined but he just seems to be hanging on!!! Since I went to the vet by myself yesterday, I was able to discuss when "the end" might be but he is not there as of yet. We now are renewing his meds on a bi-weekly basis rather than a monthly basis as she does not think it will be that long. Zack could prove us wrong once again!!

Anyway, I did make two cards this weekend before the stroke. The first was inspired by Freshly Made Sketches #443 but I never uploaded it to the challenge in time.


Below is the Sketch that inspired this card:

I started off my card by stamping my background on Neenah Solar White cardstock with the Stamp Market's "Just Vines" background stamp and coloring it in with Copic Markers.


I added this panel to a white, A2, top folding card. I then adhered light green cardstock triangles that I had stamped the same background on with Versamark Ink.


I used the Stamp Market's "Paper Hug" die to die cut my sentiment out of white and green paper. I adhered this over the stamped panels.


I tucked white, die cut leaves and flowers from some leftovers under and over the sentiment.


My last step was to use a Clear Aqua Shimmer Pen and Glossy Accents over the die cut sentiment, and used Nuvo "Fresh Snow" Glitter Accents in the middle of the flowers. This still needs something else but right now I am putting it aside.

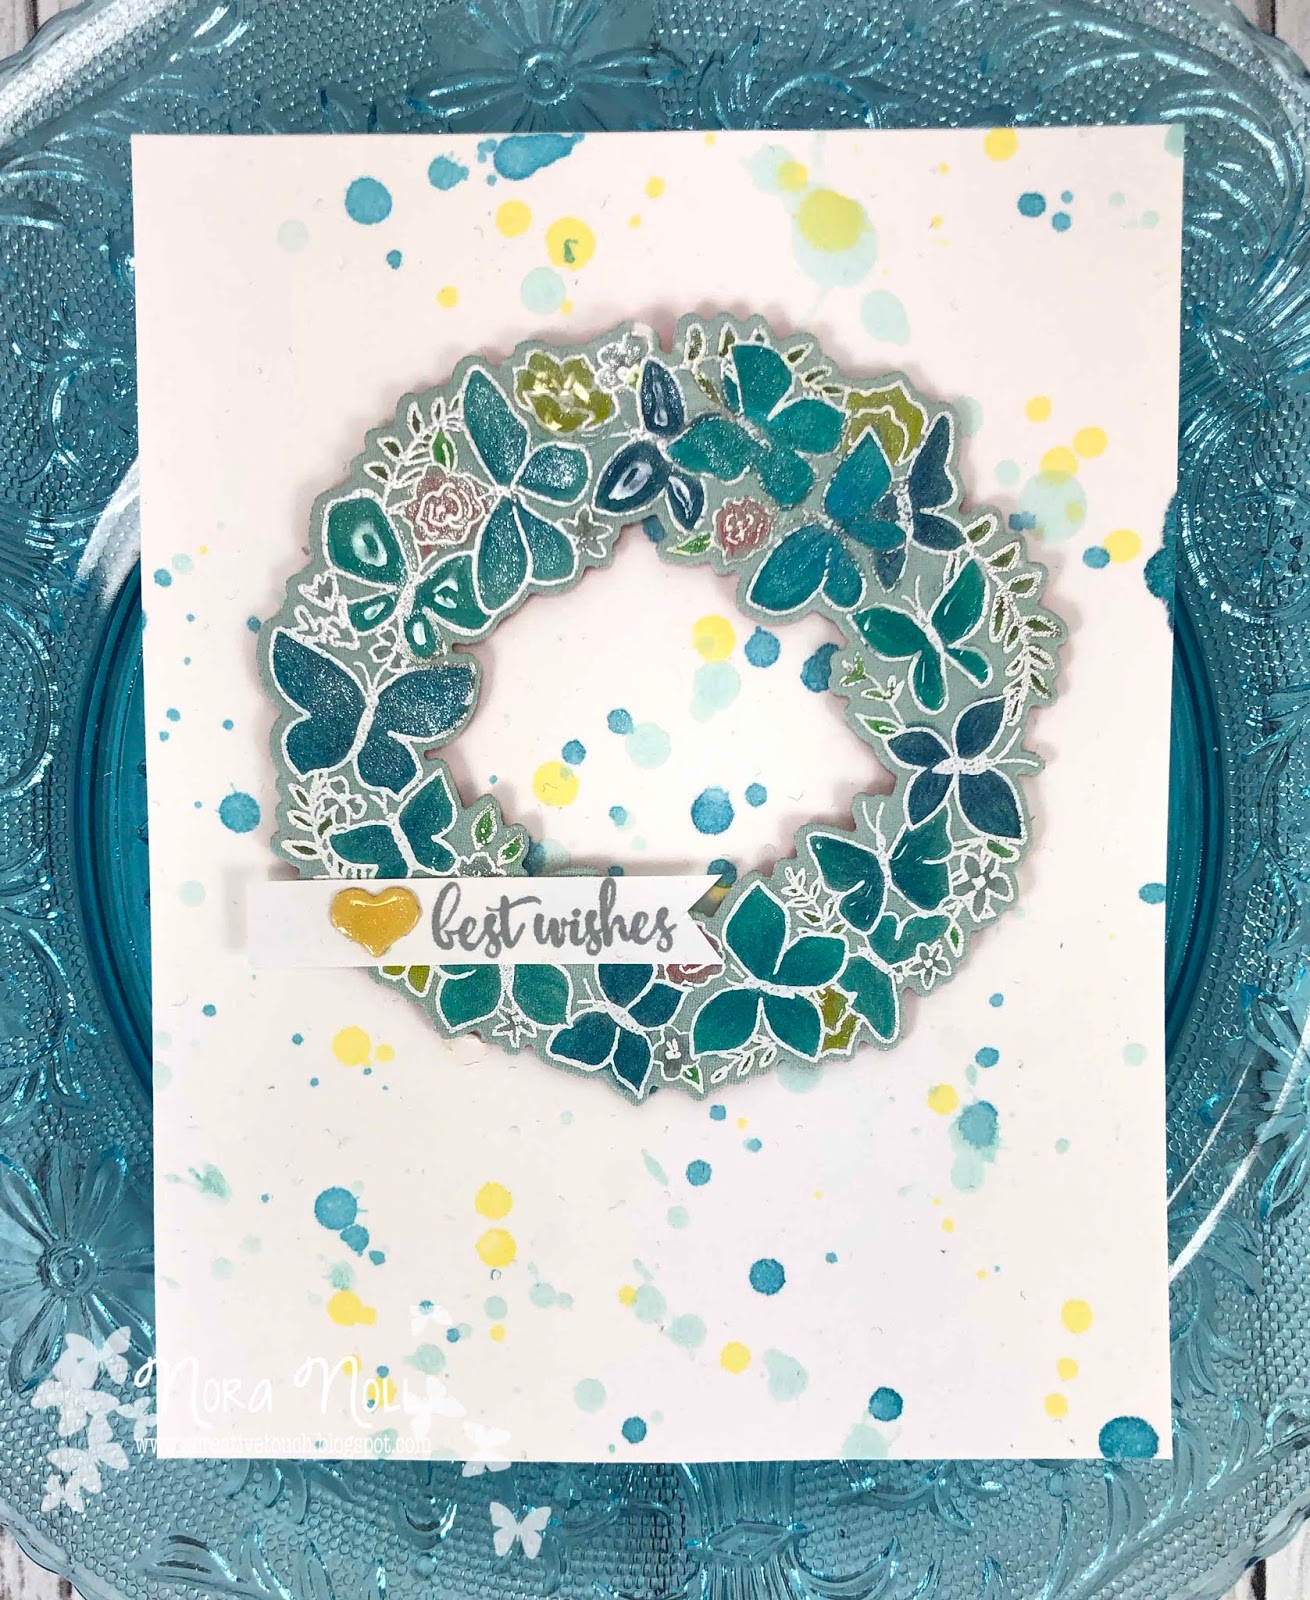
For my second card, I used this weeks CASE this Sketch #380 as my inspiration for my card.


I knew when I saw this sketch, I wanted to use Pink Fresh Studio's "Frame Builder Botanical Oval Set" that has been sitting on my desk, waiting to be used. My interpretation of the sketch is not exact, but I like how it came out.


The paper is from Dress My Craft "Hydrangea Lawns" paper pad.


I used the "stained glass" technique with these die cuts. I die cut the flower portion of the botanical frame three times and glued the pieces together. I then adhered it to the card front. The inner portions I colored with Copic markers, glued them inside the frames, then colored in using the Clear Aqua Shimmer Pen and then covered them with Glossy Accents.


 I used the same technique with the leaves x2.


My last step was to add the sentiment, which was on my desk and do not know the manufacturer off the top of my head.

I am entering this card into The Flower Challenge #46-Summer/Winter too.


That is all from me tonight. I thank you for taking the time to stop by. Have a fabulous night!!


Saturday, July 11, 2020

CAS-Fridays and Crafting of Hue Blog Hop

Hi everyone!! Today the CAS-Fridays Design Team is doing a blog hop. We are featuring the
CAS-ual Fridays Stencils. There is also a SALE on stencils!! They will be $5.00 until July 12, 2020!!!

I created a card where I used the Curtis Stencil to dry emboss AND heat emboss for a simple look.


The key to dry embossing with a stencil is the layering "sandwich" you do through your die cut machine. I have an old Sizzix Big Shot so I use a Sizzix Texturz Impressions Pad and Sizzix Texturz Silicone Rubber Mat for my sandwich.


I have an old tabbed adapter plate so I open it to the right tab, place one standard cutting mat down, with the silicone rubber mat on top of that. I usually clean my silicone mat with a lint brush but when I was making this card, I couldn't find where it was in my room!!


Next I place my paper over the rubber mat, with my stencil over the paper.


I then top off the sandwich with impressions pad and run everything through my machine.


When you take your paper out, it looks like this. You see the top where there is a line from the outside of the stencil? This DOES NOT always happen. It depends on the stencil. I worked around this by cutting my embossed paper down to make it disappear. If I had not cut it down, I was going to put a strip of gold cardstock in between the embossing and the edge so you would think it was part of the design!!!


For the next step, I die cut my sentiment from gold cardstock and fun foam using the "happy" from the Happy Hanukkah Fri-dies. I adhered the gold die cut over the foam and set it aside to dry.


While the die cut was drying, I used a gold embossing ink to smear over a white cardstock strip and then heat embossed this with gold embossing powder. I adhered the strip onto an A2, top folding card front, and then glued the red embossed cardstock around this.


I masked and heat embossed the birthday sentiment from the Whole Shebang stamp set on  a white strip of cardstock and adhered it to the card front.


My last step was to I adhere the die cut sentiment to my card front using Ranger Multi Matte Adhesive.

This card was so simple to create and using your stencils to dry emboss just extends the uses of your supplies!!!

Remember, all STENCILS are on sale today until July 12, 2020 for $5.00 with no code needed.


Also, clearance has been marked down to $.99!!! When it is gone, it is gone!!! You can even use my code, NORASENTME to get an extra 15% off your TOTAL ORDER!!


Be sure to click on the links below to see what the other members of the Design Team created!!!  One commenter from all the blogs will be picked to win a $50 CAS-ual Friday Shopping Spree Code! This code will be picked on Tuesday, July 14, 2020.

Nora Noll <<<<<<<You are HERE!!
Special Guest from Crafting of Hue


I thank you for taking the time to stop by today. Have a FABULOUS day!!