Friday, January 1, 2016

Stamping Smiles Design Tic-Tac-Toe Challenge #1

Happy New Year!! The first Stamping Smiles Design Tic-Tac-Toe Challenge goes live today. Yippee!!

I actually created TWO projects for this challenge, using the middle column from top to bottom.


I chose to use sparkles, embossing and new on my cards.

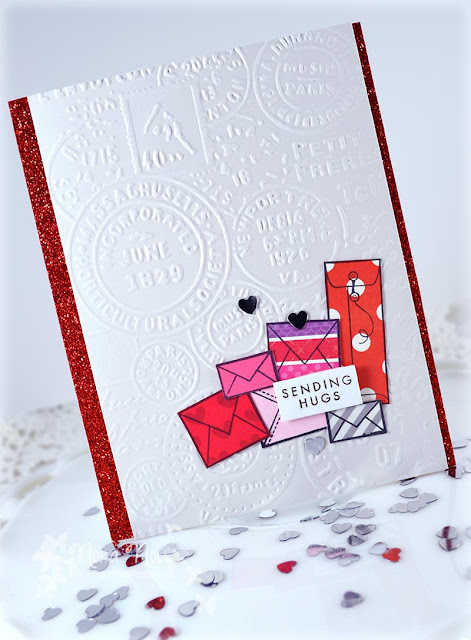
For my first card, I chose to emboss the Soft Stone card stock with a new embossing folder from Kaisercraft and added sparkle to the card with some glitter tape and silver hearts.


The gray card stock was cut to 4" by 5 1/2" and popped up over the card base with foam adhesive.


I then adhered stamped "envelopes" from Simon Says Stamp!'s "Happy Thoughts" set over the embossed paper. These "envelopes" were stamped onto patterned paper scraps and fussy cut by hand. I actually have to admit that I sat down one night to do the stamping and then another night to do the cutting so that I could have these images on hand to eventually make a card set.


The sentiment is from Hero Art's "Act of Kindness" set (also new) and stamped in PTI Smokey Shadow ink onto a piece of white, scrap card stock. I popped it off the envelope cluster using a piece of foam adhesive. My last step was to randomly adhere the little hearts using Ranger Multi-Matte adhesive.

I was so excited with how easy this card was to put together using the Tic-Tac-Toe board that I decided to create another card with a similar design.


For this card, I embossed a white background using a heart embossing folder, which I adhered to a 4 1/4" by 5 1/2" card base.


I then adhered the "envelopes" that I had stamped on scraps in the same general area. However, I decided to tuck the sentiment into one of the envelopes. I love how it looks!!


The last step was to adhere a variety of shiny, different shaped sequins randomly around the envelopes.

For someone who takes a long time to make a card, I created two cards in no time using the challenge card. I know that I will be making at least one more card using a different row because I had so much fun!!

I thank you for stopping by!! Have a wonderful day!!


Supplies:


Tuesday, December 29, 2015

Design Team Announcement

Today I am excited to announce that I am on the new Stamping Smiles Design Tic-Tac-Toe Challenge Design Team!!


I have long been admirer of Ka, the challenge owner, whom is a talented paper crafter and a really lovely person. I am delighted to be able to work with her and the other fabulous crafters on this design team.

I have to admit that this type of challenge is new to me but I know that it will be one to get my creative juices flowing. I am SO EXCITED to be a part of this design team and I hope that you will have fun playing along too.

Please check out the other talented design team members that I will be creating with.

The Challenge Originator

Design Team Members

I thank you for stopping by!! Have a wonderful day!!


Friday, December 18, 2015

Paperie Ink-Christmas Caroling with the Hedgehogs

Happy Friday!! It is exactly one week before Christmas! My blog has been echoing with all the nonexistent posts. I am so disappointed in myself!! I have been busy with Christmas preparations and my crafting has gone by the wayside. I have a week off starting on Christmas eve and I am hoping to get A LOT of creating done so I can post a bit more.

It is my turn over at the Paperie Ink blog.  I am sharing a card I created with the versatile Christmas Carolers stamp and die set from Paperie Ink. This set is SO CUTE and I have had fun creating all kinds of cards with it. I decided to create a holiday theme for this card.


I created the little scene by first blending Stormy Sky, Chipped Sapphire and Blueprint Sketch Distress inks, then stamping and heat embossing the snowflakes. I then added the adorable hedgehogs that I had stamped, die cut and colored in with Copic markers and adhered over some die cut hills. I dressed them in some festive headpieces, using foam adhesive to give each a little dimension. 


The music stand is adhered with foam adhesive too, and positioned in front of the little critters. 
I then adhered the entire scene over a red A2 card base that I covered with a stamped die cut.  


The last step was to stamp the white banner with the sentiment in red. I adhered it using foam adhesive so that it straddled both the scene and the red card base. 

This card was so fun to make with these little guys. I also LOVE how the background with the Distress inks came out!! 

Thank you for stopping by. For more adorable cuteness, please visit the Paperie Ink blog. 

Supplies: