Showing posts with label #Sympathycard. Show all posts

Tuesday, September 27, 2016

CAS-ual Fridays Stamps "Casual Comfort" Inspiration

Hello everyone!! Today it is my turn for a little CAS-ual Fridays Stamps inspiration.

I chose to use the CAS-ual Fridays Stamps "Casual Comfort" stamp set and the matching "Casual Trees" Fri-dies to make two cards. When I sit down to create cards lately I am trying to make more then one at a time. I have also needed a lot of encouragement cards for various people so the "Casual Comfort" set was the perfect set to play with.

Before I even figured out my card design, I die cut two trees out of Kraft card stock and two trees out of vellum using the "Casual Trees" Fri-dies. On the Kraft die cuts, I used liquid enamel dots to create the illusion of flowers. On the vellum, I used clear glitter glue for the same effect. As they were drying, I designed my cards.

For my first card, I chose to use a bit of patterned paper on the card and a butterfly punch paired with the CAS-ual Fridays stamps.


I adhered a 3 3/4" by 3 3/4"piece of  paisley patterned paper onto a purple, A2 card base. I then added a purple card stock frame that I had adhered over vellum.

The frame was created by using the smaller circle from the "Ornament Tag" Fri-dies. When I purchase a die, I always try to stretch them beyond their original purpose and this die was perfect for this frame. I even used the circle from the middle of the frame as a starting point for my second card!!


Next I adhered one of each of the Kraft  and vellum "Casual Trees," so that the tops were opposite of each other.  I stamped "sending comfort" in purple ink onto a white card stock strip and used foam adhesive to adhere it to the card.


I punched a butterfly out of burnt orange card stock and adhered it over part of the sentiment strip. My last step was to adhere some clear sequins onto the card front.

My second card's design is a bit simpler.


My first step was to blend "Peacock Feathers" distress ink onto a white, A2 card front. I then misted it with water and patted the water off with a paper towel. I splattered silver mist over the ink and water and set the card front aside to dry.


While the card front was drying, I used the purple circle scrap from my first card to heat emboss the sentiment from the "Casual Comfort" stamp in silver.


Like the first card, I adhered the "Casual Trees" die cuts so that the stem tops were opposite of each other. I used foam adhesive to adhere the sentiment circle over the die cuts.


My last step was to adhere orange flowers that I had die cut using the CAS-ual Fridays Stamps "4 Petals" Fri-dies. I added a bit of silver glitter glue in the middle of each of them to match the silver sentiment.

I really like how using the same products with a touch of different papers and a few dies can make two completely different looking cards. I challenge you to give it a try.

Don't forget, if you use my code nora2016, you can get 15% off your order from the CAS-ual Fridays Stamps Store!!


I thank you for stopping by my blog today. Have a fabulous day!!


Supplies:

Card #1
Stamps-CAS-ual Fridays Stamps "Casual Comfort"
Dies-CAS-ual Friday Stamps "Casual Trees" and "Ornament Tags" Fri-dies
Paper-Paisley Patterned Paper-Nicole, Vellum, Purple and Burnt Orange card stock-Bazzill, Kraft and white card stock-Paper Studio, Stampin Up! "Perfect Plum" card stock card base
Ink-Stamping Up! "Plum Pudding" dye ink
Other-Sizzix Big Shot, Pretty Pink Posh Sequins, Nuvo Gloss-"Crushed Grape," Stickles "Diamond, Ranger Matte Adhesive, 3M Foam Adhesive, Martha Stewart Butterfly Punch

Card #2
Stamps-CAS-ual Fridays Stamps "Casual Comfort"
Dies-CAS-ual Friday Stamps "Casual Trees," "Ornament Tags" and "4 Petals" Fri-dies
Paper-Vellum, Purple and Burnt Orange card stock-Bazzill, Kraft and white card stock-Paper Studio
Ink-Versamark, Ranger "Peacock Feathers" Distress Ink
Other-Sizzix Big Shot, Nuvo Gloss-"Crushed Grape," Stickles "Diamond" and "Silver", Ranger Matte Adhesive, 3M Foam Adhesive, Prima "Chrome" spray mist, Ranger Mini-Mister, Wagner Heat gun


Saturday, July 23, 2016

A Day Late and a Dollar Short for the MFT Camp Create Challenge: Inlaid Made Easy and our 20th Wedding Anniversary

Happy Saturday!! It is hotter then anything here and the humidity is AWFUL. I am spending the day in my craft room and then will be going out to dinner later with another couple. We rarely do this and am excited about it.

We went away for the day to NYC on Wednesday for our 20th Anniversary. We walked over 10 miles (plus took the subway) and my feet are still recovering. Note to self-wear sneakers even if you don't think they look good!!


Comfort is better then fashion!! I have blisters in places that I have never had them before.


This is Chris and I on our way home from our day. One of the things we did was to visit both the 9/11 Memorial Museum and the reflecting pools outside.


I have to say, I was really impressed with both. The museum was understated and powerful. It gave you time to roam around, stop and think about what you were seeing. Since it was a Wednesday, it was not terribly crowded either. Made me sad because I still remember this event so clearly but I thought the memorial was well done.

My camera on my phone is not working correctly so I did not get a ton of photos on this day. Kind of disappoints me-not that I would have taken a lot in the museum anyway. I wanted to take it all in and be present. However, I do like to get shots of fun things we see.

Okay, now on to my card!! I created for this card for MFT's Camp Create: Inlaid Made Easy. Makes me mad because I had this card completed BEFORE the deadline but just was too tired to photograph it. Ugg!!


I started off by die cutting a piece of Bristol Board with MFT's "Chunky Chevron Cover Up" die and  using foam adhesive on the back to adhere it to a white, top folding A2 sized card base. I took all the tiny chevrons and misted them with Heidi Swapp "Teal," "Tinsel" and "Gold" Colorshine, as well as a "Picket Fence" Distress Stain.


While the little pieces of chevron were drying, I adhered sequins in random empty chevrons on the card front. Using a "Blueprints 13" die-namics, I die cut my sentiment strip out of MFT "Berrylicous" card stock and used Hero Arts "Soft Granite" ink with a stamp from MFT's "About Sympathy" stamp set. Try to say all that fast!! I also die cut the hearts using MFT's "Staggered Heart Border" dies.


When the misted chevrons were dry, I did a bit of inlaying-both with foam tape and without-in random empty places on the card front.


The last step was to adhere the sentiment and the hearts, as well as using Wink of Stella and Glossy Accents on top of the "Berrylicious" heart.

This was fun to do but not sure I would be using this technique often. It takes a lot of time and a bit of effort to create a card. I am just to lazy to make this kind of effort for every card!!

Well, again, this was for My Favorite Things Camp Create: Inlaid Made Easy day.


Thank you for taking the time to stop by. Stay cool and enjoy the rest of your Saturday!!


Sunday, July 3, 2016

My Favorite Things Sketch #287

Hello everyone!! It has been a beautiful weekend weather wise here. Sunshine in the low to mid 80's and NO HUMIDITY!! I will take that any day. It is the humidity that kills me every time.

Chris and I walked to breakfast this morning it was so nice. Our usual place was closed for vacation, unbeknownst to use, so we went to a hole in the wall that I don't remember ever being there. Apparently we had eaten there when we first moved to this town nineteen years ago and after today, I know why we didn't go back. Not only was the food not great but for a hole in the wall, it was expensive!!! I cannot figure out how it stays in business. Anyway, we will NOT be going there again!

Today I am posting two cards that I created for the My Favorite Things Sketch Challenge #287. Again, I am playing with the MESS ON MY DESK. (I really, really need to clean it up but am waiting until the carts I want are in at IKEA in the color I need them to be.)
My first card I used patterned paper that was left over from my SJ Kit Club Kit that I die cut using My Favorite Things "BluePrints Die-namics #13".


I then die cut a sentiment block out of white card stock using MFT's "Cross Stitch Rectangle Stax" and stamped a sentiment from a retired set.


The blooms are from MFT "Fall Florals," which is one of my favorite floral stamp sets right now.

The second card I created I like a lot better then the first.


I die cut some Fancy Pants Chevron Paper with one of the MFT "Blueprints #13" dies and adhered it to a top folding, white A2 card base. I then placed a banner that I had die cut from a piece of MFT  "Dots and Stripes Fresh" paper over the chevron.


On the circle, which was a scrap on my desk, I blended "Spun Sugar" Distress Ink and then misted Heidi Swap "Primrose" Color Shine and "Picket Fence" Distress Stain on top. I adhered it onto the card front with foam adhesive.


I then layered images from MFT's "Sweet Succulents"set that I had stamped, die cut and colored in with Copic markers.


I used "Clear" Wink of Stella over all the succulents and a bit of "Icicle" Stickles over the flower. The sentiment, also from "Sweet Succulents" was stamped on piece of white scrap and adhered with foam adhesive.

That is all from me today. I hope you have a FABULOUS rest of the day. I thank you for taking the time to stop by.
P.S. As I am writing this, my husband is outside working on putting trim around our windows. He is swearing, which he rarely does, so that is not good!!!

Saturday, July 2, 2016

Freshly Made Sketches #243, As You See It Challenge #138 and SJ Card Kit "Extras"

Hello everyone! Was able to get into my craft room today after a very long week.

My stepmother lost her mother this week. It was very sad all around, though a blessing as well. My stepmother is a fabulous person and I just hated to see the pain she was going through. I cannot say that she was not prepared as her mother was 93 and had been ill but I don't think that you ever are fully prepared for a death, especially your mother.

On top of that, I have been searching for a dress to wear to a wedding next week. Nothing I try on is doing it for me. Hate shopping but I have been more then I like to this week!!

So today I am showing you a card that I created for "Freshly Made Sketches Challenge #243" and "As You See It Challenge #138," which was to use the colors red and white. I have played with the "Freshly Made Sketch Challenge" before but this is a first for me to enter the "As You See It Challenge."

This is the card I created for both challenges:


I had a picture in my head of how I wanted this card to come out but could not execute it. I knew when I saw the red and white challenge that I wanted to use my My Favorite Things "Etched Flower" stamp and heat emboss it with my American Crafts Zing embossing powder in "Rouge." 

My first three tries at doing this were not so hot-even though I did all the correct steps. It was MADDENING!! I finally switched the ink I was using from Versamark to Hero Arts Pigment Ink in "Unicorn White." It made all the difference! I then die cut my panel using an Avery Elle "Wonky Stitched" die and adhered it to my card using foam adhesive.


I die cut a leaf out of vellum using PaperTrey Ink's "Turning a New Leaf" die and a butterfly out of patterned paper using Memory Box's "Pippi Butterfly." I then adhered them to my card front.


I embossed a sentiment from My Favorite Things "About Sympathy" stamp set in white on a strip of "Red Hot" card stock. I then adhered it to my card front  using foam adhesive to finish it off.

I really like how it came out but am not happy that it took me so long to do. I am not a huge fan of heat embossing so just doing that technique stressed me out! Who wants to stress when they are supposed to be having fun?

Again, I am entering this card into "Freshly Made Sketches # 243", as well as "As You See It #138."


On another note, I created three cards out of extras that I had left over from my card kits. I was supposed to blog them on Thursday but could not due to searching for that dang dress and the wake. Better late then never I guess!!

The first two are very similar. Everything came in the kits with the exception of the teal card stock. 


I wanted to jazz up the card front a bit so I used my Martha Stewart mini scorer to score some lines on this card.


My second card I did some die cutting for the oval and on the sentiment, and layered everything in a cluster.


This card is my favorite. I did some ink blending behind the deer, as well as some stenciling. I then blended the same ink on the sentiment block.


I had colored the deer with Copics and layerd that over the sentiment.


My last step was to adhere the sun, which was a die cut scrap that I already had in my stash.

That is all for today. Hope you have a fabulous night!!


Tuesday, June 28, 2016

Inspiration Post for Challenge #12 at Stamping Smiles Designs Tic-Tac-Toe Challenge Blog

Hi everyone!! I just wanted to let you know that it is my turn over at the Stamping Smiles Designs Tic-Tac-Toe Challenge Blog with a little inspiration for Challenge #12.


I had a lot of fun creating a card with a piece of cork as the inspiration for the whole card.


For all the details, please hop on over to Stamping Smiles Designs Tic-Tac-Toe Challenge Blog and let me know what you think.

Have a great day!!

Tuesday, May 31, 2016

Rosey's Kit Reveal for the SJ Kit Club Blog

Happy Tuesday everyone!! I hope you all had a great holiday weekend.

Ours was filled with dinners and cook outs with family and friends. Totally exhausted today and need a day off! LOL!!

Some sad news for me, though. Scrapjazz.com, a small web board I had belonged to since I started scrapbooking (13 years) is being closed. It was bought ten years ago by Scrapbook.com and is basically only used by several people now. I get why they are closing it but it makes me sad. I have met some virtual and in real life friends from there. It helped me step outside my comfort zone and people encouraged me in my creative life, as well as my real life. I am going to miss it immensely.

Today I sharing the cards I created with Rosey's Kit from the SJ Card Kit Blog. She sent us such pretty papers and I created five cards out of her goodies.


The first card I created I used a sketch from the "Can You Case It?" blog and Rosey's Kit.


Here is the sketch:

I cut the papers up and used a couple to create strips across the front. I also used a thin piece of stitched ribbon that was in the kit.


I added some "Spun Sugar," "Vintage Photo," and "Walnut Stain" Distress ink onto the sentiment block before I adhered it onto the front with foam adhesive.


I then layered the brown and white flower over each other and used a pink brad in the center.

My next card I used sketch #126 from the "Match this Sketch" blog.


Here is the sketch:


I used a die cut for the pink background paper and adhered it over a blush pink A2 card base. I then adhered some paper strips over the front like they were in the sketch.


I then used a piece of ribbon from the kit that I cut into a banner. I layered a blush circle over the top with foam adhesive and then one of the little Lawn Fawn "Into the Woods" animals Rosey sent that I had colored in with Copic Markers.


I added some black enamel accents for the eyes and a little Nuvo Crystal Drop in "Gloss Carnation Pink" for the chipmunks nose. Here is where I made a boo boo and had to cover it up. The black enamel eye left a black thread to his nose. I had to cover it up with a white gel pen. I was so mad!! This is my favorite card, even with the boo boo!!

My third card I created I used an old My Favorite Things Sketch that was on one of my Pinterest boards to make my card.


Here is the sketch:

I tweaked it a bit, the panel being smaller then the one in the sketch but that is the beauty of a sketch! I die cut the striped panel and adhered it to an Aqua Mist card base that was cut into an A2 size. I layered the polka dot banner over it, as well as the birthday sentiment that I blended "Tumbled Glass" and "Walnut Stain" Distress Ink to.


I added the leave behind the sentiment and used foam adhesive for the little acorn that had been colored with Copic markers and some Cinnamon Stickles.


A little odd pairing but I like how it came out.

My fourth card was inspired by all the fun scraps on my desk!! I die cut the blue paper, in addition to an dark brown piece of patterned paper, with a square nesting die from Umbrella Crafts.


I adhered them at an angle on a 4 1/4" by 5 1/2" Aqua Mist panel. I then die cut the panel with a Blueprint die from My Favorite Things and adhered it to a Dark Chocolate card base.


I then adhered two leaves from the kit onto the front. I used foam adhesive to glue the sentiment block down over the leaves.


The card still needed something so I adhered three brown sequins that were not included in the kit onto the front. I think this will be good for a male birthday card, don't you?

My last card is my least favorite.


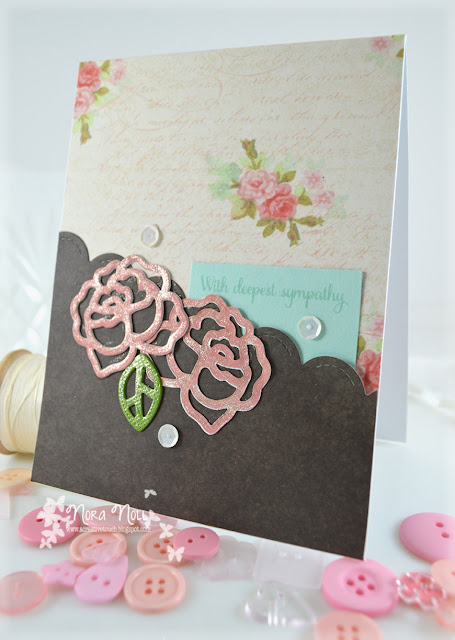
I used patterned paper from the kit for the card front, die cutting the brown on an angle with a Lawn Fawn scallop die. I tucked a piece of Aqua Mist paper beneath the scalloped paper that I had stamped a sympathy sentiment on.


Next I die cut Paper Smooches "Roses" out of pink patterned paper, a green leaf and three roses out of white card stock. I layered two layers of card stock under one rose and one layer under the other and adhered them to the card. I also adhered the green leaf to the card.


I coated the roses and the leaf in clear Wink of Stella and adhered some vanilla sequins around the cluster. Again, not my favorite but it will do.

Okay, I am done. Did you hang in there with me? It was a long post and I apologize. Please hop on over the ScrapJazz Card Kit Club Blog to see the other ladies creations this month.

Thanks for stopping by!! Have a wonderful Tuesday!!