Showing posts with label Winnie and Walter. Show all posts

Tuesday, January 20, 2015

Winnie and Walter Gradient Challenge with Vanessa

Hello, Hello, Hello!! Today I am going to to a really quick post to show you the card I created for Winnie and Walter's Gradient Challenge with Vanessa. This card was probably the easiest and quickest I have done in a long time.

I started by taping off the front of a 4 1/4" by 5 1/2" card. I then inked a mixture of "Salty Ocean" and "Tumbled Glass" distress ink with an ink blending tool into the gradient design on the right. I then moved my tape over slightly and added a second, thin gradient line to the left of the first. Instead of starting with the darkest color on the bottom like I did with the first gradient, I swapped it and started with the darkest color on top. This was so easy and so fun to create!! (The photos are a bit "blue" and I apologize. I had a hard time fixing these in PS.)


I then stamped the "you" from Winnie and Walter's "Big Bold You" set with versa mark ink and heat embossed it with holographic ink. It does not show up as I wanted it to so I tried to ink a bit of the "Salty Ocean" ink over it. I then stamped the "thank" with the same color blue.


The last step was to adhere some sequins and rhinestones. This will not require any additional postage and was so easy to make that I could do a bunch at one time.


I want to thank you for taking the time to stop by my blog today.

Supplies:


Monday, January 19, 2015

Faux Shaker Card for Winnie and Walter's First Anniversary Bash!

Happy Monday everyone!! We have today off for Martin Luther King day. While Char is studying for mid-terms, I decided to post one of the few cards I created on Saturday. I finally had bit of mojo so I went with it and created three cards. That is a record for me! It takes me SO LONG to do one card, let alone three. I also made mistakes in the process and had to start over for some of them.

Today I am sharing a card I created for Winnie and Walter's First Birthday-"Shaker Challenge with Julie." However, there is a bit of a twist. I have made shaker cards before but even though they are all the RAGE, I do not like them. They are bulky, take too many steps and I often don't wind up sending them. I decided to create a "faux" shaker card instead.


I decided that I wanted the color scheme to be in white and silver. I based the card design on a different Winnie and Walter Birthday challenge-"Sketch Challenge with Joni."


I eliminated the two banners because they didn't work with my card. Here is how I created it:

  • I die cut a pinked edge circle out of a 4 1/4" by 5 1/2" piece of white card stock. I then misted it with Heidi Swapp "Tinsel" Color Shine. 
  • While that piece was drying, I die cut a circle out of silver glitter card stock. I then die cut a square piece of vellum and attached that to the back of the silver piece.
  • On the front of the vellum, stamped the Winnie and Walter Sentiment in Versamark ink and then heat embossed it with black embossing powder. I then adhered this piece to the misted front of the card.
  • Next,  I took the white card base, lightly penciled in a circle and used glossy accents to adhere silver and white sequins around the inside of the circle.
  • Using foam tape, I covered the non sequined front of the card base and carefully adhere the front to the card. 
  • My last steps was to adhere silver and white sequins randomly on the front, as well as add three stars that were die cut out of white glitter paper.

I really like how this came out and it was so fun to do. Can you tell it isn't a "real" shaker card? I also don't have to throw it away because it does not leak!! You could do this with any type of shaker card you wanted. If you wanted to add a bit of glitter, you could use a bit of Stickles randomly around the middle of the card as well.

Once again, I am entering this card into two challenges for the Winnie and Walter Blog. Run on over there and play if you haven't already. There are a TON of challenges to enter, as well as some fabulous inspiration projects. I also decided to enter it into Darnell's NBUS Challenge #3. I suggest that you check out her blog if you don't already. She is a HOOT and is a tremendous talent!! My Winnie and Walter sentiment stamps were new, as well as the silver glitter paper.


I thank you for stopping by today. Enjoy your day.

Supplies:
Paper-Paper Trey Ink Stampers Select White and the Vellum, Die Cuts With a View-silver
Dies-My Favorite Things
Stamps-Winnie and Walter "Big Bold You"
Other-Versamark Ink, Ranger Black Embossing powder, white glitter paper, Big Shot, Pretty Pink Posh sequins (silver), Darice (white sequins), Heidi Swapp Color Shine (Tinsel), Scotch foam adhesive


Monday, October 6, 2014

Winnie and Walter "Sketch with Julie"-World Card Making Day Challenge

Hello all!! Happy Monday! It was a little chilly here today. I think fall is finally here. Yeah!! That is my FAVORITE season!! I love the weather, the changing of the leaves, the smell, fresh apple cider, Halloween...you name it, if it has anything to do with fall, I LOVE it.

I am posting another card I created for World Card Making Day 2014. It was another Winnie and Walter Challenge. This challenge was to create a card using the sketch as a guideline. Here is the card I created:


Can I say that this is my favorite card from Saturday? I used Paper Trey Ink "Snowflake Medley" set and "Big Bang Bling" from Winnie and Walter for the stamping on this card.

This was the basic sketch that we had to follow:

Instead of circles, I inserted snowflakes. I also left out two of the tiny circle on the left side, using a sequin as the third. I cannot tell you how happy this card makes me.


I chose the blue colors and snowflakes because I am planning on sending this to one of my friends who does not celebrate Christmas but Hanukkah. I also think I am going to make some thank you cards with this design. However, I need to find a good stamp that says "thanks snow much." I have one but it isn't right for how I want to use it. Don't you think these would be cute for after the holiday?


The paper peeking out from the curve I stamped with the two stamp sets. I LOVE how it came out. I know, I have said that before but this REALLY is one of my favorites that I have created in a long, long time.


That is all for now. Thank you for stopping by!! Have a great night!!

Supplies:


Sunday, October 5, 2014

Winnie and Walter Challenge #2: Pinspiration Challenge with Vanessa, Color Challenge and some more Copic Practice

Happy Sunday!! Once again I am sharing some of the cards I created for World Card Making day yesterday. I rarely have chunks of time like I did yesterday and I created seven cards, which is a lot for me!!  I played along with the Winnie and Walter blog. It was so much fun!

I actually was disappointed yesterday that there were not more challenges at places. There were chances to win by commenting but not a ton of public places for challenges that I saw. I am probably just viewing the wrong places, though.

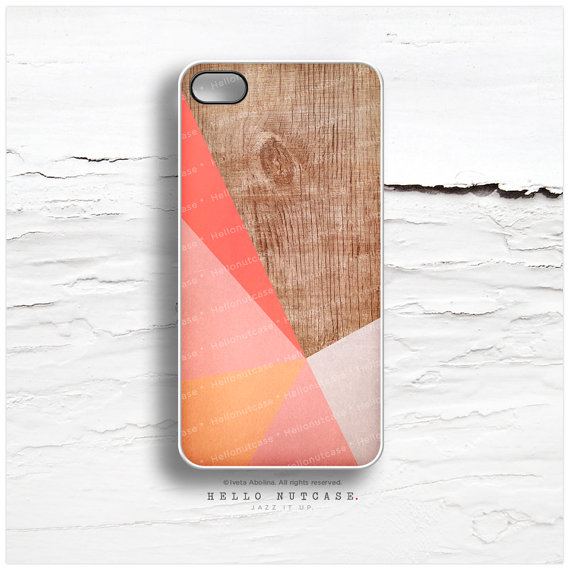
The first card I am sharing was a Pinspiration Challenge by Vanessa. She picked the image below and we had to create a card inspired by that image.


I will be honest, at first I thought this was going to be rough. Then I looked through my patterned paper and had an a ha moment. Below is what I came up with.


My inspiration for the whole card was the wood paper. I was inspired to use the wood paper by the image above. I also used pinks in a geometric pattern, which was also inspired by both the paper and the photo. This card was so fun to make!!

I started by die cutting and inking the kraft paper. I then die cut the wood patterned paper into a rounded rectangle and adhered it over the card base. Next, I die cut strips of paper and overlaid onto the wood.


Once I got that far, I was kind of stumped. I dug through a bunch of stamped images that I have lying around and had another a ha moment. I decided to use a vase of flowers over the wood paper as the focal point. The colors were perfect after I inked them up a little to tone the white of the paper down. 


I know that the inked look is not for everyone but I like how this card came out. 

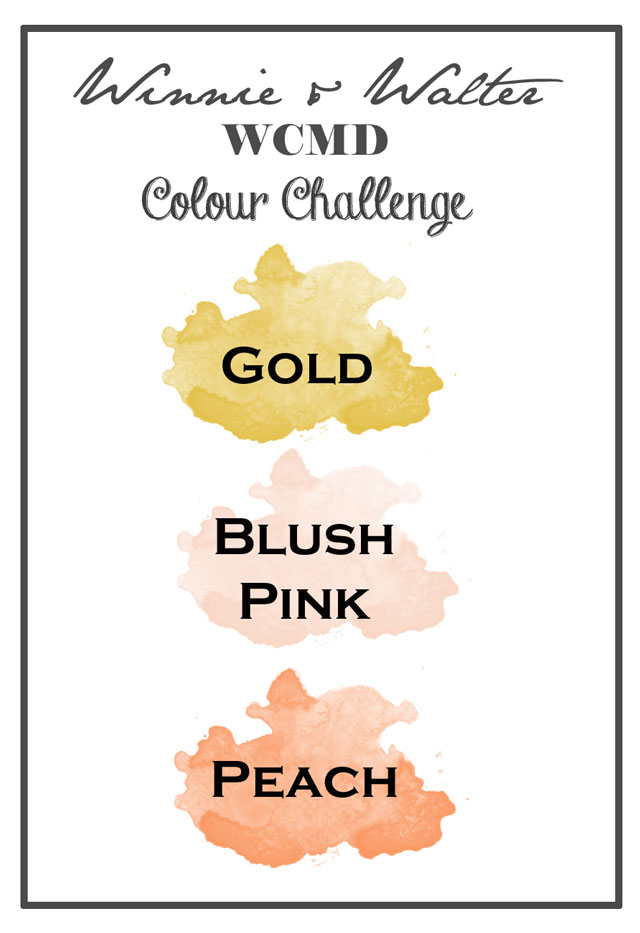
The third challenge was a color challenge. I thought it would be a cinch but I ran in to a few glitches. Well, it was really my fault. I looked at it quick and walked away for lunch. When I came back, I did not look at the colors but thought the challenge was to use blush, pink and gold. I had my first card almost done when I looked back and noticed it was not pink but PEACH. I was so mad at myself!! 


So I had to figure something out to save the card so I could enter the challenge. 


See the banner? That was a cover up of the pink. I actually tried to stamp over the original happy in versa mark and emboss in gold but it look HORRIBLE. I had to figure out something else. The banner was perfect. However, I had to tuck it under the die cut word, which was already glued down with glossy accents. That is why you see the little crease in the h. 

I knew I wanted this card to be clean and simple. I die cut the word happy six times out of blush card stock and glued five layers together. The snow flakes were die cut from the same color while the sentiment dried. I then stamped the word happy in PINK and adhered "holiday" to the card. When I found out it was supposed to be peach, I substituted the banner. Of course, I don't own peach so I used a melon ink instead. 


I then adhered all of the snowflakes down. Each of the snowflake centers was embellished with a peach rhinestone. 


The last step was to use gold Stickles on the bottom half of the die cut sentiment. I am going to actually put a little more on as the glitter area shrunk as it dried. 


It is different, I will give it that. 

I also made a second card as I had enough die cuts to make two. On the second one, though, I did not layer the sentiment die cut and stamped the word happy directly onto the card stock.


Instead of the gold being on the sentiment, I splattered gold mist onto the background. I then adhered all the die cuts.


I then added some clear Wink of Stella onto the die cut and dried it with a heat gun.


I have to admit that I do not like this card as well as the first but that is OK. It isn't horrible, just not my favorite. This color challenge wound up being way more difficult then I thought it would be!!

I am going to enter these cards into this months Virginia's View Challenge. The challenge is to make a clean and simple card.


For my last tidbit of the day, I will show you my the last two color sheets for my Copic marker class. Day 6 was all about coloring animals with different colors and textures. I actually had the most fun doing this homework.


My doggies are my favorite!! I like the fox but had a hard time with getting the right shades.

Day #7 of the class was the use of difficult colors. They are not lying about this!! I only colored one image on this practice sheet and it is HORRID.


I should not really get that down on myself as part of the reason it is so bad is that I did not have the right colored dark markers. I have about ten on my list that I want for Christmas, as well as about ten refills of my most used colors. Quite an expense!!!

That is all for now. I hope to post my mason jar I created for Paper Trey Ink's "Make it Monday" challenge later. I still have a bit to do on it, though. 

Thank you for stopping by.


Supplies:

Pinspiration Challenge Card:


Color Challenge Card: