Showing posts with label #birthdaycard. Show all posts

Sunday, February 26, 2017

Freshly Made Sketches #276 and a PaperTrey Ink Anniversary Card Posted Too Late

Hello everyone!! It is Sunday night and I am posting a couple of cards I created.

The sound of crickets were here on my blog last week as I was not feeling the creativity bug. Then on Thursday night I came down with hives and was a little sick to my stomach. Think I had an allergic reaction to something I ate-but still trying to figure it out!! Yesterday Charlotte and I went shopping with my niece who had come down on Friday. She took Char to a Panic at the Disco concert. Both had a BLAST.

I was able to play a little last night, though. My first card I created using Freshly Made Sketches #276 my inspiration.


My card is not as clean as the sketch but it has the elements.


I combined Simons Stays Stamp! images from "Time for Wine" with a sentiment from Paper Smooches "Free Spirit" stamp set. Las time I used this set, I made my wine purple, but today I played with it being a "white" wine. The color is not perfect but close to what I wanted!!


The background was created by watercoloring Ranger "Twisted Citron" and "Mowed Lawn" Distress ink onto watercolor paper and then pairing it with a little Kraft card stock.


Love how it all came together and know I could send this to several of my friends.


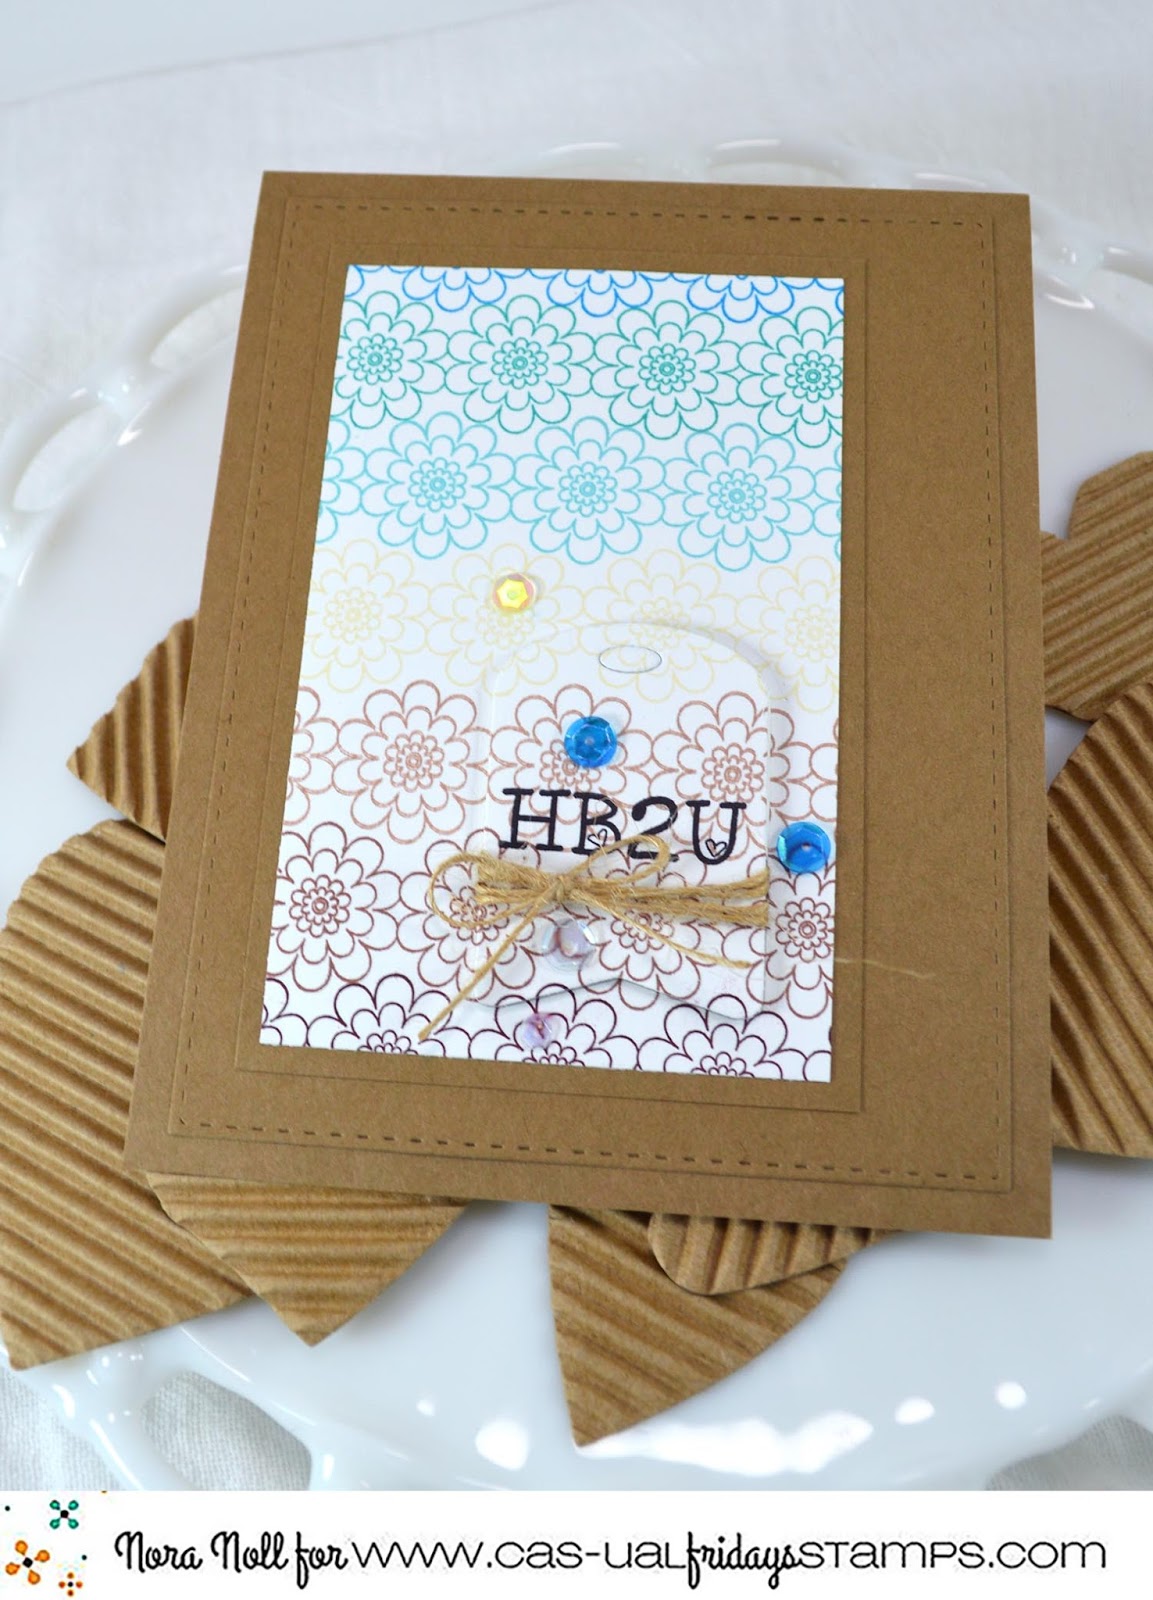
My next card I actually created last week for the PTI 10th Anniversary Challenge but never got around to photographing it. It was also EXTREMELY simple. I rarely enter PTI Challenges as I can never make my cards look as good as so many other contributors!!


I was inspired by the "2015 Birthday Tags" stamp set and my favorite DT member, Dawn McVey. While I do not have that set, I do have the "2012 Birthday Tags" (The Vault) set and used that instead.


I stamped the green and white patterned paper using "Ombre Builders" and used "Edgers #3" die to die cut the scalloped edge. I thought the colors were perfect for a more masculine card.

Of course I am a day late and a dollar short for entering this but that is okay. Any card made is a good thing!!

I am also entering this into Simon Says Stamp! Wednesday Challenge "Anything Goes."


I thank you for stopping by today. Have a great night!!

Nora


Supplies:
Stamps-Simon Says Stamp! "Time for Wine" and Paper Smooches "Free Spirits"
Dies-My Favorite Things "Blueprints 13," Simon Says Stamp! "Time For Wine"
Ink-Memento "Tuxedo Black," Ranger Distress Inks in "Twisted Citron" and "Mowed Lawn"
Paper-Neenah Solar White, PaperTrey Ink "Green Parakeet," Recollections "Kraft"


Supplies:
Stamps-PaperTrey Ink "Ombre Builders," "2012 Birthday Tags" (The Vault)
Dies-PaperTrey Ink "Edgers #3," "Limitless Layers 2 1/4" Ovals"
Paper-PaperTrey Ink "New Leaf," and "Classic Kraft Polka Dot," Recollections "Kraft," Neenah Solar White
Ink-PaperTrey Ink "New Leaf"

SaveSave
SaveSave

Saturday, February 4, 2017

CAS-ual Fridays Stamps Sneak Peek Day Four and Release Day!

Hello everyone!! Today the new release from CAS-ual Fridays Stamps goes live!!! However, I have one last sneak peek to share with you.

Today I am excited to showcase two new stamp sets-"Full on Floral" and "Daisy Chains"- from CAS-ual Fridays Stamps

On the first project, I used the new "Full on Floral" stamp to create the background on a card.


I started out by stamping in persimmon ink on a white, A2 card base. I then layered a piece of matching card stock over the stamping-using just a paper cutter to make it this wonky shape.


Next I stamped the sentiment in the same ink color from "Franklyisms" on the corner of a white piece of card stock. I used my paper cutter to make it a bit smaller then the persimmon card stock and adhered it over it so that the red/orange paper was peeking out from the bottom.


My last step was to adhere some matching sequins around the sentiment. 

Here is a peek at the stamp:


I LOVE this fun background and plan to make a set of cards to give to one of my friends for her birthday using some of the fun new sentiments from this release.

On my next card I used the new "Daisy Chain" stamp set. 


I started off my card stamping one of the borders onto a white piece of card stock in different colors of ink.


I made sure that when I changed each color, I moved the border over so that the bottom of the flowers tucked in to an empty space that was left from the one below it. I then stamped the sentiment from "Heartfelt Sayings" in black ink.


I used the smallest tag from "Tag Buddies" to cut out the sentiment. I layered the white base over some brown card stock. 


I wrapped the tag with some jute and used foam adhesive to make it pop off the white panel. 


The last step was to adhere some sequins in matching colors over the card. 

That is all from me today. All the new stamps that were showcased in my last four posts are available at CAS-ual Fridays Stamps Shop starting today!! Want a discount? Use my code nora2017 to get 15% off your total order!! 


Don't forget to hop on over the CAS-ual Fridays Stamps Blog. The other Girl Fridays have some fabulous projects!!

Thank you for stopping by. Have a fabulous day!!


Supplies:
Stamps-CAS-ual Fridays Stamps "Full On Floral" and "Franklyisms"
Paper-Neenah Solar White, MFT "Persimmon"
Ink-MFT "Persimmon"
Other-Sequins, MISTI, Ranger Multi Matte


Supplies:
Stamps-CAS-ual Fridays Stamps "Daisy Chains" and "Heartfelt Sayings"
Dies-CAS-ual Fridays Stamps "Tag Buddies"
Paper-Neenah Solar White and Recollections "Kraft"
Ink-(in order from top to bottom) Simon Says Stamps "Island Blue," Hero Arts "Ocean," My Favorite Things "Blue Raspberry," Hero Arts "Soft Vanilla," Lawn Fawn "Doe" and "Walnut," Memento "Cocoa," Ranger Archival Black
Other-Scrapbook Adhesives Foam Adhesive, May Arts Jute, Ranger Multi Matte and Sequins


Friday, February 3, 2017

CAS-ual Fridays Stamps Sneak Peek Day #3

Happy Friday!! So glad that it is almost the weekend!!

We are day number three for CAS-ual Fridays Stamps Sneak Peek. Tomorrow the new stamp sets will be available in the store.

Today I am showcasing the new CAS-ual Fridays "Franklyisms" and "Tag You're It" stamp sets.

For my first project, I used a sentiment from the "Tag You're It" set on a tag from the "Tag Buddies Fri-dies."


To start with, I used the middle tag from the "Tag Buddies" to die cut a tag out of white card stock. I then used gold pigment ink to stamp some flowers on the edge of the tag using stamps from yesterdays sneak peek. ("Flower Power" and "Peace Out")


Next I stamped the sentiment from "Tag You're It" in gold. I added gold embossing powder to the entire tag and used a heat gun to emboss the images.


My last step was to tie the tag onto a gold box that I bought from the craft store after Christmas. This was the easiest project but it looks like a million bucks!!

Here is a full sneak peek of the "Tag You're It" stamp set:


Aren't these so fun? I can see me making some really fun cards and tags with this set.

My second project I combined the "Franklyism" stamp set with the new "Full On Floral" stamp set that will be officially debuted tomorrow.


I started by stamping the "Full On Floral" in white pigment ink onto a piece of white card stock. I then heat embossed the image using white embossing powder. Next I blended distress ink in four colors over the florals, wiping the card stock with a dry paper towel at the end so the image would pop off the card.


I adhered this panel to a persimmon colored, A2, top folding card base. I added a strip of yellow card stock, as well as a strip of black to the left of stamped panel. I used a clear sparkle marker to add some shine to the black strip of card stock.


I stamped the sentiment from the "Franklyisms" stamp set onto a piece of vellum with white pigment ink and heat embossed it using white embossing powder. I added the square to the card front using some Washi tape.

Here is a sneak peek of the entire set:


I adore this set and will be using this to make birthday cards for my friends. We are of that age!!

All the new sets will be available tomorrow, February 4, 2017 at the CAS-uals Fridays Stamp Store. To get 15% off of your order, please use the code nora2017.


Don't forget to stop by the CAS-ual Fridays Stamps blog. You don't want to miss what the other Girl Friday's created!!

Once again, I appreciate your visit. Tomorrow there is one more day of sneak peeks. Please be sure to stop by!!


Supplies:
Stamps-CAS-ual Fridays Stamps "Tag You-re It," "Flower Power" and "Peace Out"
Paper-Neenah White card stock, Gable box from Hobby Lobby
Ink-Tsuinko Delicata Gold
Other-Ranger Gold Tinsel Embossing Powder and Wagner Heat tool

Supplies:
Stamps-CAS-ual Fridays Stamps "Franklyisms" and "Full Floral"
Ink-Hero Arts Unicorn "White" Pigment Ink, Ranger Distress Ink-"Candied Apple," "Squeezed Lemonade," "Carved Pumpkin," and "Ripe Persimmon"
Paper-MFT "Ripe Persimmon" card stock, Bazzill black,  Stampin Up! Banana, Neenah Solar White, PTI Vellum
Other-Washi Tape, Ranger Multimatte, Spectrum Clear Sparkle Marker, Ranger Ink Blending Tool, Ranger fine white embossing powder, Wagner Heat tool


Tuesday, January 31, 2017

Some Cards from the January ScrapJazz Card Kit Club

Hello everyone!! I hope you are all having a great day. We had an early dismissal due to snow and I could not have been happier. My new semester schedule is taking a little while to get used to so short days are acceptable right now.

Today I am sharing some cards I created using the kit Claudia sent us.


She sent us so much stuff that I could have made about 20 cards!! However, I only managed to find time to create five.


I used the flower as a mask to make the background and then layered the rose over the die cut bases that I inked with Distress ink in a couple colors.


Used a stamp from PTI to create the sentiment on this card. I die cut some of the paper Claudia sent and used the fun fiber to give the card a bit of oomph. I also used Stickles and some Glossy Accents on the present.


I used Distress Ink and Glossy Accents to jazz up the rose on this card. CASEd a design for this card from Pinterest.


I used the other side of the patterned paper from the card above. This time instead of the present, I added the die cut flowers, the scroll and a bit of ribbon from Claudia's kit.


This was the first card I created. I used a pre-made polka dot card for the base. I layered the orange paper strips, the border and the chipboard over it to make this easy card.

I like using supplies that others give us. Sometimes it is hard to figure how how to use them but eventually I get an idea.

I thank you for stopping by today. Have a fabulous night!!


Tuesday, January 10, 2017

Party Tuesday!!

Okay, there is not really a party today BUT I do get some alone time tonight and that is always a reason for me to be happy!!

Today I am showcasing a card I created for my brother's birthday on Thursday. I have to admit that I almost forgot to make one but I am trying so hard not to forget my IMMEDIATE family's birthdays this year. (Forget anyone else. I am HORRIBLE at sending out cards!!)

I apologize for the bad editing of this photo but I had a hard time getting the "true" color of this card.


Two challenges were my inspiration for this card. First was Reverse Confetti's Sketch #44. I cannot enter the challenge, though as I do not have any of their products on this. However, I loved the sketch so I went with it anyway!!

 I also am playing along with "Less Is More" for their "Ombre" Challenge.


Anyway, I started my card off by stamping the balloon from my NEW PaperTrey Ink "Scene It: Celebration" stamp set with My Favorite Things "Blue Raspberry" ink on a white panel that was a scrap on my desk. I then stamped it again with Hero Arts "Soft Pool," which I thought was the next lightest color BUT was really not! The last color I stamped the balloon with is My Favorite Things "Sno Cone" ink. 


Frankly I like the way the colors came out so I did not re-stamp any of it but will know for next time.
I then drew pencil lines for the strings and then went over them with a black Pigma pen. I mounted the panel on a piece of black card stock to make the images POP a bit.


I set this aside while I adhered a patterned paper strip and a thin piece of glitter paper to the front of an  A2 sized, turquoise card. Next I adhered the stamped panel over the card front. I angled the PaperTrey Ink "party" die cut over the right bottom edge and adhered it down using Ranger Multi-Matte adhesive.


The last step was to adhere sequins randomly over the front.

Not sure that turquoise is a boy color but it definitely is less girly then many of the cards I make. I am just happy that I am remembering to send a card out!!

I thank you for stopping by today. I hope you have a great day!1


Supplies:
Stamps-PaperTrey Ink "Scene It: Celebration"
Dies-PaperTrey Ink "Party" dies
Ink-My Favorite Things "Blue Raspberry," Hero Arts "Soft Pool" and My Favorite Things "Sno Cone"
Paper-Turquoise A2 Card, Imaginisce Paper, Stampin Up! "Whisper White" Card stock, Bazzill Black, Die Cuts With a View "Glitter" pad
Other-Big Shot, Sequins, Ranger Multi-Matte, Pigma Pen

Sunday, November 6, 2016

Happy Sunday!!

It is Sunday here and I have spent most of the day in my craft room. I actually got around to photographing some cards I created last weekend. Photo editing is NOT my favorite thing!!!

I have OFFICIALLY put myself on a no buy challenge as I have been spending way too much money again on things I do not really need. I have so much that I have never even touched that it is ridiculous that I buy more. Anyone else like this?

I have been doing Kathy's 30 Day Coloring Challenge at The Daily Marker but have yet to upload any of my stuff. I am slowly going through my stamp sets that I haven't used to make sure they see some ink.

 Here are two birthday cards that I made last weekend. One was using My Favorite Things Soda Pop dies, the Bottle Cap dies and matching stamps. I made a TON of smooshed bottles in different colors so you will be seeing more cards from this collection in the future!!


The sentiment strip on the bottom was done by masking and then ink blending. I really love the way it came out!!


I am planning on making a set of these cards to give to someone as I think they are too fun.

My second card I made to send to my friend for her birthday. It is the same design as the card here but I did it in different colors.


I like the original card a lot better as the colors are more me. I created this card to go with a bunch of cards I made for my friend in this color scheme though.


I used Ranger Distress Specialty Paper for the white background. While it took the distress ink nicely, it did not do well with the Distress Sprays. I will not be using it again if I am going to use the sprays on my card.

On another note, I think age is frying my brain lately. We missed my niece's birthday party last night because I put it in my calendar for NEXT weekend. I was sick so we didn't go when I realized my mistake but I feel really bad. I am such a DORK!!

I thank you for stopping by my blog today. Have a great night!!


SaveSave