Showing posts with label Cards. Show all posts

Saturday, June 4, 2022

A New Release for Kat Scrappiness!!!!

 ***Some affiliate links are used in this post at no extra cost to you.

Hello Friends!!!

It is a busy week this week. Exams start for the students and I am so happy for the school year to be OVER!!! It has been one of the toughest that I ever have remembered and I don't think it will be getting any better.

Today I am popping with a couple cards I created for a NEW RELEASE over at the Kat Scrappiness Shop. It is a stamp, die and paper set to raise money for Ukraine. It is called #UkraineStrong. 

All profits from this set until July 1, 2022 (or while supplies last) will be donated to the Ukraine Crisis Relief Fund. With all that has been going on in our own country, there is still a need for relief to the Ukrainian people. 

I created a couple of cards for this release that were on the Kat Scrappiness Blog yesterday. 


I used the new paper and stamps, along with the Kat Scrappiness Heart Donut Builder Dies and Midnight Sky Pearls to create my card. 


I wanted to show case how pretty the papers are on this card and could be used for a ton of other kinds of cards. I already know that I will be using it for some masculine birthday cards in the future.

My second card I used the paper and stamps again but with the Kat Scrappiness Stitched Scallop Nesting Tags Dies and White Diamond Sequin Mix.

I stamped the sentiment and the sunflower in blue using the stamp set, and made the polka dots on the back of my card using the center of the sunflower. 

The tag was cut from the #UkraineStrong paper pad. This card is actually my favorite from the three I created for this release!!!

I have a BONUS CARD over on Instagram today using these products too. There is a hop going on with a  with a random prize being given. Hop on over to Instagram and click on the badge. All the details for the hop are in the post!!! 

I want to thank you for taking the time to stop by. I hope that you will support this cause. Have a FABULOUS day!!


Saturday, October 23, 2021

Just Us Girls Challenge Guest Design Week 4-Photo Week #607

Some Affliate Links are used in this post. Please see my Affiliate Link Policy.

 Hello everyone!! I hope you all had a FABULOUS week. 

I have been so busy trying to get my head above water this week with cleaning, designing and adding a work out into my day. I wish my body didn't need a work out because it is time that I could use doing things I LIKE TO DO!!!

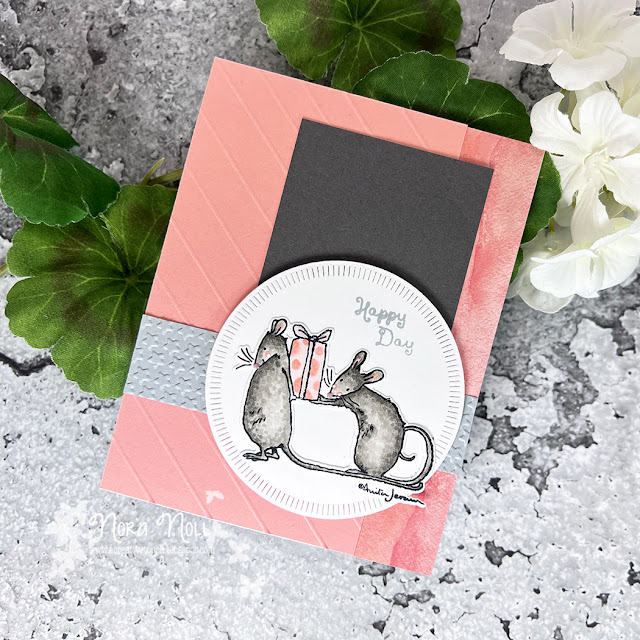
Today I am here with another card as a Guest Designer for the Just Us Girls Challenge Blog. This weeks Challenge #607 was to use a photo as the inspiration. Below is what I created.

The challenge badge inspired me for a few elements on my cards. First, I was inspired by the colors. Then, I was inspired by the stars and my last piece of inspiration was to use at least one animal on my card.

I pulled out the "Birthday Wishing" stamps and dies from the Colorado Craft Company to create with. I had bought these ages ago and never used them. I thought by coloring the mice a warm gray with Copics would help me get in one of the colors I wanted to use.


I loved how these mice came out!!! I layered them over a circle from The Greetery that I die cut out of Neenah Solar White cardstock. I used some Glossy Accents over the present and a teeny bit of Nuvo Bubblegum Blush Gloss for their noses.


The stars were embossed using a Paper Studio "Tiny Stars" embossing folder onto a piece of Concord & 9th piece of cardstock. 


The pattern paper on the right is from Lawn Fawn's "Watercolor Wishes" 6" by 6" paper pad.

This card came out so much better than I had anticipated! I will be creating an exact replica of this card as I stamped two of these mice images and colored them in the same way. 

Please hop on over to the Just Us Girls Challenge Blog to play with us this week. I cannot wait to see what you create.

I want to thank you for taking the time to stop by today. Have a FABULOUS day!!


Thursday, March 11, 2021

Day 3 of the CAS=ual Fridays March 2021 Release

 Happy Thursday!! I cannot believe the week is almost over but I am glad that it is!!

Today I am on the blog with Day 3 of the CAS-ual Fridays Stamps March 2021 release. I created a card using the new Love Notes stamp set and Heart Notes die bundle. 

I started off this card by stamping a white, A2, top folding card with the music from the Love Notes stamp set. I then used foam adhesive to adhere a piece of pattered cardstock over the top.

Next I die cut three music notes from cardstock using the Heart Notes bundle. I tried to use paper that matched the stripes from the background. I adhered these music notes so that they were overlapping each other. 

I stamped the sentiment from the Love Notes set in green and then fussy cut it out. I adhered the sentiment to the card front using foam adhesive. My last step was to randomly adhere some jewels around the notes and I was done. 

This new stamp and die set, as well as all the other products, are available in the CAS-ual Fridays Stamp Store under the NEW section right now!!! Use my code NORASENTME to get 15% off your total order!!!

Be sure to comment to be entered into a random drawing of all the commenters on the designers blogs to win a prize. Hop on over to the CAS-Fridays Blog to link up to the fabulous creations created by the Design Team!!

That is all from me today. Be sure to pop back in tomorrow with the last sneak peek project from the new release!!! Have a FABULOUS day!!


Monday, September 28, 2020

A CAS-ual Fridays Release Day 1-Slimline Pinked Fri-dies

Hello everyone!! 

Today I am sharing some cards I created with the NEW CAS-ual Fridays Slimline Pinked Fri-dies! I am so excited because this set was a collaboration between me and Michele, the owner of CAS-ual Fridays. This set has a TON of different dies to it and is so versatile. Below are just three cards I created with it but I know I will be using this set for a lot of new cards in my future!!

The first card I created, I used both of the banner dies to create a really simple card.


This card literally took me minutes to make!! I found scraps of pattern paper in a rainbow of colors and used the banner die in the set to cut them out. 


The banner was not quite bit enough to give me the length I wanted so I die cut a second banner out, adhered it to the top of the card and then cut the rest off. 

The black piece of cardstock is hiding the little space in between the two sets of banners!!! The sentiment is a sneak peek of one of the new sets that will be showcased tomorrow. Below is a peek at the Fri-die set.


My second card I created a slimline shaker card using the smallest scallop circle, the smallest stitched circle, the large stitched rectangle and the leaves from the Garden Fri-dies to create a trio of sunflowers. 


I die cut the large rectangle and used a cloud stencil for the background. 


Next I die cut circles out of the front using the small stitched circle and blended Walnut Stain ink over the top. I then used the Tin Roof Stencil with Espresso ink to create the sunflower center. 


I used the smallest scallop circle from the set to create the "flower" part of the sunflower. 


I adore how this card came out and have an idea for a slightly different sunflower card for a future post on the CAS-ual Fridays Blog

My last card is NOT my favorite and I almost did not post it. I ruined it by using Glossy Accents over the top of the sentiment so it changed a different color. The "way to go" banner is crooked too but is stuck down so securely that I could not fix it. This is what happens when you are running on no sleep and are up late making cards!!! That said, I have decided to use it because over all, I do like my original design.


For this card, I used the star dies over a background that I had blended two different types of blue inks. I tucked a banner die cut and a small scallop circle underneath the card front to give it a fun feel.


The die cut sentiment and stamped sentiment are a sneak peek of a future set that will be released later on in the week as well.


Now for the fun part...I am offering a giveaway from MY BLOG of the new Slimline Pinked Fri-dies!!! I will be picking the winner from the comments on this post. You have until Saturday, October 3, 2020 to comment and I will pick a winner on Sunday, October 4, 2020. 

This new die set, as well as all the other new products are available in the CAS-ual Fridays Stamp Store right this moment. Hop on over and click on the NEW section. 

You can use my code, NORASENTME to get an extra 15% off your total order!!! This includes the new release!!


That is all from me today. Be sure to stop by tomorrow for another fun peek at some new CAS-ual Fridays stamps!!! Thank you for taking the time to stop by!!!


Wednesday, June 21, 2017

MFT Camp Create -Divine Dry Embossing and Spectacular Shakers

Happy Wednesday!!

Today I am back again with some more for My Favorite Thing's "Camp Create."

I have been attempting to do these challenges-some are more successful then others. I created a galaxy background for the first challenge-was going to throw it out and then my daughter told me she liked it. Have yet to figure out how to make a card out of it, though.

I did create a card for Day 3's "Spectacular Shaker" challenge.


I am going to be honest-I HATE making shaker cards. No matter what I do, I never like it. I used the technique from the video with the foam and could not get it to line up properly. Couldn't line up the foam right in the middle and the sides fit with the card stock when I originally measured it but not when I put it together.


I used a retired MFT die "Rock and Roll" for the guitar and star die cut, as well as "Blue Prints #13" for the stitched rectangle. The sentiment is from a Simon Says Stamp" retired stamps set.

Supplies:
(affiliate links used when possible)
Paper-Neenah Solar White 110 lb white paper, Gray Bazzill, "Papaya" card stock, "Kraft" card stock, Hero Arts Acetate
Dies-My Favorite Things "Rock and Roll Die-namics" (retired), Blue Prints #13
Stamps-Simon Says Stamp!

I created a card for the "Camp Create" bonus round "Divine Dry Embossing."


This card I actually LIKE!!! I embossed the background with MFT's "Die-namics Hugs & Kisses" Cover Up die.


I then die cut it with MFT's "Blue Prints #13." I used a sheep from "Ewe are the Best" stamp set that I had colored in with Copic Markers.


The sentiment is from MFT's "LJD Celebrate With Cake" stamp set. I then added some die cut clouds with a sun peeking out.


I added a bit of Clear Spectrum Sparkle marker on some elements from the card as a finishing touch.

Well that is all from me today. I hope you have a FABULOUS day. Thank you for stopping by!!


Supplies:
(affiliate links used when possible)
Paper-Neenah Solar White 110 lb white card stock, Bo Bunny Press (pink), My Minds Eye "Pale Aqua" card stock
Stamps-My Favorite Things "Ewe are the Best," "LJD Celebrate With Cake"
Dies-My Favorite Things "Die-namics Hugs & Kisses," "Blue Prints #13," "Ewe are the Best," "Fishtail Flags," Taylored Expressions "Little Bit Suns and Clouds," Lil Inkers "Small Sunshine"
Other-Sizzix Big ShotMemento Tuxedo Black Ink, Ranger Multi Matte, Adhesive Foam, Clear Spectrum Sparkle Marker, Scotch Adhesive, Copic Markers

Thursday, January 31, 2013

Scrapjazz January Card Challenge

I post challenges every month over at Scrapjazz.com. One of the challenges I posted this month was to create a card by drawing an image free hand or tracing one and using it as a focal point. I used to do this before I started stamping and I forgot how much I enjoyed it.

Here is the card I created for this challenge. I "doodled" the mums on this image free hand, as I did the "vase" (not my best work but ok.) I then colored in with Prismacolor pencils. I need to get more mineral oil to blend my images more but this will do for the challenge.


I had so much fun drawing this card that I bought a sketch book to doodle in. I haven't done anything like this in years and I forgot how much I enjoyed it.

Thank you so much for stopping by. Have a great Friday!!

Nora

Friday, January 25, 2013

Winter Layouts and Cards from a Sketch

I write articles for Scrapjazz.com occasionally and this month I created a sketch. I cannot post the sketch but I wanted to post what I created using it as a guide.

The first page I created was of my daughter in the snow.  I pretty much used the sketch as is. I inked the heck out of my embellishments and used some of my plethora of punches for the snowflakes. I also used glitter glue to make the snowflakes shine. We haven't had snow like this in two years and I hope I don't see that type of winter ever again!!


Don't these photos look so peaceful? This is part of the complex where my father and step mother bought their condo. I flipped the sketch to the right to create this page. The brown spatters are on purpose. I used a mist spray to get the look I wanted. I am looking forward for a return to that weather!!


The next two projects I created were cards. One was a birthday card for my niece, Sydney and the second a holiday card. Syd is a little fashionista and the circle embellishment was perfect for a card!! I used a lace stamp from "Cutie Pie" from My Mind's Eye. This is one of my all time favorite sets. I cannot tell you how much I have used it. It works for layouts and any card theme you can think of.


I created a ribbon poinsettia for my second card-not a technique I would try again!! I think it came out all right but unless I was sitting down and making them like an assembly line, this flower was too labor intensive. Perhaps it was the satin ribbon but it took too long for me to make it to want to give this card away.


Thank you for looking. I hope you come over to Scrapjazz and browse the many articles they have over there. If you do, introduce yourself on the message board. We would love to have you!!

Nora

Tuesday, January 22, 2013

A Couple Scrapbook Pages

I am back!! Wow!! This must be a record for me in the amount of posts I have written in one month!!

Today I am sharing a couple scrapbook pages I created. Last February we drove to Florida (crazy!) during February vacation to see my father. On this visit, we went to Kilwin's Ice Cream in Stuart, FL at LEAST three times. The ice cream was the BEST I have ever tasted in my life. As you can see, Charlotte enjoyed it too!!


I had fun creating the photo frames on this page. I die cut them with my Silhouette machine and then stamped them with "Cutie Pie" stamps from My Mind's Eye. I love how it came out!!

The second page I created is about the animal park we visited on the same trip. We didn't have high hopes for it but it wound up being pretty fun. The lions were behind a fenced in area, of course, but they had trees by the fences so they were up close and personal. I don't think I have ever been as close to this type of animal before. Most zoos I have been to the trees are in the distance and the big cats tend to be far away. It was a treat to have them this close to the public. A ton of other animals we were close enough to touch, though we followed the rules and kept the windows up. I need to find the time to scrap those photos though. There were a ton!!


I had fun using Washi tape on this page and another stamp from the "Cutie Pie" stamp set. I think my favorite part is the title. I like the effect of the different letters.

The last think I am posting is a card I created using My Mind's Eye papers and a phone die cut from Ellison. (The tag and circle die cuts are from Paper Trey Ink.) I really wish I had one of these "vintage"phones. I guess I shouldn't say that they are vintage because we had one of these when we were growing up. Does that make me old?


That is all for today!! Thanks for stopping by!!

Nora

Sunday, January 20, 2013

Paper Trey Ink's Make It Monday 100th Video!!

Have you ever checked out Paper Trey Ink's Make It Monday Videos? Every Monday they feature a new technique that you can use on cards or other types of paper crafts. This week, one my FAVORITE  card designers, Dawn McVey, created a video on how she packages cards that have embellishments that go off the card. (Video 100) It was really interesting. She often sends these type of cards out in larger envelopes, just like I have always done!! With the video, there is also a weekly challenge. I decided to play and here is my card and the envelope I came up with:


Supplies: Everything is Paper Trey Ink with the exception of the black cardstock (Bazzill), the alphabet Stickers (Doodlebug Design Candy Shoppe) and the patterned paper (Crate Paper "Cupid"), Copic Markers

Here is the just the card:


This is the front and the back of the envelope. I like the back better then the front. I am always afraid to embellish the front too much if I am going to send the card through the mail.


I hand stamped paper strip with "Tag It's #11" from Paper Trey ink in black, Berry Sorbet and Kraft ink. I will be doing this technique more often! I will let you in on a little secret, though. The stamping isn't straight! Normally I would throw it away but because I wanted to get this done for tomorrow, I just went with it. SHHH SHHH!! Don't tell anyone!!


I used the Copic Markers below to color in the circle element on the tag. Cannot say these are my favorite colors but it came out OK.


I am posting the photo of the envelope box too so that you know what size envelopes to buy if you need them. I only had white on hand but usually have both white and cream. 


One suggestion that Dawn gave in the video is if you are sending a dimensional card like mine, if you place a piece cardstock over the front, it will protect the embellishment. I usually put the front of my cards facing toward the back and tape the back with packing tape so the card back will go through the machine. However, I am going to use the cardstock trick next time.

Nora