Showing posts with label Copic Markers. Show all posts

Saturday, March 6, 2021

A Few Challenge Cards

 Hi everyone!! Long time no see!!

Just popping in with a couple of cards for some challenges. I have been creating but not blogging cards lately. I have been too busy still organizing and shopping for my new craft room. I just want it all to be done!!! 

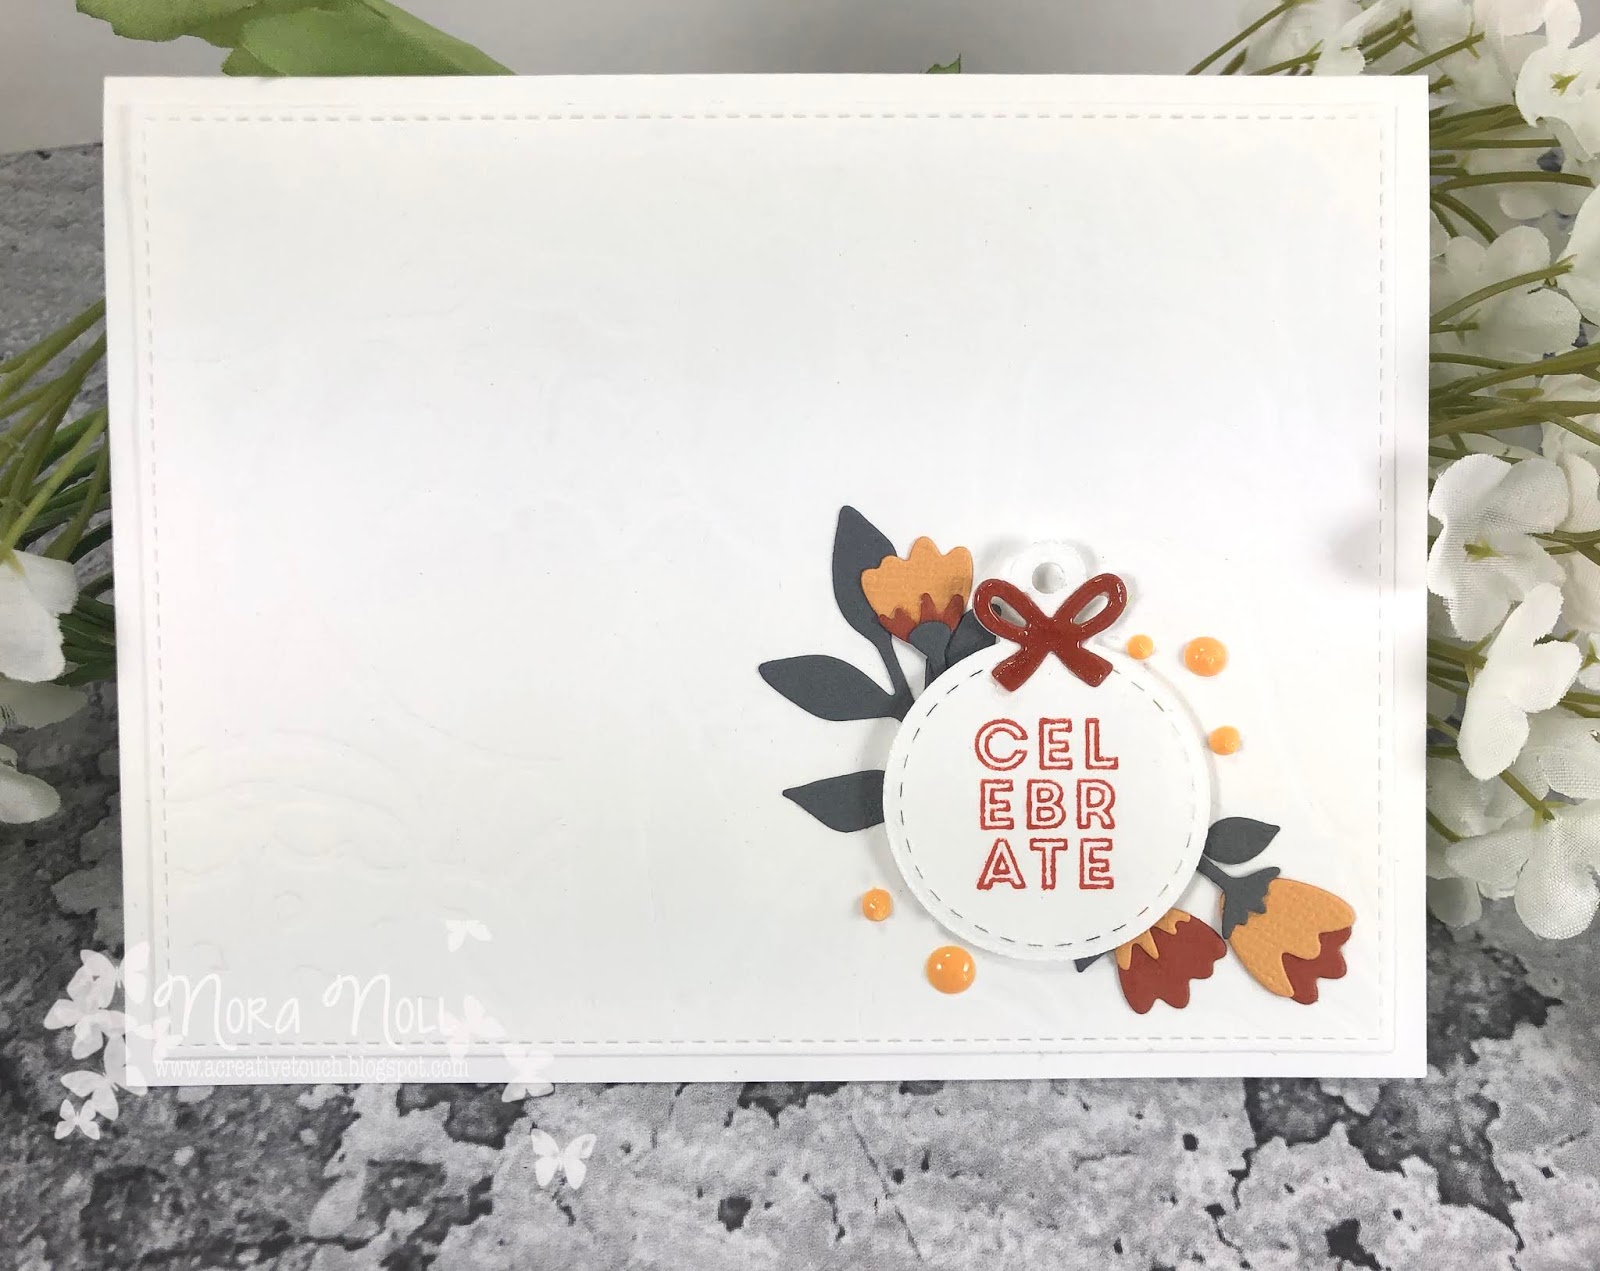
The first card I am entering into the Lawn Fawnatics Challenge #96. It is all about the BIRTHDAY!!!

I dug out my taco set-Lawn Fawn Year 9-and matching Year 9 Dies-to make this card. I did a bit of no line coloring for my taco with Copic Markers and layered it over a SSS Mix and Match Circles that I stamped in red, as well as a balloon, which I had in my stash. 

I added some pattern paper that I NEVER use but am obsessed with buying, in the back of everything. The layout design was inspired by The Paper Craft Crew Sketch #414. Again, I am entering this into the Lawn Fawnatics Birthday Challenge #96 as well. 

I loved this card so much, I created a second version. 


I added splatters from the sketch on this one, as well as made the sentiment a continuous strip.

I love how these came out!!! I can send to either a girl or a boy!

I am going to enter the second card into the Watercooler Wednesday Card Challenge #310: All About Occasions. 


My second card I created using my Altenew Paint-A-Flower: Tulip

I have a monthly subscription to get the Paint-A-Flower sets but barely use them. I decided when I was going through all my stamps that I was going to make some cards with them.


I used my Copic markers to color this in and then went over the flowers with a Clear Glitter Brush Pen. 


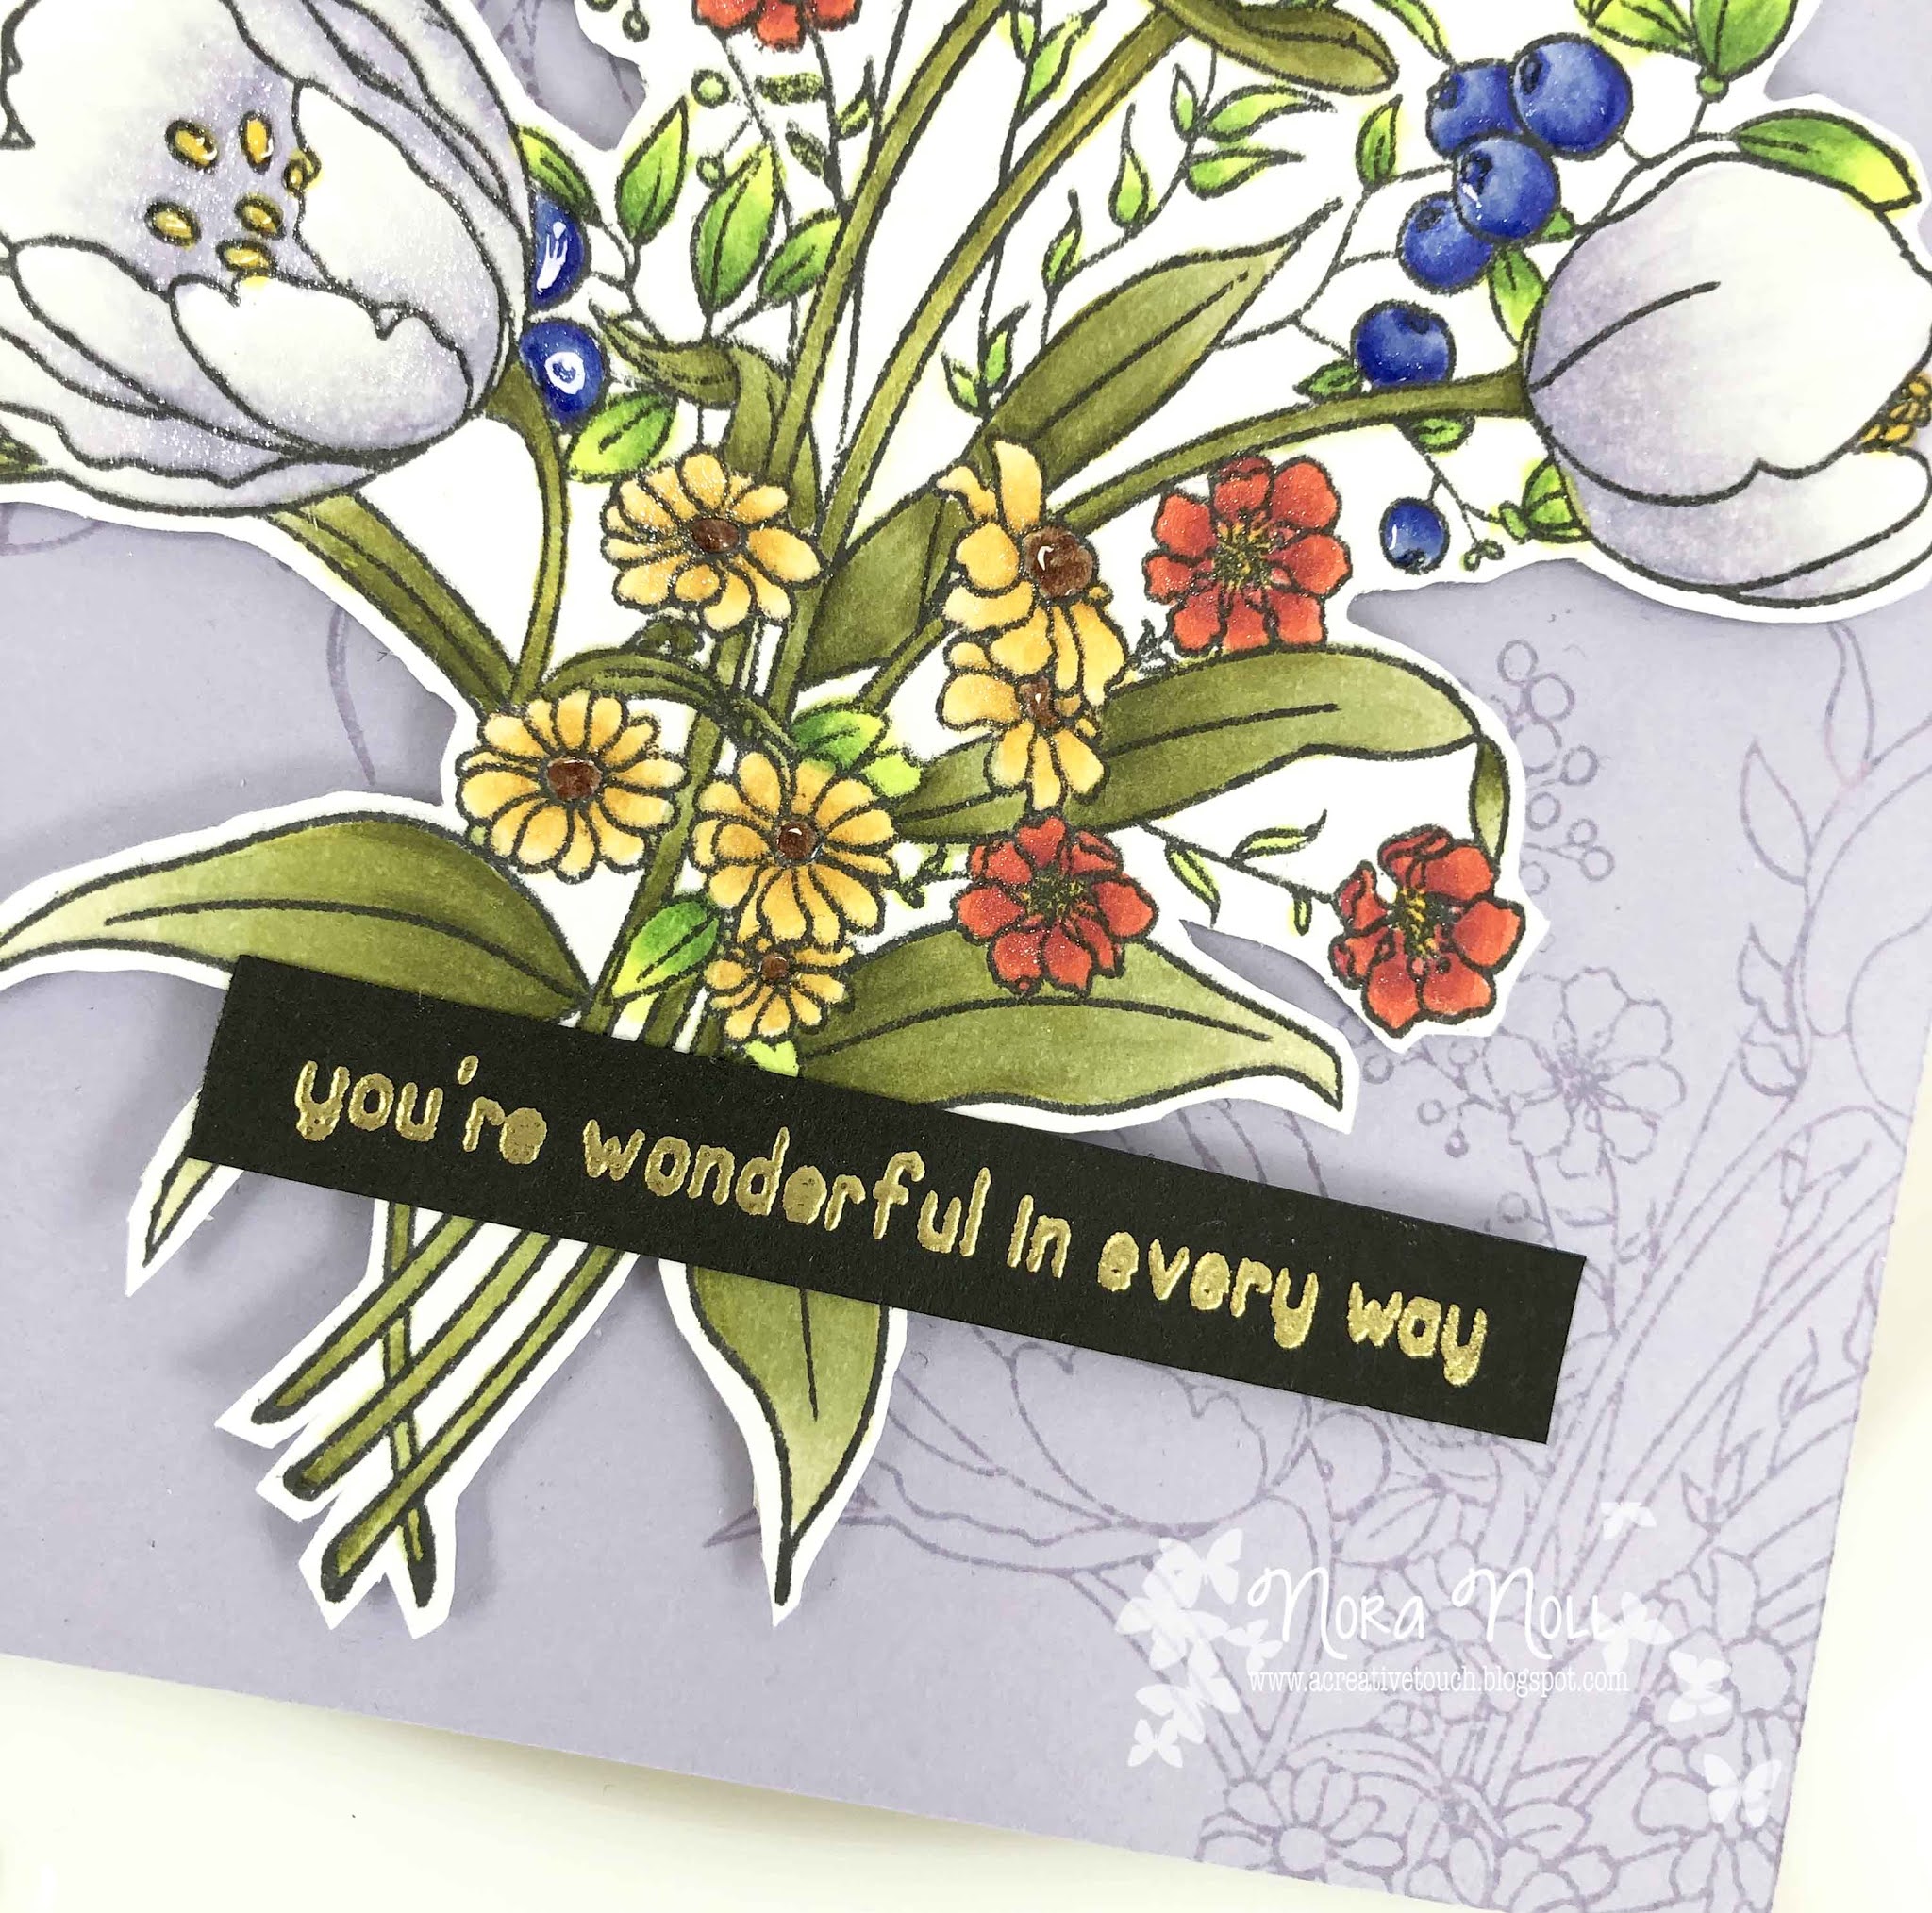
I used a sentiment strip from my stash but I have not idea who created it!!

I am going to enter this into this months's Flower Challenge #54: Shades of Purple. I might be pushing it here as I have other colors on this but think the purple is what stands out on this card. 

Well, that is all from me today. I wanted to get these posted before I forgot. I hope you have a FABULOUS day!!


Friday, January 1, 2021

Day 2 of CAS-ual Fridays Stamps-Introducing the Salty and Margarita Glass Die!

 Happy New Year!!! 

Today I am popping in with two cards created with the new Salty stamp set and Margarita Glass die from CAS-ual Fridays Stamps. This is my favorite set from the new release as I am VERY PARTIAL to margaritas!!!

For my first card, I created a very simple card using the Salty stamp set. 


I started this card by partially stamping the margarita glass from the Salty stamp set with Tuxedo Black Memento ink onto the left side of an A2 sized, white piece of cardstock. I then stamped the sentiment using the same black ink onto the bottom right. I used Copic Markers to color the margarita in. I added some accents to the glass using a white gel pen and Diamond Stickles into the salt crystals.

I then cut the panel down and adhered it to an A2 card front that had some scraps of pattern paper that matched the color of the margarita. 


This card was really simple but I LOVE how it came out. Below is a peek at the new stamp and die set.


For my next card, I did a bit of paper piecing.


I started off by using the new Chunky Chevron stencil (being introduced tomorrow) with some kraft ink onto a kraft A2 card front. I then stamped the black sentiment using the Salty stamp it onto the front of the card.


I set this aside and stamped the margarita glass from the Salty stamp set onto a scrap piece of watermelon colored pattern paper, some white cardstock and two pieces of green. I used the new Margarita Glass die to cut out the salt, the glass and the pink for the margarita.


I fussy cut the lime out of the two colors of green and then adhered all the pieces together and then adhered the glass to the card front. 


To complete this card, I added some Diamond Stickles on the salt crystals and some Nuvo Crystal Jewel Drops in lime green.

To see some more fabulous creations using these new products, be sure to hop on over to the CAS-ual Fridays Stamp Blog

These new sets, as well as the complete release are available now in the NEW section of the CAS-ual Fridays Stamp store. 


Be sure to use my code NORASENTME to get 15% off your total order!!

I will be back tomorrow with some projects using the new stencils that are being released!!!

I thank you for taking the time to stop by. Have a FABULOUS day!!!


Wednesday, October 7, 2020

A CAS-ual Fridays Spooky Halloween Card

 Happy hump day everyone!! Today I am over on the CAS-ual Fridays Blog with a Halloween card created from the new Spooky stamp set. Below is a sneak peek of the card I created:

I used a dot technique to make the sentiment POP off the background. Hop on over to the blog post to see how I created this card!!!


Tuesday, May 26, 2020

Hello Hello Hello!!

Hi everyone!! How is everyone holding up?

I keep thinking today is MONDAY but it is Tuesday and I am still mostly staying home. Things are opening up here BUT I am not one to hurry back out to "normal." Headed out today after work to Home Depot to buy a trellis and do some other errands with Charlotte and with the exception of Home Depot, it was actually nice because stores were EMPTY. However, I was still a bit stressed and will not be going out again anytime soon.

Soooo, I have been creating like crazy but not posting. Do people even read blogs anymore? I need to post on IG on a more regular basis but I hate typing things with my phone. My fingers are too big. I just wish I could upload to IG via my computer.

Any how, I have been taking the Spring Online Card Camp 2 and have had SO MUCH FUN. I have not made everything I created into cards as of yet, but the techniques I have learned and the ones I have used before have been so freeing.

My first two cards are from Day 12 and it is to use basic shapes in geometric patterns. I used circles on both of my cards.


All the paper besides the card base was from my scrap drawer. Simple design but I really like how it came out. However, the card below is my favorite one I created using this technique.


I used a printed background sheet behind my circles!! I think it looks so funky!!!!!  I also added a pattern paper circle for the middle of these circles and I liked that look too.

Below is a card for Day 3 of camp. I am so made because I should have used a colored cardstock because the embossing on the dry embossing on the white cardstock is hard to see.


I added some flowers from WPlus9 and the sentiment and tag are from Mama Elephant. All of these products I have had in my stash but have not used.


Another card I created this weekend was for last weeks Freshly Mades Sketches but never uploaded. I have been doing a lot of that lately.


Now I liked how this turned out EXCEPT for those stupid black tiger stripes in the back. I was trying to make a night sky and I used too dark of a gray and couldn't blend it out.


I also made the mistake of coloring in the girls first, which I would NOT do again. I would have done the sky. Since it took me so long to color, I decided terrible sky or not, I was making into a card!! This stamp was a NBUS so I am going to upload this into the NBUS Challenge.


Below is the sketch that inspired this. I flipped it so that the sentiment was in the upper left, rather than the bottom right.


Well, that is all from me today. Thanks for taking the time to stop by!!


Wednesday, February 19, 2020

It is all about the Birthday

Happy Wednesday everyone!! I hope you are all doing well.

Popping in with some birthday cards that I created. My first one is a color combination I have not really used before. I wanted to make a birthday cake with chocolate frosting-which is MY FAVORITE. My husband makes the best home made chocolate cake and chocolate frosting combination. I ask for it for all my birthdays!!

I used Reverse Confetti's Cake and Champagne Stamp and Die set for the cake and champagne, and Lawn Fawn's Coles Alphabet Die for my sentiment.


I decided that gold was the perfect color to accent the chocolate with so I created the sentiment using gold cardstock and made the cake stand gold.


I colored in everything using Copic markers and added some sparkle and shine on some of the elements with a Tonic Aqua Shimmer Pen.


This card was inspired by some challenges. Addicted to CAS #178: Codeword CAKE and Less is More #413: More.


My second card was inspired by Seize the Birthday's Challenge #183: Show Me Some White Space.


My jumping off point for this card was the cake element which I had in my stash. The pink, purply blue and aqua were inspired by the colors from the logo.


I used scraps of pattern paper for my candles.


I used CAS-ual Fridays Fun-Fetti Fri-dies for the hearts that are the "flame" on the candles. I added some Stickles to the flames too.


The circle was popped up with foam adhesive.

I was so happy to make these cards as I have had no creative inkling to do anything at all lately.

On another note, this past weekend I celebrated my birthday with my daughter and my husband in Washington DC.  My daughter goes to college down there and I wanted to see her. We went to downtown Alexandria on Saturday and walked around. The day was so beautiful!! We went into an old torpedo factory that has been renovated for artist studios. They displayed their wares for sale and I was able to talk to a few of them about their art and it was so interesting. I love to hear how people are inspired by things.


Well, that is all form me tonight. I thank you for taking the time to stop by. Have a fabulous night!!


Monday, May 13, 2019

Cards for some Challenges

Hello everyone!! Just popping in to post two cards for some challenges.

The first card I created for CASE this Sketch #321.


I was a bit liberal with my interpretation, using the Pretty Pink Posh photo strip die as my border that did not take up the whole bottom. I tried to make up for it by adding the sentiments outside of the "line."

Here was the inspiration:


The bears I had all colored in my stash. I created the tiny backgrounds behind the bears with Distress Ink.


I added some clear sparkle marker and Glossy Accents over the balloon and the stripe and top of the hat. I added some white polka dots on the little present with a gel pen.

My second card was inspired by this weeks Fab Friday Sketch #163.


I want to apologize for the lighting in my photos. It has been SOOO rainy here and I didn't have the best light when photographing my cards!!


I used an XCut martini die as the centerpiece of my card. I love this fun die and cut some extra to make a few more later.


I layered three martini glasses together, with a piece of acetate in between one layer and the little pick with the lemon ribbon through the third. I then used some Glossy Accents for the "alcohol" in the glass.


I added a lime wedge that I used some clear sparkle pen and Glossy Accents over. The die cut sentiment is from MFT and the stamped strip is a sentiment from Simon Says Stamp.

Well, that is all from me today. I thank you for taking the time to stop by!!! Have a fabulous night!!