Showing posts with label Friend Card. Show all posts

Saturday, April 2, 2022

Kat Scrappiness Spring Fling Paper Pack Release

Hey friends!! Just popping in with a post showcasing the new Kat Scrappiness Spring Fling 6" by 8" paper pack. The colors and patterns are fresh and fun. 

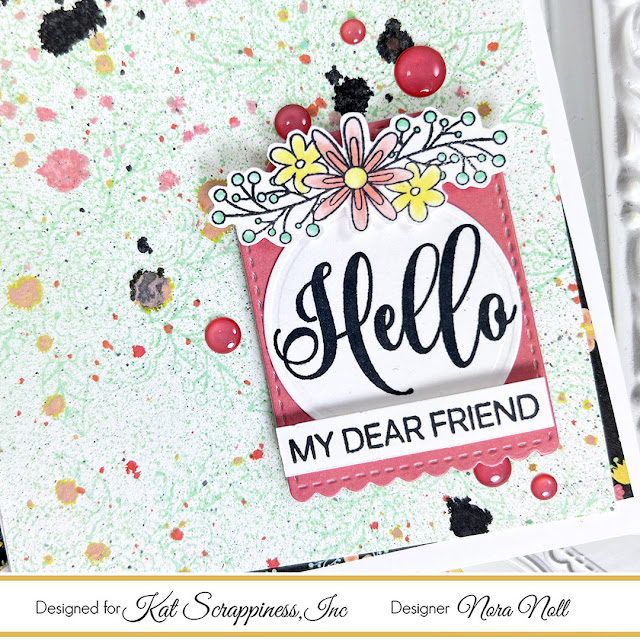
I created a card for this release using the new paper and the Friendship Greetings stamp set.

I started off my card by stamping the large flower from the Friendship Greetings set in green across my card front. I then sprinkled different colored inks over the top that matched the colors in new Spring Fling pattern paper that I used behind it.


I used the new paper and the smallest tag in the Stitched Scalloped Nesting Tag Dies for my tag. The flower and sentiments are also from the Friendship Greetings Stamp set. 


I colored in the blooms with Copic Markers and die cut the "hello"sentiment (from the same set) using the Embossed Edged Circle Dies.

I finished off my card with some Kat Scrappiness Shades of Coral Enamel Dots.

Well that is all from me today. Be sure to hop on over to the Kat Scrappiness Blog to see the creations the other members of the Design Team created!!

I want to thank you for taking the time to stop by. Have a FABULOUS night!!


Tuesday, March 22, 2022

My Turn on the Kat Scrappiness Blog

Hello everyone!! Just popping in with a card that I created for the Kat Scrappiness Blog

To see how I created this card and more photos, please use THIS LINK to see my post.

Thanks for taking the time to stop by. Have a FABULOUS day!!


Wednesday, March 27, 2019

Day 4 of the March CAS-ual Fridays Stamps Release

Hello everyone!! I hope you are all having as much fun as I am seeing all the fun, new products from the CAS-ual Fridays Stamps March release.

Today I am showcasing new Trellis Cover Fri-die with a shaker card. I also used the die set introduced yesterday, Sweet Friend and the stamp set Pretty Posies to complete the sentiment.


I have to admit that I am the WORST at making shaker cards but was determined to make this work. I am not going to go through the directions for how I created this because I know there are plenty of people out there that are better at it than me.


I will say that I added a frame around the edges to cover up a bit of a mess I made when adhering the shaker to the white, A2 card front.


The "friend" was die cut from shiny, rose gold cardstock using the Sweet Friend Fri-die. The "thinking of you" was embossed using a rose gold glitter embossing powder. I assure you it does match but had a hard time photographing this card so you could see that.


With all the trouble I had making this card, I LOVE the way it turned out.

This Trellis Cover Fri-die is now available in the CAS-ual Fridays Stamp Store in the NEW section. Use my code NORASENTME to get an extra 15% off your total order.


That is all from me today. Be sure to hop on over to the CAS-ual Fridays Stamps Blog to see some more incredible creations using this new die and to enter into a giveaway.

I hope you all have a FABULOUS day!!!


Saturday, August 20, 2016

CAS-ual Fridays Stamps "Mon Ami" Stamp Set with Prima Oil Pastels

Hi everyone!! Today it is my turn for a little CAS-ual Fridays Stamps Inspiration on their blog today. I chose to use the "Mon Ami" stamp and die set to make a pretty card.


I started off by heat embossing the flowers from "Mon Ami"stamp set in white on watercolor paper and then die cutting the flowers out with their matching die. I "colored" on the flowers using two different purple pastel oils from Prima. I used a watercolor brush and water to blend them together.


While the flowers were drying, I cut a piece of patterned paper into a 4" by 5 1/4" panel and used my score board to score some lines at random intervals. I adhered the scored paper onto a "Soft Stone" A2, top folding card.


I die cut a tag using the CAS-ual Fridays Stamps "Tag Buddies Fri-Dies" to die cut a tag out of gray scrap paper. I adhered it onto the card front using foam adhesive. I originally was going to tie a silver bow at the top of the tag but decided to make a thread nest instead. I adhered the dried flowers over the nest with foam adhesive and added some Silver Stickles for the flower centers.


I then used foam adhesive to mount a sentiment strip that I had stamped with the same set. The last step was to add a few sequins around the tag.

I hope you enjoyed this card today. It was the first time I had used this stamp set and the oil pastels. I will be using both again soon as I love how this came out!!

If you would like to shop for this stamp set, use the code NORA16 to get 15% off your next shopping spree at CAS-ual Fridays Stamps.


I thank you for taking the time to stop by today. I hope you have a FABULOUS Weekend!!


Friday, May 27, 2016

CAS-ual Friday's Friend Card

Happy Friday everyone!! It is my turn on the CAS-ual Fridays Stamps Blog.

I created a card using mixture of old and new products for my card.


I started this card off by stamping the small flower from the "Pretty Posies" set in Hero Arts "Soft Pool" ink onto a white card base. I then misted Prima "Tea Stain" and "Gold Foil" onto the front of the card.


While the mist was drying, I die cut the word friend using CAS-ual Fridays"Friend" die out of gold glitter paper.


I set the word aside and stamped a sentiment onto vellum using the "Wallflower" set with "Golden Glitz" Delicata pigment ink and then heat embossed it using Ranger's Gold embossing powder.


I then dug through my stash of ready made embellishments and pulled out a tag from We R Memory Keepers and a flower from "Pretty Posies" that was a leftover from a different project.


With all my elements gathered, I was ready to assemble my card.


I took the white card base and adhered it to an A2 card base. I then adhered the tag over the embellished panel.


Next I adhered the vellum panel over the tag. I made sure to use the adhesive under the embossed letters as not to have any of it show through.


I then adhered the "friend" sentiment and used foam adhesive to give the colored flower some dimension. I thought the pool flowers needed a bit more so I glued sequins in the middle of them and then used some Nuvo Crystal Drops in "Caribbean Ocean" over some pieces of the flower.

This card was totally out of what I usually do and I had so much fun creating it. I rarely emboss vellum and using pre-made embellishments on cards is not easy for me. However, I really like how this came out.

I thank you for stopping by today. Have a fabulous weekend!!


Supplies:
Tag-We R Memory Keepers


Saturday, August 1, 2015

Long time with no post and a Paper Trey Ink CASE

Hello everyone!! I am sorry I did not have any spectacular posts for you last week. I have had time to sit at my desk to play but my mojo is just not there. Don't you hate that? I have two half done cards sitting on my desk that I just cannot seem to find the energy to complete.

Instead of coming up with new ideas from scratch, I did a little CASEing of the Paper Trey Ink girls with some of the stamps that I own but have never inked. I decided to make a card set so I sat down and stamped a bunch of images from Paper Trey Ink's "A Second Helping of Sunshine" set and "Quilted Summer" set. For the next few days I will be sharing what I made using these fun stamps.

Today I am sharing two cards I created using this card by Ashley Newell (the second card in post) as the CASE. I loved her use of white space and the fun way she used the stamp set "A Second Helping of Sunshine" on this card. In my CASE, I pretty much copied the card in its entirety, using supplies that I had rather then copying everything exactly.


First, I chose to keep Ashley's white card base. I did not use the same colors as she did but used Paper Trey Ink's Melonberry, Lemon Custard, and WPlus9's Blossomsberry as the main colors for this card.

I did not have the stamp that she used for the background so I used one of the circles from My Favorite Things "Bokeh Builder" stamp set to stamp the Melonberry circles on the white card base.


I then die cut a white piece of paper using the My Favorite Things "Die-namics Inside and Out Diagonal Stitched Rectangle." I adhered the stamped images that I had created, the purple twine around the bottom and adhered this to the card front with foam adhesive.


My last step was to stamp and adhere the Melonberry banner and use glossy accents over the cherries. I also added a rhinestone in the middle of the scale for a fun touch. This was so fun to make and even better that I did not have to design it from scratch!!

My second card is almost exactly the same as the first card but I used different colors.


Instead of a white background, I used a Melonberry card base stamped with WPlus9's Blossomberry ink. I also stamped the scale directly onto the white die cut like Ashley did in her card. However, I stamped, die cut and adhered the scale markings with foam adhesive to give it a little pop.


Like the first card, I used glossy accents on the pears. I chose to keep the twine off this card so it was just a little different from the first.

So I guess the moral of the story-no mojo?-use CASEing as a way to get some cards done! It takes the guesswork out of the whole process and by using your own color scheme and a few design elements, you can make it your own.

I thank you for stopping by today. Enjoy the sunshine!


Supplies
White Card:


Melon Card: