Showing posts with label Shaker Card. Show all posts

Saturday, September 3, 2022

A New Release at the Kat Scrappiness Shop

***Affiliate Links are used in this post at no extra cost to you!!! 

Hi friends!! 

Today I am popping in with some cards for the NEW RELEASE over at the Kat Scrappiness Shop! It is all about HALLOWEEN and SHAKER CARDS!!!

My first card is a Halloween card I created with the new Kat Scrappiness Creepy and Kooky Paper and the Creepy Crawly Dies.


I used some of the Kat Scrappiness Hocus Pocus sequins, the Pumpkinlicious sequin mix, Eye Candy Sprinkles and  the Eye See You Sprinkles for inside my card.

Isn't the spider just too cute?? I had so much fun creating this card!!! 

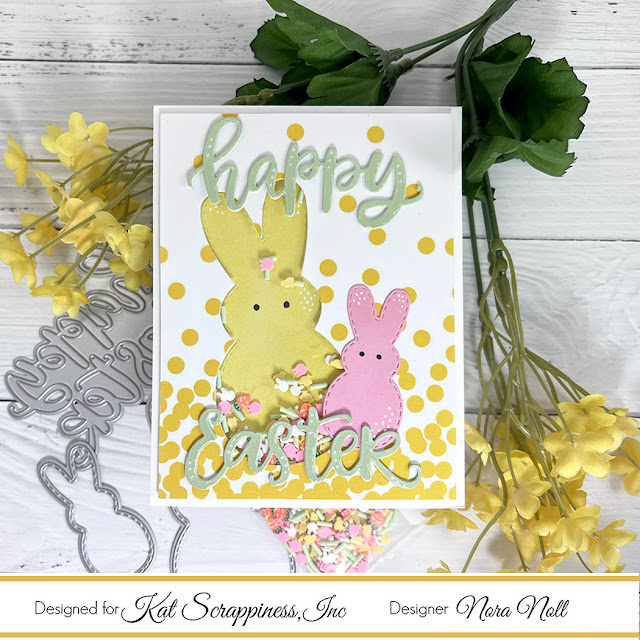
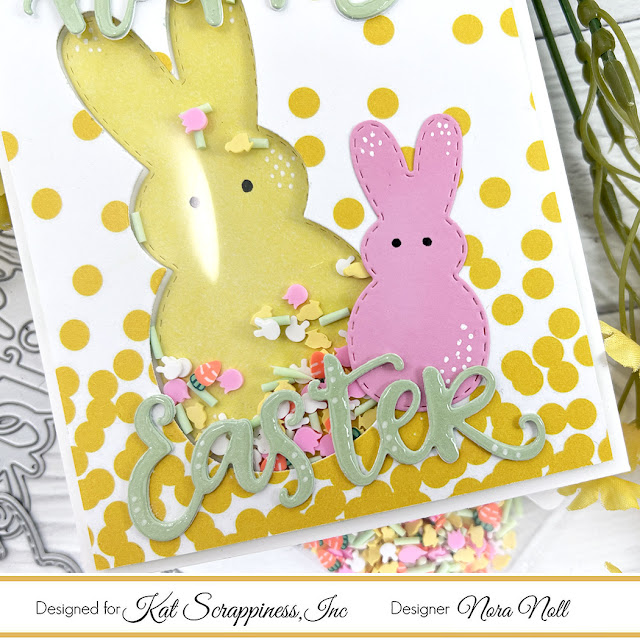
For my next project, I created a shaker tag with Heart Locket Shaker Card Kit at the Kat Scrappiness Store.


I covered the shaker in gold embossing powder and filled with the following colors of Kat Scrappiness Confetti Sprinkles: Ballerina Pink, Unicorn Pink, and Platinum.

I love the way this came out and cannot wait to use it on a gift for a friend!!

There is an Instagram Hop today in honor of the new release. The first stop is over at the Kat Scrappiness IG. Hop on over for what you could win when you comment on all the stops. I have a new creation with another new shaker set that I LOVE!!

Thank you for taking the time to stop by. Have a FABULOUS day!!!

Nora


Saturday, April 23, 2022

Shaker and Stencil Release from Kat Scrappiness

 ***This post contains affiliate links that are used at no extra cost to you

Hello Friends!! 

I am so excited today for a NEW April 2022 Release from the Kat Scrappiness Shop! They released new Shaker Dimension Sets and STENCILS!!!

I created two new projects for this release, a shaker card and a congratulations card with the new stencils.

For my first card, I used the new Butterfly Shaker Dimension set and the new Floating Dots stencil for this card. 

I started off by creating my pattern paper background using the new Kat Scrappiness Floating Dots Stencil, the new Kat Scrappiness Stencil Brush and a stamp from the Kat Scrappiness Friendship Greetings Stamp set. I die cut it using the largest die from the Kat Scrappiness Embossed Edge Rectangles Dies and adhered it to a white A2, card front.

I used the Kat Scrappiness Stitched Postage Stamp Edged Rectangles to die cut a white postage stamp element and adhered it over my pattern paper.

Then it was time for the shaker!!! I used various colors of Distress Oxide Ink and Clear Embossing powder over the front of my butterfly. I filled my shaker with Kat Scrappiness Trix Mix II and White Diamond Sequins

I used the Kat Scrappiness Boxed Sentiment Strips to die cut a sentiment from the Friendship Greetings stamp set and adhered it over the butterfly with foam adhesive. To finish off my card, I glued sequins from the Trix Mix II randomly around the shaker. I LOVE how this card came out and cannot wait to send it to someone!!

My second card is one that is special to me because it is for my daughter. When I saw the new Falling Star Stencil, I knew exactly what I wanted to use it for-a graduation card!


I started off this card by using some blending red dye ink across a white, slimline card base. I then used the same red ink and the Kat Scrappiness Falling Stars Stencil to stencil stars over the entire card front.


Next I spritzed water and some mica spray over the entire card front. I then added the glitter letters that were die cut from gold and platinum glitter paper using the Kat Scrappiness Upper Case Condensed Alphabet.


I made sure to NOT adhere these letters in a straight line so that I didn't have to fight for it to be perfect!!!


My last step was to randomly adhere some pearls from the Kat Scrappiness Gray Opal Pearl Mix randomly across my card front. I cannot WAIT to give this to my daughter for her graduation!!! 

Want to see some more fabulous projects with other new Shaker Dimension Kits? Hop on over to the Kat Scrappiness Blog!!!


What is a release without a hop? At 12 noon EST, we 
have an Instagram Hop to showcase the release. Comment on all the DT posts to be put in a random prize drawing!!

That is all from me today. I want to thank you for taking the time to stop by. Have a FABULOUS day!!!


Saturday, February 26, 2022

Happy Easter!!

 Hello everyone!! I hope you all are having a fabulous Friday! We had an ice storm here. I thought we would get more snow but instead we got mostly freezing rain. The good thing about the bad weather is I got the day off from work since I work at a school!

Today I am on the blog for the Kat Scrappiness February 2022 Embellishment Release. I created an Easter shaker card using the new Spring Has Sprung Sprinkles.

I started off my card by die cutting the large bunny using the Kat Scrappiness Stitched Bunny Outline Dies from white cardstock. I shaded it in with yellow ink and added some black eyes with a gel pen. 

I then die cut the same bunny out of a piece of pattern paper from the Rainbow Confetti Slimline Paper. I adhered the yellow bunny onto a white, A2, top folding card, using the pattern paper as a guide. I used some foam adhesive and the Spring Has Sprung Sprinkles to create a shaker card.

I die cut the little rabbit from the Stitched Bunnies from pink cardstock and blended some pink ink across the top. I added some white dots and black eyes with gel pens. I adhered it next to my shaker bunny.

I added a die cut green Happy Easter that I had die cut with the Happy Easter w/Shadow Die and adhered it to my card. I added some white dots using a gel pen and covered my sentiment with Glossy Accents. My card was complete!!

I urge you to hop on over to the Kat Scrappiness Blog to see some other fabulous cards created with this new release!!

Thank you so much for stopping by. Have a FABULOUS day!!


Monday, July 26, 2021

Final Day of the CAS-ual Fridays July 2021 Release-Falling Leaves Stencil

 Hello Crafty Friends!! This is my second post for today. My first post with the NEW Cupcake Inspirations Challenge #524 is HERE.

I am popping in to show you the card I created with the CAS-Fridays NEW *Falling Leaves Stencil. I actually bit the bullet and made a shaker card-something that is SO NOT ME!!!

I started off this card by using the *Falling Leaves Stencil with Altenew *Seashore Mini Ink Cubes, creating an ombre effect with the leaves. I chose to make them lighter on top and the darkest on the bottom. I die cut the panel with a rectangle die and created my shaker card. (I am not going to do a tutorial on how I did the actual shaker. Here is a good link to show you how it is done.)

I adhered the shaker onto an A2, top folding card front that was the same color as the ink. I used the CAS-Fridays *WTF2 stamp set to stamp two of the sentiments onto white card strips. I adhered both of the sentiments across the top.

I covered the "Who totally forgot?" with a *Clear Sparkle Marker and *Glossy Accents. My last step was to adhere three sequins from the shaker mix around my sentiment block and my card was DONE!

I adore how this came out and have some future ideas on how I am going to use this stencil!!

The *Falling Leaves Stencil, as well as the whole release is available in the *NEW section of the CAS-aul Fridays Shop. Please use my code, NORASENTME, to get an extra 15% off your total order!!!


Be sure to hop on over to the CAS-ual Fridays Blog to see other fabulous projects using this new stencil by the Design Team, as well as to enter into a random prize drawing.

That is all from me today. I want to thank each and every one of you for stopping by this week for all my new creations. I hope you all have a FABULOUS week!!!


***All links starred with an asterisk are Affiliate links that if used, are no extra cost to you. 

Wednesday, March 27, 2019

Day 4 of the March CAS-ual Fridays Stamps Release

Hello everyone!! I hope you are all having as much fun as I am seeing all the fun, new products from the CAS-ual Fridays Stamps March release.

Today I am showcasing new Trellis Cover Fri-die with a shaker card. I also used the die set introduced yesterday, Sweet Friend and the stamp set Pretty Posies to complete the sentiment.


I have to admit that I am the WORST at making shaker cards but was determined to make this work. I am not going to go through the directions for how I created this because I know there are plenty of people out there that are better at it than me.


I will say that I added a frame around the edges to cover up a bit of a mess I made when adhering the shaker to the white, A2 card front.


The "friend" was die cut from shiny, rose gold cardstock using the Sweet Friend Fri-die. The "thinking of you" was embossed using a rose gold glitter embossing powder. I assure you it does match but had a hard time photographing this card so you could see that.


With all the trouble I had making this card, I LOVE the way it turned out.

This Trellis Cover Fri-die is now available in the CAS-ual Fridays Stamp Store in the NEW section. Use my code NORASENTME to get an extra 15% off your total order.


That is all from me today. Be sure to hop on over to the CAS-ual Fridays Stamps Blog to see some more incredible creations using this new die and to enter into a giveaway.

I hope you all have a FABULOUS day!!!


Tuesday, June 21, 2016

Just Believe-CAS-ual Fridays Stamps Inspiration

Happy Tuesday everyone!!

It is my turn for a little inspiration for the CAS-ual Friday's Stamps Blog. Since it is the summer time, I have a bit more time to play so I decided to do a little painting on my card.


I started out by cutting down a piece of watercolor paper into a 4" by 5 1/4" piece. I then used some pink paint to water color my pink stripes along the front.

I set that aside to dry and then started to work on my flowers. I stamped each flower from CAS-ual Fridays "Wallflower" stamp set in white pigment ink and used white embossing powder to heat emboss each of them. I then painted them in orange, purple and green. I had to dry these for quite a while before I die cut them with their matching dies. I had a little "uh oh" moment with one the flowers I colored in green but it was all okay!!

While the flowers were drying, I stamped and heat embossed a sentiment in white onto vellum with CAS-ual Friday's "Dream then Do" stamp set.


All my pieces were set and the next step was to put the parts together!! I die cut a circle into the striped panel and adhered the stamped vellum sentiment under it. I then put a bunch of sequins that were the same color as the flowers under it and adhered another piece of vellum over the first to make a pocket. I then used foam adhesive to adhere the striped panel onto a white A2 card base.


I then started layering the die cut flowers around the sentiment circle. The tiny flowers I popped up with foam adhesive. I fussy cut the flowers I made in green to use as leaves.

To finish the card off, I adhered some clear gems in different sizes in the middle of the flowers, as well as some random sequins.

If you would like to do some crafty shopping, hop on over to CAS-ual Friday's Stamps Store and use the code nora2016 to get an extra 15% off. Who doesn't like a coupon?


Thanks for stopping by!! Have a FABULOUS day!!


Supplies:
Stamps-CAS-ual Friday's "Wallflower" and "Dream then Do"
Dies-CAS-ual Friday's Stamps "4 Petal Set" Fri-Dies
Paper-Master's Touch Watercolor Paper, Recollections White, Bazzill Vellum
Paint-Twinkling H20's
Ink-Hero Arts Unicorn White
Other-Big Shot, Foam Adhesive, Sequins, Ranger White Embossing Powder, Heat Gun, Ranger Multi-Matte Adhesive


Saturday, August 29, 2015

A Shaker Card

Today I had time to practice making a shaker card. As many of you know, I LOVE sequins but HATE making shaker cards. I thought today that I would try to get over my dislike of making them. I was going to use the FUSE tool that I have in a pile with other unopened supplies on my floor but I got nervous and just created one using the foam method.

Here is the card I created:


I know it is simple but it took me a darn long time!! I decided to use dies and patterned paper rather then stamping anything on this card.


The sequins are from Pretty Pink Posh. Aren't they pretty? They go perfectly with the polka dot paper!


I am not going to go through a step by step because there are tons of videos you can watch versus me putting things into words. Besides, I would not recommend anyone copying my method. I am great up until I have to put the back on. I wound up putting  a second piece of acetate in back of the butterfly to enclose the sequins. Then I adhered it to the pink paper.

Things I learned making this card:
  • I am still not a huge fan of this method of making shaker cards. I prefer creating "Faux" shakers where I glue the sequins down in strategic places.
  • I think that I am going to pull out my FUSE tool for the next shaker card I create.
  • I like the simple die cut filled with sequins in the middle. It can make a very dramatic effect on a card.
  • I need to practice using the adhesive on the foam. It was sticking to everything!
That is all for today. I thank you for stopping by and looking. Have a great night!!


Supplies: