Showing posts with label Thinking of You Cards. Show all posts

Monday, June 26, 2023

Quick Post With Some NEW Cards

Hey friends!!  

I am just popping in with some new cards. The beauty of having summers off is that I actually get a lot of time in my craft room!!!

My first card is to enter Freshly Made Sketches #591-and I am telling you that it is a stretch but it is MY TAKE on the sketch-and it is not an exact interpretation.


Below is the sketch:


See what I mean about the "interpretation" part? I have playing around with products that I have cut, colored, die cut, stamped etc over the past months but never used in a card. This is one of  the cards I made for a set using Pinkfresh Studio Arch Floral Stamps and matching Dies


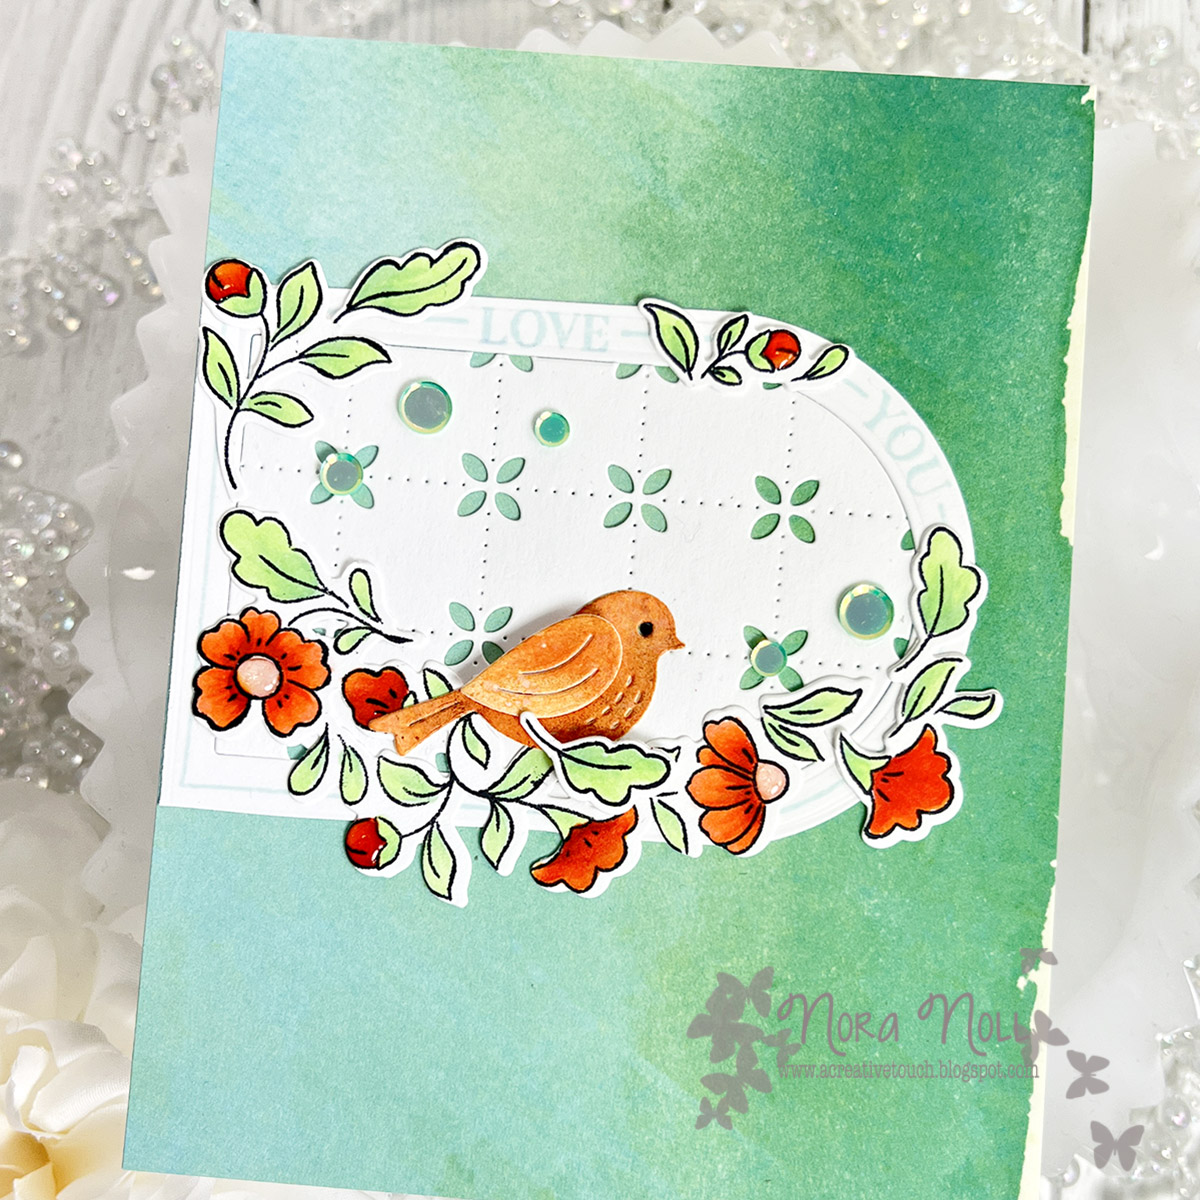
The "frame" is also a PinkFresh Studio stamp-Around The Shape Arches, paired with Floral Grid and Nested Arch Dies.


Last but not least, the bird is from Lawn Fawn's Magic Iris Bird House Add On. The pattern paper is from an old Recollections Paper Pad that I have had forever.

My next card is a day late and a dollar short. I created it for Tuesday Morning Sketches #712

Again, I went a little overboard with this sketch. 

The flowers are from Pinkfresh Studio's Arch Floral Stamps and Dies, the sentiment is from Spellbinders, as is the embossing folder.

I used Copic Markers to shade in my leaves. The doily and tiny envelope are from my stash.


 Again, this is one of a set I created for my friend. 

Well, that is all from me today. I want to thank you for taking the time to stop by. Have a FABULOUS Monday!!

Nora


Sunday, June 21, 2020

A CAS-ual Friday Post

Happy Sunday everyone!! Today I am over on the CAS-ual Fridays Blog with TWO cards I created with one panel. Below is a sneak peek of one of the cards!!


To see how I created this, hop on over to my post to see a step by step!!

I thank you for taking the time to stop by today. Have a FABULOUS day!!!


Tuesday, October 8, 2019

Thinking of You at CAS-ual Fridays!

Hello everyone!! Today it is my turn over at CAS-ual Fridays Stamps Blog with a fall themed card.


Hop on over to see a pictorial step by step on how I created this card. I used a few "tricks" to get some of the elements I wanted!!! Thanks for stopping by!!!


Tuesday, August 13, 2019

Thinking of You-CAS-ual Fridays Stamps

Hi everyone!! Today it is my turn over at the CAS-ual Fridays Stamps Blog. I created a "Thinking of You" card and made my FIRST EVER video!!!


To learn how I created this card, hope on over to my post and watch the video.

Thanks for taking the time to stop by!! Have a GREAT day!!


Tuesday, July 9, 2019

Finding Inspiration at CAS-ual Fridays Stamps

Hi everyone!! Today is my turn over at the CAS-ual Fridays Stamps Blog.

I created a card that was inspired by just a few of the photos that I took of beautiful hydrangea bushes across the Irish countryside over the past two weeks.


Below is a sneak peek of the card I created:


Hop on over to my post to see the full card and a photo tutorial on how I created this!

Have a FABULOUS Tuesday!!


Saturday, March 2, 2019

A Couple of Challenge Cards

Hello everyone!! Just popping in to post a couple of challenge cards I created this afternoon. It is the second weekend in a row that I have not only had time but ideas for some of the challenges.

My first card I created for Freshly Made Sketches #377 and Simon Says Stamp Wednesday Challenge-Anything Goes.


 I started off by literally flicking on three colors of mist on a white, top folding, A2 card front. Then I added an orange circle and a peachy colored square, mimicking the placement from the sketch below.
Then I added some orange roses and some greenery, which are from Altenew's "Vintage Rose" stamp set. Last week I had stamped a BUNCH of these roses in three different colors and put them aside to use on future cards.


My last step was to add some orange confetti randomly around the flowers.


Where did the orange come in from then? It was from a photo from Pinterest that was a challenge on a private FB page I belong to.

My second card I created is for CASE this Sketch #311.


I used a stamp by Gorjuss which I have had FOREVER!! I used Copic markers to color it in and then used a get well sentiment from WPlus9's "Get Well Gang"stamp set on the the bag label.


I die cut the little girl using an MFT die and popped the middle up using foam.


This is a pretty simple design but I really wanted to emphasize the image rather then use any pattern papers. I added several moonstone confetti sequins around the image for a little bling.

Well, that is all from me today. I thank you for taking the time to stop by. Have a FABULOUS night!!


Supplies:
(Affiliate Links used, when possible, at no extra cost to you)

Card # 1:
Paper: Neenah Solar White, My Minds Eye Papaya, Peach Scrap
Stamps: Altenew Vintage Roses, Memory Box Best Lift Typewriter Sentiments
Dies: Altenew Vintage Roses, Spellbinders Pierced Circle Dies, Spellbinders Pierced Squares
Mist: Ranger Dried Marigold Distress Stain, Heidi Swapp Citrus Color Shine, Ranger Picket Fence Distress Stain
Ink: Altenew (orange roses and green leaves) and Memento Gray Flannel dye ink
Other: Sizzix Big Shot, Ranger Multi Matte, Foam Adhesive, Cartwright Confetti Sequins

Card #2:
Stamps: Gorjuss and WPlus9's Get Well Gang
Paper: Neenah Solar White, My Minds Eye Yellow
Ink: Memento Tuxedo Black and Gray Flannel
Dies: My Favorite Things
Other: Sizzix Big ShotRanger Multi MatteFoam Adhesive, Cartwright Confetti Sequins

Monday, February 25, 2019

Happy Monday and Some Cards

Happy Monday! Just dropping by to add a couple of cards.

The first card I used two challenges as my inspiration-CASE this Sketch #310 and Just Us Girls #476-Photo Challenge.


I had fun stamping a bunch of different colored roses on my day off last week using Altenew's Vintage Rose stamp set and die cutting them using the matching dies. I decided to use a couple of the purple ones on this card.


I embossed the pattern on the white Neenah Solar White Cardstock using a Darice embossing folder.


The sentiment is from my new favorite Memory Box stamp set "Best Life Typewriter Sentiments."

Again, I am entering them into two challenges.


My second card I created for Inkspirational Challenge: Use Your Stash.


I used Sugar Pea Designs "Birthday Balloons" Stamp set and and the MFT cloud stencil for the background.


I was also going to do a color challenge but could not get the colors right.


Well, that is all from me today. I hope you have a FABULOUS day!!


Sunday, September 27, 2015

CYCI#88 Challenge-Anything Goes

Happy Sunday!! It is a beautiful, fall day here in New England. What I would view as a "perfect" day, though I know others like the warmer weather. I like it crisp enough to have to wear a sweater and some socks!!

Today I am sharing a card that I created using scraps from the mess on my desk. I created this card for a challenge. I had made paper and then die cut leaves. I had the paper left and thought, why should I throw it out? Instead, I decided to use it to make a card.


The first thing I did to create this was to die cut two leaves from patterned paper scraps using Paper Trey Ink's "Leaf Silhouette" dies. I then die cut a mask and inked the leaves using Distress Ink.


I used an A2 sized "Soft Stone" card base and used a stencil with some soft stone ink on the background. I then stamped the sentiment.


I adhered some orange stripe pattered paper scrap onto the card front and the inked strip over it that. Next I used some foam adhesive to adhere the leaves. I then put a bit of sparkle with Wink of Stella over the leaves. My last step was to adhere some clear sequins to the card front.

I LOVE how this card turned out. It was one of the easiest I have ever made. I challenge you to use some scraps from your stash to make a card. I am entering this into CYCI#88-Anything Goes Challenge.


I want to apologize for my being behind on commenting. I have had a lot of stuff going on and it has impacted my computer time. I so hate that!! I know I won't be able to catch up but hopefully I will be able to stay on top of this weeks creations.

I hope you enjoy the rest of our day!

Supplies:
Paper-Soft Stone and White Card stock-Paper Trey Ink, Patterned Paper-scraps from my stash
Ink-Shaded Lilac, Dusty Concord, Squeezed Lemonade Distress Ink, Burned Orange and Blue Violent ink from Simon Says Stamp, Memento Tuxedo Black Ink
Stamp and Dies-Simon Says Stamp
Sequins-Darice
Other-Ranger Matte Adhesive, Foam Adhesive, 

Wednesday, July 10, 2013

Summer Card Camp Homework Day 2

I am taking a card class and once again I had homework. I was to use a technique that they taught us to make a card. There were four techniques shown and I used three of them.


My first card I created using a watercolor technique. Since I don't own any gelato pastels, I had to improvise to get the look that the instructor created on her card. I used ink on an acrylic stamp, spritzed it with some shimmer Smooch Spray and dragged it down my water color paper. It did not flow as easily as when you use the gelato but I am happy with it. (I apologize for the photo. I am just learning how to use the new version of Photoshop after having used Elements for years. I cannot get the hang of fixing the color correctly in this version)


I used Jennifer McGuire's technique of inking up a word stamp in different colors for the sentiment I used on the card. Again I had to improvise because I do not own a stamp positioner. That was another thing I gave away long ago when I converted to clear stamps!!


I just wanted to give you a little different view of the card because you can see the shimmer from the clear shimmer spray. I love using clear shimmer spray instead of spritzing with water because I like the effect it gives on the card. This view also gives a better representation of the card. May be because I didn't use any auto on Photoshop to fix it!!

On my second card, I used the technique of drawing a line in the middle of strips of paper and stamping. This card looked better BEFORE I put it through my die cut machine to emboss. However, I finished the darn thing at 11 pm last night and just didn't have the energy to fix it.


Instead of using just sentiments on the card, I chose to use some pattern stamps. I used and arrow on the orange strip and hearts on the pink. The hearts would have showed up better had I not embossed the darn thing. Ugg!!


In the middle of the embossed circle, I put dots of crystal glitter glue to give the card a little bit of shine. I only applied it to the white part. It is hard to tell but I think you can see a little shine in this close up photo. 


I think this last view shows it off a little better.

Things I have learned from Day 2 of this card class:
  • *First and foremost, practice makes perfect. For the masking technique, I made mistakes like not making sure the ink didn't get on the line before or after what I was stamping. I had to start over at least three times before I got it right. 

  • *If you don't have the right supplies, it is OK to improvise. I really, really wanted gelatos. I almost bought a set yesterday but I didn't have a coupon so I decided I would purchase them another time. I was regretting that last night when I watched the video!! However, I made do with what I had and I think the card came out really nice.

  • *When I do the strip card again I won't a) emboss the whole front like I did and b) I would use slightly bigger shape stamps. The hearts are too small to see on the pink and that bums me out.

Well that is all for today!! I will see you again tomorrow!!

Nora

Supplies