Showing posts with label Penny Black. Show all posts

Wednesday, July 30, 2025

A Couple of Cards for Some Challenges

Hello friends!!

I am just popping in with some cards for some challenges. I love summer because I am able to spend time in my craft room. However, I should be cleaning it rather then creating. It is a MESS!!! 

The first card I created was for Freshly Made Sketches #697. Last week I dies from Spellbinders Small and Large Die of the Month Club and die cut a ton of images. I decided to use the die cuts from the Large Die of the Month for my card. One thing that I had a lot of fun with is picking through all my paper scraps for my cutting.


Below is the sketch I used for my card. I am also going to enter this into this weeks Simon Says Stamp Wednesday Challenge-Anything Goes.

I dug out my Christmas Paper Pads to augment my card. The paper is from Penny Black Festive & Frosty paper pad.


I used a scrap of Basic Grey paper for the blue strips. How I wish that paper company still existed!!!


The little border is a die from Spellbinders and the embossing folder is Twirling from Simon Says Stamp. The sentiment is a sticker from Tim Holtz idea-ology Christmas Stickers. 

My next card that I created is for the Jingle Belles Challenge. It was a Tic-Tac-Toe challenge and I chose the first column down-animal, die cut, red.


I started by embossing the white background using the Twirling embossing folder.


I used a little mouse that was from my stash but I believe is from Lawn Fawn. I think it was a Stamptember stamp purchase? 


I had a blast making the red panel with different shades of red Distress Stain. I added some white acrylic paint and some foundry wax when the stain was dry. 


I am not sure who made the sentiment. It was in my stash.

My last card is NOT a Christmas card. I created it for my husband's friend's 60th birthday. I am entering it into the Little Red Wagon Challenge #818-Masculine.


I used paper and die cuts from 49 & Market. This card is a 5" by 7" card, a size I NEVER create!!


I did a bit of distressing on the edges and then dragged Vintage Photo Distress Ink along the edges.


For the numbers on this card I used dies from The Greetery.

Well, that is all from me today. I have some other cards I created but will post them another time.

Nora


Sunday, October 4, 2020

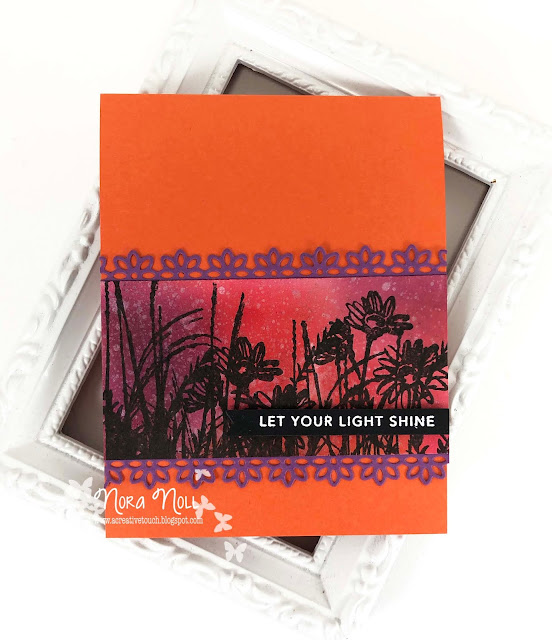
Let Your Light Shine

 Hi everyone!! Just a quick pop in tonight with a card I created today for two challenges. I wanted to make sure I got in under the wire!!!


I used this weeks CASE this Sketch #392 and The Color Challenge #613 as inspiration for my card.

I used five shades of Distress Ink on this card-Milled Lavender, Seedless Preserves, Fired Brick, Carved Pumpkin and Dried Marigold on the background. I know, I know, it doesn't look like it BUT I would not have been able to get the depth of color otherwise. I then covered the blended background with Hero Arts White Iridescent Shimmer Spray.


I used the Penny Black Delicate Silhouettes stamp set with black Versafine ink to stamp the botanicals and the sentiment is from Taylored Expressions Simple Strips Friendship. 


I used the Pinkfresh Studio Slimline Lacy Edgers to die cut the purple border from a piece of scrap paper.


I LOVE how this card came out and have another piece of shaded cardstock that I plan to use to make an identical card.

That is it for me tonight. I want to thank you for taking the time to stop by. Have a FABULOUS night!


Monday, December 2, 2013

Penny Black "Cold Nose Warn Heart" tag-Day 2 of Twelve Days of Christmas Christmas Fun

Today I am going to share another tag that I created. This time I used the Penny Black Stamp set "Cold Nose Warm Heart." They have a series of adorable little penguins in holiday poses.


I first stamped my penguin and colored it in using Copic markers. Next I die cut the image with My Favorite Thing's "Pierced Circle Stax." These are my new go to circle dies! I then layered the circle over a PTI die cut snowflake and tag. 


My last step was to put tiny dots of Stickles glitter glue on the stamped snowflakes and embossing paste on the hat to make it look like fur. On the back of the tag, I put a "to" and "love" sentiment. I wasn't sure how much I would like this when I was putting it together but it is one of my favorites that I have made this weekend.

Thank you for stopping by today. I hope you will return tomorrow for an ornament idea. Have a great day!

Nora


Supplies:
Ribbon-Michael's
Patterned Paper-Echo Park