Showing posts with label Stencils. Show all posts

Sunday, May 2, 2021

A CAS-ual Fridays Post to Brighten Your Day

 Happy Sunday everyone!! 

I cannot believe we are in MAY!! I have to admit that I want this month to go fast as work has been really tough. I am ready for summer vacation!!

Today I am on the CAS-ual Fridays Blog with a bright and cheery card. 


Hop on over to my post to see what products I used and how I created this!!!

I want to thank you for taking the time to stop by. Have a FABULOUS day!!


Thursday, May 28, 2020

On the Blog at CAS-ual Fridays Stamps

Hi everyone!! I cannot believe it is already Thursday and almost the beginning of JUNE!!! Summer is almost officially here!!

Today I am on the CAS-ual Fridays Stamps Blog with a masculine birthday card.


Hop on over to the post to see how I created it!!

Thanks for stopping by!! Have a GREAT day!!


Friday, November 1, 2019

Last Day of Sneak Peeks for the October 2019 CAS-ual Fridays Release is all about COFFEE

Happy Friday everyone!! I am so thankful for the weekend but cannot believe it is already NOVEMBER!!! This fall is flying by fast.

Today I am popping in with two cards for the last day of the CAS-ual Fridays Stamps October 2019 release. My projects are showcasing the two new coffee stamp sets-Coffee Days and Cup Refills in honor of the Coffee Lovers Blog Hop.


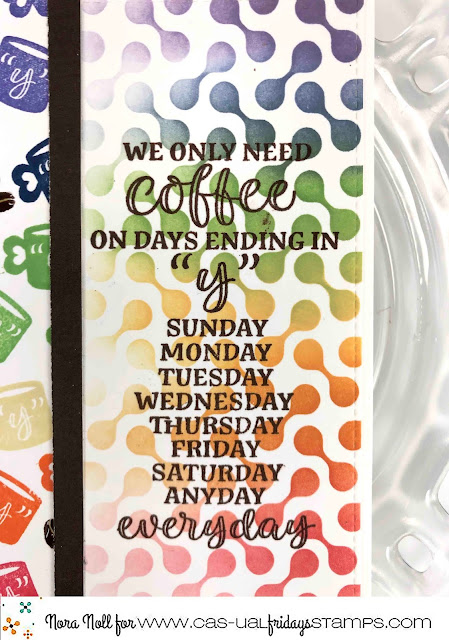
On my first card, I combined the Curtis Stencil and the new Coffee Days stamp set to create my card.


I did a bit of rainbow blending using the Curtis Stencil and stamped the sentiment from Coffee Days over the top in brown ink. I cut it into a rectangle and set the panel aside.


On a white, A2 sized card base, I stamped the coffee cups from Coffee Days in the same colored order as the stencil. In between the cups, I stamped the coffee beans from the stamp set.


I then assembled the card, adhering the stenciled side over the top of the stamped cups. I adhered a brown strip of cardstock to differentiate the two sides and give your eyes a rest.


My last step was to use some Glossy Accents over the top of the coffee beans.

For my second card, I combined the new Cup Refills stamp set, the Curtis Stencil and the Coffee Cup Fri-dies for a fun birthday card.


I started by blending green Distress Ink over the card front. I then stenciled over the blended ink with the same color.


Next I stamped the sentiment from the Cup Refills set and stamped the coffee beans from the Coffee Days set below.


I then watered down some brown Distress Ink and used a tooth brush to spritz brown ink over the card front. When that dried, I adhered the die cut coffee cup and used Glossy Accents over both the coffee beans and the coffee inside the cup.

The new release is available NOW over in the NEW section in the CAS-ual Fridays Stamps Store. Use my code NORASENTME to get an extra 15% off your total order.


Well that is all from me today. Be sure to hop on over to the CAS-ual Fridays Stamps Blog to see some more projects from the Design Team using these stamp sets.

I thank you for taking the time to stop by today and all this week for a peek at my projects. Have a FABULOUS day!!


Tuesday, October 29, 2019

CAS-ual Fridays Stamps October Release-Ever After

Hello everyone!! I hope you are all having a good week. Today I am getting my flu shot after work. Not looking forward to it but because my husband is on a biologic for a chronic condition, it is something I have to do. I am a huge advocate for vaccination but not a fan of needles!!

On a happier note, I am posting another project showcasing a stamp set from the new CAS-ual Fridays Stamps October 2019 Release.


I used the sentiment from the new Ever After stamp set for this card.


I wanted to keep the card very simple because of my background so I chose to be very minimalist with the sentiment and the embellishment on this card.


I started off my project by using the Modern Petals Stencil and Cosmic Shimmer Luna Paste on an A2 sized cardstock rectangle. When the panel was dry, I die cut it with a rectangle die and adhered it to the card front, as shown.


Next I used the Casual Trees Fri-dies to die cut a sprig and heat embossed using silver embossing powder. I then adhered the sprig to my card front.


Using the new Ever After stamp set, I stamped the sentiment onto a white cardstock strip using Versamark ink and heat embossed it with silver embossing powder. I adhered it to the card front using foam adhesive.


My last step was to adhere some pearl embellishments randomly around the sentiment and die cut. I have to admit, this is one of my favorite cards that I created for the new release. It was really hard to photograph but it is so pretty in real life.

This stamp set, as well as the complete release is available NOW in the NEW section of the CAS-ual Fridays Stamp Store. Use my code NORASENTME to get 15% off your total order.


Be sure to hop on over to the CAS-ual Fridays Stamps Blog to see some more projects from the Design Team using this stamp set.

I thank you for taking the time to stop by today. I will be back again tomorrow with another fun project for this release.

Have a FABULOUS day!! 


Wednesday, July 10, 2019

A Flip, Flap Card and A Video Experiment

Happy Wednesday everyone!!

I had to check my watch to see if I had the right day today. I got home Friday from a fourteen day trip to Ireland and I am still acclimating to this time zone. I am waking up early, which helps me to get things done, but I still trying to figure out the days of the week. I won't post about my trip today but will be doing a post sometime this week. Still processing it all.

Today I am popping in with a card I created as an experiment. I have been watching YouTube videos on interactive cards the last couple days and I wanted to give it a try. My first creation is a Flip Flap card and I even created a little video to show you the card in action at the end of all my photos.

I am not going to give you a step by step as I am NOT an expert. I still haven't even stamped a "pull" instruction on my little tag but was so excited that it worked that I had to post!!


Anyway, this is the outside of my card. I actually started off the whole thing with the martini die cut. I had it all put together in my stash and I wanted to use it on a card.


I think my favorite part of the front is that I used some Glossy Accents to mimic the alcohol in the glass!! I could change the color to make it a different drink next time. Perhaps a Lemon Drop????


When you pull the little tag on the side, the front opens up to a snarky sentiment.


I used a sentiment from CAS-ual Fridays Stamps "Shenanigans" stamp set on the inside. I am the oldest of all my friends so this will be sent to someone this summer!!


Okay, I am attempting to input the video below. PLEASE let me know if you can view this!!


I want to start doing videos and this was an easy way to see if I could do it. Not professional by any means but it is a start!! I will also admit that the green is more accurate in the photos rather than the video. Sorry about that.

I am entering this into Just Us Girls Challenge #495 which is a "smile" word challenge. I think this card would make someone smile, don't you? I will also be entering this into Seize the Birthday, with no topping.


Please let me know what you think!! I thank you for stopping by. Have a FABULOUS day!!


Supplies:
(Affiliated Links used when possible, at no extra cost to you)
Paper-Neenah Solar White, Prima, Bazzill
Stamps-CAS-ual Fridays Stamps "Shenanigans," Technique Tuesday "Sassy Birthday," Altenew "Label Love"
Inks-Ranger Distress Ink in "Shabby Shutters" and "Twisted Citron," Stampin Up! "Old Olive," "Real Red," "Daffodil Delight," "Pumpkin Pie," Memento "London Fog," 
Dies- Xcut-Martini Glass, My Favorite Things
Other-CAS-ual Fridays Stamps "Curtis Stencil," Glossy Accents, Scotch Tape Runner, Sizzix Big Shot, Picket Fence Studios Blender Brushes


Sunday, May 5, 2019

Happy Sunday and a Bunch of Challenge Cards

Hello everyone!! I hope you are all having a nice day. It is rainy and dreary here so it has been a low key day here.

Charlotte is home and we went to the gym together this morning. I am trying to instill some healthy habits for her now that she is home from college. It doesn't hurt that it is nice to have a workout partner!!

Since this weekend has been so gray, it was a good time to stay in and make some cards for some challenges.

I actually got to play a bit with some new stuff this weekend, which was fun. For my first card, I used Carta Bella's "Kite Stripe" stencil, and Altenew's "Wallpaper Art" stamp set and matching dies.


My inspiration for this card was the sketch #335 from the Paper Craft Crew Challenge Blog and Just Add Ink's Sympathy.


Instead of the circle, I chose to use one of the flowers from the Altenew stamp set. I also chose to stamp on some patterned paper from Bo Bunny's "Harmony Collection." I used Shaded Lilac Distress Ink and an eyeshadow applicator to shade some depth into the flower. I used the same technique with Bundled Sage and Shabby Shutters Distress Ink for the leaves.


I added some Mustard Seed in the middle of the flower and then went over the little stamens with some white gel pen. When I finished, I covered the leaves and flower with a clear Nuvo Aqua Shimmer Glitter Gloss marker.


The background was done with the "Kite Stripe" stencil and Memento Tuxedo Black. Let me tell you, that made a MESS!!!

For my second card, I used Freshly Made Sketches #386 and the Flower Challenge #32, which was to heat or dry emboss, as the inspiration for my card.


I started off by using the "Kite Stripe" stencil once again but instead of using ink, I chose to use Gina K Designs Glitter Glitz Gel in white on Neenah Solar White cardstock. This was my first time using this product and it was FUN!!!


Once the panel was dry, I die cut the bottom using a Pretty Pink Posh Scallop Border die. I then adhered it to an A2, top folding card base with an embossed polka dot pattern.


On the point of the border, I adhered a pinked circle. Over the top of that, I used foam adhesive to adhere a white circle.


Next I adhered an extra piece of a lacy MFT die cut and a WPlus9 image from the stamp set "Hello and Thanks" that I had colored in using Copic Markers.


I added some Nuvo Aqua Shimmer Glitter Gloss marker and Glossy Accents on top of the flower image.


My last step was to adhere a sentiment from Altenew's "Leaf Canopy" stamp set to finish off the card.

My last two cards I am posting today I used CASology's Week #341 cue card: Turquoise as my inspiration.


These cards were so fun to make!! I used Pinkfresh Studio's "Dainty Blossom" dies on both cards. I received these dies on Thursday and HAD TO USE THEM!!  I also used an Impression Obsession "French Text" stamp on both cards, which has been sitting in my stash for over a year.


I blended Peacock Feathers Distress Ink onto the stems, making sure the top was darkest part of the flower. I then added Nuvo Aqua Shimmer Glitter Gloss over the top to give it a bit of sparkle.


On my second card, I adhered the white panel over a turquoise under panel that I had stamped and heat embossed.


I was not sure if this was clean and simple enough so the first card is the card I made second.


I actually like this card better as it has a bit more interest.


Well, that is all from me today. Finally, right? I thank you for stopping by. I hope you all have a FABULOUS night!!


Supplies:
(All links are affiliate links at no extra cost to you)

Card #1
Paper: Neenah Solar White, Bo Bunny 6" by 6" "Harmony Collection" paper, MFT Stripe
Stamps: Altenew "Wallpaper Art" and Paper Trey Ink ""Words of Comfort"
Dies: Altenew "Wallpaper Art"
Ink: Memento Tuxedo Black, Ranger Shaded Lilac, Shabby Shutters, Bundled Sage and Mustard Seed Distress Ink
Other: Carta Bella "Kite Stripe" stencil, Ranger Ink Blending Tool, Nuvo Aqua Shimmer Glitter Gloss, Scotch Adhesive, Ranger Multi Matte, White Gel Pen, Adhesive Foam, Pretty Pink Posh Sequins and Sizzix Big Shot

Card #2
PaperNeenah Solar White cardstock, Die Cuts With a View
Dies: MFT, Paper Trey Ink "Limitless Layers," Pretty Pink Posh "Scallop Border" WPlus9 "Hello and Thanks"
Stamps: WPlus9 "Hello and Thanks" stamp set, Altenew "Leaf Canopy" (sentiment)
Other: We R Memory Keepers Embossing Folder, Adhesive FoamCarta Bella "Kite Stripe" stencil, Nuvo Aqua Shimmer Glitter Gina K Designs Glitter Glitz GelSizzix Big ShotMemento Tuxedo Black, Glossy Accents

Card #3 and #4
PaperNeenah Solar White, Simon Says Stamp glitter paper
Stamps: Impression Obsession "French Text" background stamp, My Favorite Things "Marble Background," Simon Says Stamp "Tiny Words," and Memory Box "Best Life Typewriter" stamps
Dies: Pinkfresh "Dainty Blossoms"
Ink: Ranger Peacock Feathers and Tumbled Glass Distress Ink
OtherRanger Ink Blending ToolNuvo Aqua Shimmer Glitter GlossRanger Multi MatteAdhesive FoamSizzix Big Shot, Ranger Clear Embossing Powder, Wagner Heat Tool, Versamark Ink