Tuesday, May 31, 2016

Rosey's Kit Reveal for the SJ Kit Club Blog

Happy Tuesday everyone!! I hope you all had a great holiday weekend.

Ours was filled with dinners and cook outs with family and friends. Totally exhausted today and need a day off! LOL!!

Some sad news for me, though. Scrapjazz.com, a small web board I had belonged to since I started scrapbooking (13 years) is being closed. It was bought ten years ago by Scrapbook.com and is basically only used by several people now. I get why they are closing it but it makes me sad. I have met some virtual and in real life friends from there. It helped me step outside my comfort zone and people encouraged me in my creative life, as well as my real life. I am going to miss it immensely.

Today I sharing the cards I created with Rosey's Kit from the SJ Card Kit Blog. She sent us such pretty papers and I created five cards out of her goodies.


The first card I created I used a sketch from the "Can You Case It?" blog and Rosey's Kit.


Here is the sketch:

I cut the papers up and used a couple to create strips across the front. I also used a thin piece of stitched ribbon that was in the kit.


I added some "Spun Sugar," "Vintage Photo," and "Walnut Stain" Distress ink onto the sentiment block before I adhered it onto the front with foam adhesive.


I then layered the brown and white flower over each other and used a pink brad in the center.

My next card I used sketch #126 from the "Match this Sketch" blog.


Here is the sketch:


I used a die cut for the pink background paper and adhered it over a blush pink A2 card base. I then adhered some paper strips over the front like they were in the sketch.


I then used a piece of ribbon from the kit that I cut into a banner. I layered a blush circle over the top with foam adhesive and then one of the little Lawn Fawn "Into the Woods" animals Rosey sent that I had colored in with Copic Markers.


I added some black enamel accents for the eyes and a little Nuvo Crystal Drop in "Gloss Carnation Pink" for the chipmunks nose. Here is where I made a boo boo and had to cover it up. The black enamel eye left a black thread to his nose. I had to cover it up with a white gel pen. I was so mad!! This is my favorite card, even with the boo boo!!

My third card I created I used an old My Favorite Things Sketch that was on one of my Pinterest boards to make my card.


Here is the sketch:

I tweaked it a bit, the panel being smaller then the one in the sketch but that is the beauty of a sketch! I die cut the striped panel and adhered it to an Aqua Mist card base that was cut into an A2 size. I layered the polka dot banner over it, as well as the birthday sentiment that I blended "Tumbled Glass" and "Walnut Stain" Distress Ink to.


I added the leave behind the sentiment and used foam adhesive for the little acorn that had been colored with Copic markers and some Cinnamon Stickles.


A little odd pairing but I like how it came out.

My fourth card was inspired by all the fun scraps on my desk!! I die cut the blue paper, in addition to an dark brown piece of patterned paper, with a square nesting die from Umbrella Crafts.


I adhered them at an angle on a 4 1/4" by 5 1/2" Aqua Mist panel. I then die cut the panel with a Blueprint die from My Favorite Things and adhered it to a Dark Chocolate card base.


I then adhered two leaves from the kit onto the front. I used foam adhesive to glue the sentiment block down over the leaves.


The card still needed something so I adhered three brown sequins that were not included in the kit onto the front. I think this will be good for a male birthday card, don't you?

My last card is my least favorite.


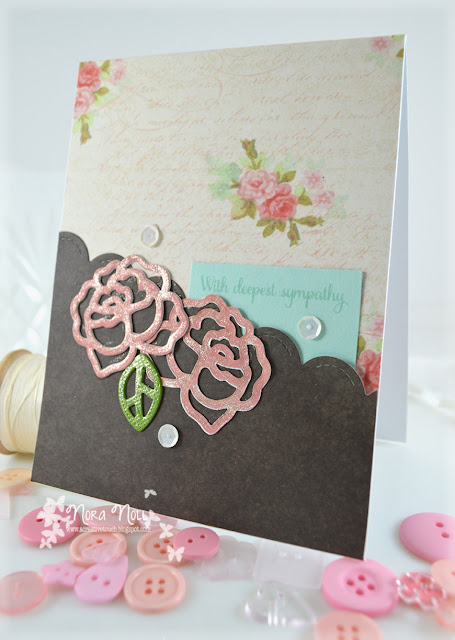
I used patterned paper from the kit for the card front, die cutting the brown on an angle with a Lawn Fawn scallop die. I tucked a piece of Aqua Mist paper beneath the scalloped paper that I had stamped a sympathy sentiment on.


Next I die cut Paper Smooches "Roses" out of pink patterned paper, a green leaf and three roses out of white card stock. I layered two layers of card stock under one rose and one layer under the other and adhered them to the card. I also adhered the green leaf to the card.


I coated the roses and the leaf in clear Wink of Stella and adhered some vanilla sequins around the cluster. Again, not my favorite but it will do.

Okay, I am done. Did you hang in there with me? It was a long post and I apologize. Please hop on over the ScrapJazz Card Kit Club Blog to see the other ladies creations this month.

Thanks for stopping by!! Have a wonderful Tuesday!!


Saturday, May 28, 2016

Challenge Inspiration at Stamping Smiles Design Tic-Tac-Toe Challenge Blog

Happy Saturday!! I am knee deep in cooking and getting ready for my niece's graduation party today and a cookout I am going to tomorrow. I hope you are all having a fabulous day!!

I am literally "popping" in on this busy holiday weekend to let you know that it is my turn over at the Stamping Smiles Design Tic-Tac-Toe Challenge Blog for a little inspiration for challenge #10.


I think this is my most favorite challenge card yet!! Here is a sneak peek at my card:


Come on over and check it out!!

Thanks for stopping by. Have a great day!!


Friday, May 27, 2016

CAS-ual Friday's Friend Card

Happy Friday everyone!! It is my turn on the CAS-ual Fridays Stamps Blog.

I created a card using mixture of old and new products for my card.


I started this card off by stamping the small flower from the "Pretty Posies" set in Hero Arts "Soft Pool" ink onto a white card base. I then misted Prima "Tea Stain" and "Gold Foil" onto the front of the card.


While the mist was drying, I die cut the word friend using CAS-ual Fridays"Friend" die out of gold glitter paper.


I set the word aside and stamped a sentiment onto vellum using the "Wallflower" set with "Golden Glitz" Delicata pigment ink and then heat embossed it using Ranger's Gold embossing powder.


I then dug through my stash of ready made embellishments and pulled out a tag from We R Memory Keepers and a flower from "Pretty Posies" that was a leftover from a different project.


With all my elements gathered, I was ready to assemble my card.


I took the white card base and adhered it to an A2 card base. I then adhered the tag over the embellished panel.


Next I adhered the vellum panel over the tag. I made sure to use the adhesive under the embossed letters as not to have any of it show through.


I then adhered the "friend" sentiment and used foam adhesive to give the colored flower some dimension. I thought the pool flowers needed a bit more so I glued sequins in the middle of them and then used some Nuvo Crystal Drops in "Caribbean Ocean" over some pieces of the flower.

This card was totally out of what I usually do and I had so much fun creating it. I rarely emboss vellum and using pre-made embellishments on cards is not easy for me. However, I really like how this came out.

I thank you for stopping by today. Have a fabulous weekend!!


Supplies:
Tag-We R Memory Keepers


Thursday, May 26, 2016

CAS(E) this Sketch #174 Guest Designer

Happy Thursday everyone!!

I am so excited today because I was asked to be a guest designer for CAS(E) this Sketch blog!!! Here is the sketch I was asked to use for inspiration:


Isn't it cool? When I first saw it, I knew that instead of stars, I wanted to use snowflakes. I actually made a SHAKER CARD too! I do not usually do holiday cards, let alone shaker cards, but this just screamed Christmas to me and I knew I wanted to make a shaker. Here is what I came up with:


I LOVE aqua and white together so I decided to use this as the color scheme. It helped that I just bought the "Caribbean Dream" sequin mix from Lucy's Cards. I was dying to use it!!


The first thing I did was die cut four snowflakes out of a white piece of card stock. I used CAS-ual Fridays Stamps "Flurry" Fri-dies for the large snowflake and Paper Smooches "Snowflakes" Wise Dies for the small one. I set the three small, positive flakes aside because I knew I wanted to use them on the card front. I then used an MFT Blueprints die to cut the panel down to a 4" by 5 1/4" rectangle.


I adhered acetate and a liberal amount of foam adhesive on the back of the card. For the two upper snowflakes I made little "pockets" with the adhesive to fill with the sequins mix.


I then assembled my shaker-adding the sequins and adhering the card to a white card base. I adhered the positive snowflakes and some sequins on the card front as well.


I stamped a sentiment from PaperTrey Ink's "Peaceful Pinecones" set with Hero Arts "Soft Pool" dye ink onto a white strip and adhered it over the large snowflake using foam adhesive. Very simple and believe it or not, fast to put together.

That is it for me today. I thank you so much for stopping by. Be sure to hop over to CAS(E) this Sketch to join in on the fun!!

Supplies: