Saturday, July 28, 2012

A Grand Experiment

I have a black thumb. I tend to either kill my plants from over watering and only by luck last year was I able to grow tomatoes, basil and egg plant in my front garden. So why did I want to try a bigger vegetable garden this year...and plant it at the end of June? I am not sure but Chris was actually on board with the idea and had the idea of doing more of a container garden then digging up our grass.

So one day last month, we decided to take on this project. The good thing about it was that we got all the vegetable plants on sale because we planted it so late. The bad thing? We spent A LOT of money on soil!! According to my husband's research, this is a "one time" expense and we just add stuff to the soil to bring the nutrients back next year.


We added cloth to the bottom so that we wouldn't have to weed. Wish me luck that it works because weeding is really not my thing.


We really wanted to get soil especially for a container garden but when you plant things at the last minute, you don't find what you want. How do I know? We went to FIVE stores to search for it but to no avail. Note to self: if we decide to do more containers next year, (and it is looking good for that) plant the stuff earlier!!


Here is what it looked like after planting. All you experienced gardeners will tell me I planted too much and planted it too close together. Do you remember I said in the beginning I haven't a clue at what I am doing?


Here is what things look like as of the beginning of this week. I let this cucumber grow and picked it today!! I decided to put cages on my pickling cucumbers because they were overtaking the garden. I know, this is not a common thing. However, at the advice of my friend Jen who has a PHENOMENAL veggie garden, I used tomato cages to prop the pickling cucumbers up and will see what happens. She says she does this and gets bumper crops of this type of cucumber every year. If it is successful, I hope to try making pickles with Charlotte this fall.


I planted my eggplant in a pot because I didn't have room in the garden. I had to plant Japanese eggplant because the store where I purchased the plants didn't have the Italian plants. I picked two today and am hoping they taste good. I love a good eggplant dish!!


We planted three kinds of tomatoes-cherry, beef steak and plum. They seem to be growing but I noticed today that the leaves at the bottom of two are a bit yellow. We have gotten a lot of rain and I am not sure the plants are loving it. We had a bumper crop of cherry tomatoes last year and I am hoping that it turns out well. Again, I know if I planted these earlier I would have some to taste already!!


Last but not least, here is my zucchini. When I planted the garden originally, I thought I had one zucchini and one yellow squash plant but they were mislabeled. Instead I have two zucchini plants. Good thing we like zucchini!! I picked two out of the garden this week. One zucchini was HUGE and had large seeds. I know now to pick them when they are a bit smaller. They tend to taste better.

So far I am enjoying watching everything grow. I intend to start all my veggies from seed next year with a grow light or on my new garden window that I am getting when we redo my kitchen. (That is hopefully happening soon but that is another post!!) Chris and I also discussed buying a few more containers and cutting down some trees to shed more light in the backyard. This is coming from a man who doesn't really even like vegetables!!

Happy Saturday!!

Nora


Wednesday, May 23, 2012

More Baby Cards!!

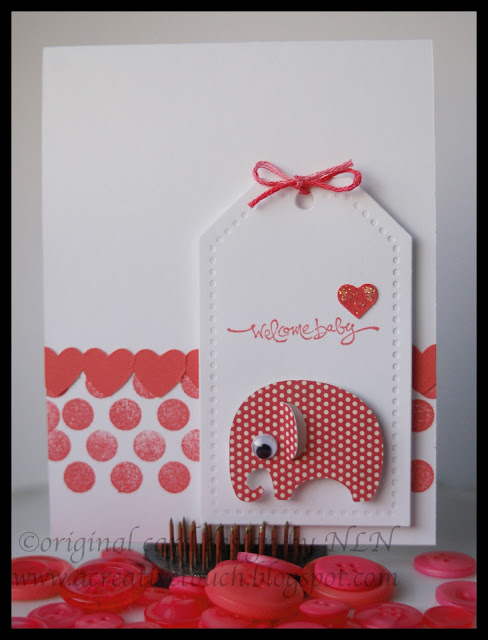
On my last post I stated that I had created multiple baby cards using a similar card design. I thought I would do a quick share with you.


I created the elephant using my Silhouette die cut machine. Isn't he the CUTEST? I loved him so much that I used it on every card I created for baby!!


Here is a close up of the little guy!!


I created this card with a slightly different background. Instead of layering paper, I chose to stamp pink polka dots and finish it off with a heart border. I don't like this as much as the first card but it works.


The last card was for my friend whom had a baby boy. I I think I like this the best. I am partial to blue!!

Have a great day!!

Nora

Monday, May 21, 2012

Thank You Card and Other Stuff!!

Once again I have dropped the ball on my blog. It is such a shame because I have been making a ton of projects but the photographing and putting blogging about them is extremely time consuming. I will get there, though.

For my first card, I created a thank you for my Aunt who LOVES smiley faces. I used my Silhouette to cut out the smiley and had fun with the colors. I think I will make a few more of these using some scraps and tuck them away for later.


I created my second card for my nephew's birthday this weekend. I really didn't know what I wanted to keep the top of the cupcake simple so I just used some number stickers.


I used my Silhouette machine to cut out the ticket and a Paper Trey Ink stamp for the cup cake. I wish I photographed the card a little better, though. The 13 is NOT crooked in real life!!


This third card I created for a friend that just had a baby. Isn't it sweet? I had stamped the bear and colored it in ages ago. I just cut it out using a Paper Trey Ink tag die to make it complete. I actually created multiple baby cards on this day, all using a similar design but die cut. I will post those on a future date, though!!


My last post today was done for Scrapjazz.com in March. The challenge was to pick a photo and create a layout on what you don't see in the photo. The journaling was about the horrific day we had with my dog Zach whom I nicknamed Stinky. I created the banners behind the photo with some Queen and Company tape and some pretty patterned paper.

I hope you enjoyed my post. See you soon!!

Nora

Sunday, April 15, 2012

A Short Cut to Thank You Notes

I cannot believe how fast this month is flying by!! This week is school vacation and I have been looking forward to this for the last month. After this there are only two months of school left. I cannot wait for summer!!!

I am going to make a confession. I am a card maker but I almost never make my own thank you notes. Usually it is because I have too many to make around holidays or my birthday and so I wind up going out and buying them. I was determined NOT to do this anymore and had to figure out a way to make my own cards but make it easy on myself. Here is what I came up with.


First I bought some plain notecards for $1.50 from Michaels. Yes, I could have just sent these but what is the fun of that? I am a HUGE fan of orange and knew that I could just doctor these cards to make them my own using supplies I already had on hand.


First I went through my patterned papers scraps and die cut a bunch of shapes using Paper Trey Ink's limitless layers 1 3/4" circle dies.


 I then went through my stamp pads and picked some colors that would match the die cuts I had created.


Next I chose some stamps, stamped the images and then die cut the stamps to make the focal point of my card. Here is a few of the finished cards:


The thing I liked about this project the most was that I really only spent $1.50 to create this cards because I used things I already had on hand. I love when that happens. I think that I am going to make some sets of these to give away as gifts.


I just wanted to post a close up of one of the cards too!!

This wasn't the only project that I had to make this month. My father was quite ill so I made a card and sent a care package to cheer him up.


I used a combination of Echo Park and My Mind's Eye products to create this. My daughter said it looked too much like a birthday card but who said get well cards can't be festive too?

That is all for today!! Happy Sunday!!

Nora

Saturday, April 14, 2012

Did you miss me?

Hello everyone!! I haven't posted in exactly two months and I feel bad. I was doing so well!!

Things have been crazy around here and I wasn't doing too many projects. I lost my mojo somewhere along the line. I am back though and wanted to share a few of the things I have been doing.

I had a few birthdays last month so I created a few cards. The first was for my friend, Donna.


This card is a combination of old and new supplies. I used Aqua Mist card stock and patterned paper from Paper Trey Ink, as well as their houndstooth background. LOVE the pink on pink!! I then stamped the sentiment on a Making Memories die cut and finished the card off with a Prima butterfly.


Here is a close put of the detail. It is such a simple card but love how it came out!!


I liked the design of the first card so much that I created a second card that was based off it using similar supplies. Instead of the label, I used punch and added a button.

The next two cards I created were for my cousin and a request of my friend to make a card to give to someone. I basically CASED the cards off this card design by Dawn McVey-the card maker I want to be when I grow up. I LOVE her stuff!!! If you haven't ever been to her blog, set aside some time because her creations are fantastic!!


Both of these cards I created were for males. I used Paper Trey Ink stamps and my Silhouette machine to created the die cuts.


Here is the card with the matching envelope. I love this color scheme so much that I used it again on the card below.


I chose to only layer two stars for this card and stamp a cupcake on the second one. I hate making the same exact card twice so this is how I mixed it up.

This last card I created I made for another friend. I used almost all scraps to complete it too!!


This was for a challenge over at Scrapjazz.com. It was to create a card with a window. I die cut a scalloped circle into the green card stock, stamped some Paper Trey Ink birthday sentiments from various sets onto it and layered it over the "It's your day" image. The only thing I would change about this card is the ribbon. I only had a small piece in this shade of pink and I can see the cutting on the edge of the bow isn't so hot. Oh well, it is home made!!!

Thank you for browsing today. Have a great weekend!!

Nora

Tuesday, February 14, 2012

Happy Valentine's Day!!

I just thought I would post a quick one today. I wanted to showcase the treat bags I made for work. I originally created a few of these little bags to give away for Valentine's Day but decided I wanted to do something a little bit different. I chose to keep the kraft colored card stock as my base but stamped them with a few different Paper Trey Ink stamps. I also used various stamps and die cuts for the tops of the bags. I assembled them in an assembly line style.


The first one I made I used a little tag I had lying around with a little heart as my focal point.


I chose not to use this design because I would have had to die cut by hand all the little tags and I didn't feel like spending time on that. I also used black ink on the banner and I decided I didn't like the looks.


Instead I chose to cut hearts out with my Silhouette digital cutter and stamp the Happy Valentine's Day in red ink. I figured that using a digital cutter would make it faster!! I filled them with Dove milk and dark chocolate hearts.


 I am hoping my fellow co-workers will enjoy getting a treat for Valentine's Day!!

Nora

Monday, February 13, 2012

Paper Trey Ink Day #9

Paper Trey Ink has had challenge contests the last 8 days. I was able to join in again today. The challenge was to create something that contained both leaves and butterflies. I chose to make a card. Please excuse the lighting on this card as I took it with artificial light.


I used PTI Berry Sorbet and Spring Moss as my color palette. The stamp sets I used for this are PTI's Turning a New Leaf and Flower Fusion #1. I used Flower Fusion #1 die and Love Live's Here die for the butterfly. The flowers I used a pop dot to lift them off the page.


I love how this card came out and will be sending this to one of my friend's whom I haven't seen in over a year.

Thank you for looking!!
Nora

Monday, February 6, 2012

Paper Trey Ink Anniversary Day #2, Card #2

Three posts in one day? That is unheard of for me!! I created another card for Paper Trey Ink's day 2 anniversary challenge. I used the free image designed by Dawn McVey. I want to be her when I grow up!!! (though I know I am older then her by about 10 years) I LOVE her style!!


My card didn't come out the way I pictured it but that is ok. You would think this took me minutes to make but took hours because I played around with ribbon to try and make a nice bow but it just didn't look right. I finally decided on this floss I had in a box but it wasn't what I really wanted. I knew I should have bought the Doodlebug Twine in Bubblegum!!! It would have been perfect!


The polka dots peeking out is a  Mat Stack #3 stamped image. The "Happy Birthday" sentiment is the free image you can download from Nichole Heady's blog today. I also used some Raspberry Fizz paper and the limitless layers 1 3/4" dies once again. I think I would try this design again but with different colors.

Have a great night!!
Nora

Paper Trey Ink Anniversary Day #2!

It is the second day of Paper Trey Ink's Anniversary countdown. Today they gave a sneak peek of what some of the new lines of stamps will be this year. Their fabulous design team made samples with an image from their new set and Nichole posted some freebie print designs for us to all play along.

I chose to use the "Bee Mine" image by Beth Silaika to make a card with. I colored it in with Copic Markers and set aside. I used a piece of PTI Dotty Biscotti patterned paper and layered it over white cardstock. I then die cut with my Silhouette digital cutter a heart border out of PTI Lemon Tart cardstock and used 3 PTI dies (Label Basics, Limitless Layers 1 3/4" circles) to cut out the other elements. I put it all together, with the finishing touch being a pop dotted heart on as the bee's wings.


Oh! I forgot to say that before I put the whole card together I inked every single element. Want to know a secret? I wasn't going to ink it at all but the ink smudged on the print out and I didn't want to have to print it out again. The ink covered it up!! I actually like the look of the inking but I think any paper is naked without it.

Thank you for looking!!

Nora

A Birthday and an Anniversary!

Happy Monday!! I wanted to start the week off right by posting a few things I made last week. I tend to take photos of my projects and then it sits on my camera. However, I pulled them off the camera yesterday to post my Paper Trey Ink's projects so I figured I would post them today.

The first card I created was an anniversary card for a teacher at work. I actually made two cards for him to choose from but only photographed this card. He and his wife were married on Valentine's Day so I wasn't sure if he would like the colors I used on this card or would want to veer away from the traditional red and pink. I should have trusted my gut because he chose this one!! This card was another CASE from someone else's card that I saw on the web. I do not have a link to the original and I apologize.


I used my Silhouette digital cutter to cut out all the hearts and then layered them over each other. I really like how this came out and will be making a similar design for Valentine's Day if I have a chance!! I will also post the inside of the card, though that is very simple.


I did not stamp directly on the inside of this card because I figured if the teacher didn't like it I would just pull the label off and put a Valentine sentiment inside. I am always thinking!!

The next project I created at 4:30 a.m.  Friday morning when I couldn't sleep. Work has had me stressed out as of late and I often wake up really early. I was actually awake at 3:00 a.m. but wouldn't let myself get up until 4:30 a.m. Imagine what I would have gotten done if I had?


I LOVE the colors on this card!! The patterned paper is a scrap of Sassafras Lass paper I had in my scrap drawer. I then used a Paper Trey Ink Mat Stack #3 to stamp and die cut to make the label. Out of all the Mat Stack's, this is my favorite. I keep hoping they will make some additions to the collection because I would buy it!! I then die cut and stamped an image from PTI's Cupcake Collection and layered it over a die cut piece of green cardstock. The bow was tied before I put the label on. I think this is my new favorite card and I just hated to give it away!!

To go with the card, I die cut a bag using my Silhouette digital cutter. I didn't have patterned paper the exact green color that I used above but the one I used was close enough.


I used PTI's Tag Its #10 set to make the little tag in the same colors as the card. I then further tied the two pieces together (and not literally!) with the same ribbon I used on the card.

Charlotte said the little girl loved the bag. It was big enough to fit a gift card and two nail polishes too!!

Thank you for looking. I hope this inspires you to create something yourself this week!!
Nora 

Sunday, February 5, 2012

Paper Trey Ink Challenge

Paper Trey Ink kicked off their 5th anniversary celebration today. They issued a challenge to make a project that was inspired by one of their design team members favorite projects. I chose to use Dawn McVey's card. I LOVE almost anything she makes and am constantly stalking her blog for new ideas. Thank you Dawn for all the inspiration you have given me over the last year.

Below is the card by Dawn that inspired me.


One of the products that she listed as her "favorite" on her list was the Mat Stack #4 Die. I chose to use the colors on her card and the Mat Stack #4 die and stamp set on the two cards I created.

Card #1


The first card I made is just a simple Valentine. I used the Mat Stack #4 stamp set and the 2010 Love Tags to make this card. I then placed two heart glitter stickers over my stamped images to complete the card. Simple but effective!!

Card #2


The second card I created for the challenge I used almost all Paper Trey Ink products. The main image is a Mat Stack #4 stamp and die, and the overlaid frame is a Tag Its #10 Stamp. I embossed Raspberry Fizz paper with a Sizzix embossing folder and the butterfly I die cut from a 6" by 6" piece of Lily Bee paper. I really like how this card came out and it will go to a co-worker tomorrow. I am forever forgetting people's birthdays!! I should just make these type of cards in bulk!!

I just want to thank all of Paper Trey Ink's design team for all their hard work. Their designs are so inspiring and make me want to get all the products they use. That is a sign of good marketing!!

Thank you for looking and hope you are all having a fabulous time watching the Superbowl. I am choosing to create!!
Nora

Saturday, February 4, 2012

A Challenge and a totally CASED Valentine Card!!

Thank goodness it it the weekend!! I live for the weekends, which I have to say is sad. It is the only time I have to get in my craft room and craft, unless I neglect my chores. Who needs to do those anyways?

For the first part of my post, I want to invite everyone to come to Scrapjazz.com and join me in the card challenge I posted. The challenge is to create a card using a holiday stamp (sentiment or otherwise) to create a Valentine card. The twist is to use an alternative color other then red/pink. I hope you come on over and play!!

The card I created for this challenge I used a penguin Christmas Eve Chowder by Unity Stamp as the focus of my card. I didn't have a sentiment that I liked so I printed one out using the computer. This is a great technique if you are ever in need of one and you don't own the right stamp!!


I chose Aqua as my alternate color choice but had to add the red hearts and the red twine for a splash of color.

My next two cards are a CASE. I loved this card by Maile Belles but didn't have the "exact" supplies she used so I improvised. I seem to be the queen of that lately!!


The first card I used a polka dot embossing folder by Quickutz for my background. I then placed a heart border that I cut using my Silhouette digital cutter. I used the Paper Trey Ink stamp Tag It's #10 to stamp the heart and sentiment and layered another Silhouette die cut of a key over it. This was SO EASY and I love the way it came out.

The second card I chose to follow the same basic design but I used patterned paper and a brighter pink for the stamped image. I also chose to mimic Maille's design a bit further by adding the buttons at the bottom of the stamped heart.


I am not sure which one I like better but both will be sent out to a special friend for Valentine's Day!!

I hope you have a fabulous Saturday full of FUN!!!

Nora

Tuesday, January 31, 2012

Getting ready for Valentine's Day

Over the past few weeks I have been making tons of Valentine's cards and attempting to design some Valentine treat bags that I can reproduce in a significant quantity. It took me a few tries but I think I have found what I am looking for!!


I die cut this bag out of Kraft card stock using my Silhouette Digital Craft Cutter. I then stamped the heart using a Studio G $1 stamp combined with the key from the Paper Trey Ink Tag It's #11 stamp set. It is an extremely simple design but I like the way it came out.


The second treat bag I made is not one i will be recreating in quantity. I received a Paper Trey Ink order in the mail and I had to try out the Favor It Box die #1 that I had bought. I stamped in pink using the Paper Trey Ink Mat Stack #1 stamp and die cut it for the front of the bag. The hearts I die cut using my Silhouette Digital Cutter. This is actually the back of the bag. The front of the bag is below.


The love tag is from Paper Trey Ink's 2010 Love Tags stamp set. I like how it came out except for the smudge. Sometimes that just happens!!

The two cards I created are very similar. I used a kraft card stock base and layered patterned paper elements over it. 


I have been attempting to use my die cut machines and my punches more often in my card making. On this card, I used a heart punch as well as a heart border punch and 2 different types of die cut machines to create the paper elements. 


For the second card, I used an embossing folder and a heart border punch behind the tag. I love the glitter heart because it already had adhesive on the back.

I think that is enough Valentine's Day ideas for one day. Come back tomorrow for a few more!! Have a great day!!

Nora